JAVA 设计模式入门
一、设计模式
1、六大原则
- 【单一原则】(Single Responsibility Principle):一个类或者一个方法只负责一项职责。
- 【里氏替换原则】(LSP liskov substitution principle):子类可以扩展父类的功能,但不能改变原有父类的功能。
- 【依赖倒置原则】(dependence inversion principle):面向接口编程,(通过接口作为参数实现应用场景)。
- 抽象就是接口或者抽象类,细节就是实现类;
- 上层模块不应该依赖下层模块,两者应依赖其抽象;
- 抽象不应该依赖细节,细节应该依赖抽象。注:通俗点就是说变量或者传参数,尽量使用抽象类,或者接口。
- 【接口隔离原则】(interface segregation principle):建立单一接口;(扩展为类也是一种接口,一切皆接口)
- 定义:
- 客户端不应该依赖它不需要的接口;
- 类之间依赖关系应该建立在最小的接口上;简单理解:复杂的接口,根据业务拆分成多个简单接口;(对于有些业务的拆分多看看适配器的应用)注:接口的设计粒度越小,系统越灵活,但是灵活的同时结构复杂性提高,开发难度也会变大,维护性降低;
- 定义:
- 【迪米特原则】(law of demeter LOD):最少知道原则,尽量降低类与类之间的耦合,一个对象应该对其他对象有最少的了解。
- 【开闭原则】(open closed principle):对扩展开放,对修改闭合。
2、设计模式的分类
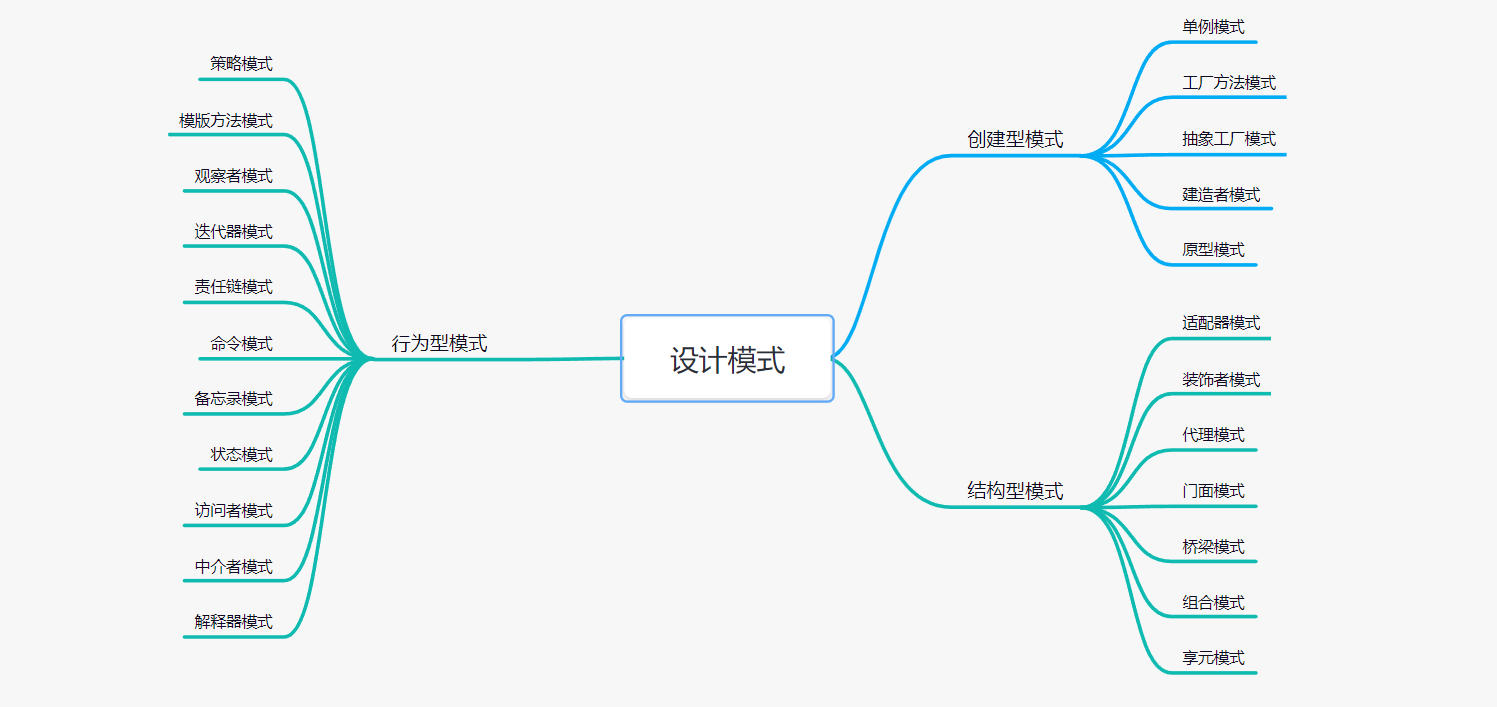
- 单例模式:某个类只能有一个实例,提供一个全局的访问点。
- 简单工厂:一个工厂类根据传入的参量决定创建出那一种产品类的实例。
- 工厂方法:定义一个创建对象的接口,让子类决定实例化那个类。
- 抽象工厂:创建相关或依赖对象的家族,而无需明确指定具体类。
- 建造者模式:封装一个复杂对象的构建过程,并可以按步骤构造。
- 原型模式:通过复制现有的实例来创建新的实例。
java.lang.Object#clone()
- 适配器模式:将一个类的方法接口转换成客户希望的另外一个接口。
FileInputStream fileInput = new FileInputStream(file);
InputStreamReader inputStreamReader = new InputStreamReader(fileInput);
- 组合模式:将对象组合成树形结构以表示“”部分-整体“”的层次结构。
- 装饰模式:动态的给对象添加新的功能。
BufferedReader bufferedReader=new BufferedReader(inputStreamReader);
- 代理模式:为其他对象提供一个代理以便控制这个对象的访问。
- 亨元(蝇量)模式:通过共享技术来有效的支持大量细粒度的对象。
- 外观模式:对外提供一个统一的方法,来访问子系统中的一群接口。
- 桥接模式:将抽象部分和它的实现部分分离,使它们都可以独立的变化。将抽象与实现解耦。
jdbc中就是使用桥接模式的
- 模板模式:定义一个算法结构,而将一些步骤延迟到子类实现。
java.util.Collections#sort() java.util.AbstractList#indexOf()
- 解释器模式:给定一个语言,定义它的文法的一种表示,并定义一个解释器。
java.util.Pattern,java.text.Format
- 策略模式:定义一系列算法,把它们封装起来,并且使它们可以相互替换。
java.util.Comparator
- 状态模式:允许一个对象在其对象内部状态改变时改变它的行为。
- 观察者模式:对象间的一对多的依赖关系。
javax.servlet.http.HttpSessionAttributeListener
- 备忘录模式:在不破坏封装的前提下,保持对象的内部状态。
- 中介者模式:用一个中介对象来封装一系列的对象交互。
- 命令模式:将命令请求封装为一个对象,使得可以用不同的请求来进行参数化。
- 访问者模式:在不改变数据结构的前提下,增加作用于一组对象元素的新功能。
- 责任链模式:将请求的发送者和接收者解耦,使得多个对象都有处理这个请求的机会。
javax.servlet.Filter#doFilter()
- 迭代器模式:一种遍历访问聚合对象中各个元素的方法,不暴露该对象的内部结构。
java.util.Iterator
3、UML
UML(Unified Modeling Language)是一种统一建模语言,为面向对象开发系统的产品进行说明、可视化、和编制文档的一种标准语言。下面将对 UML 的九种图+包图的基本概念进行介绍以及各个图的使用场景。
以往的开发中,特别迷信 UML,当然开发过程中一定是设计先行,但是现在的开发讲求灵活性,能用更简单的表示方法进行设计更好,设计的目的是帮我我们更好的理解业务,更好的进行开发。
常见的工具有:powerDesigner Rational Rose proccesson
UML 分静态图和动态图两种,其中常用的静态图 5 种,动态图 4 种。
常用的静态图:用例图、类图、包图、对象图、部署图
常用的动态图:顺序图,通信图(UML1.x 时称为协作图),状态机图,活动图
(1)类图
类图(Class diagram)是显示了模型的静态结构,特别是模型中存在的类、类的内部结构以及它们与其他类的关系等。类图不显示暂时性的信息。类图是面向对象建模的主要组成部分。它既用于应用程序的系统分类的一般概念建模,也用于详细建模,将模型转换成编程代码。类图也可用于数据建模。

在 UML 类图中,常见的有以下几种关系: 泛化(Generalization), 实现(Realization),关联(Association),聚合(Aggregation),组合(Composition),依赖(Dependency)
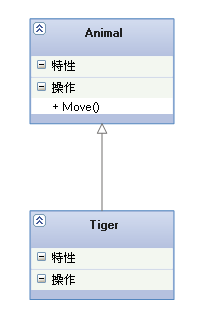
1、泛化(Generalization)
【泛化关系】:是一种继承关系,表示一般与特殊的关系,它指定了子类如何特化父类的所有特征和行为。例如:老虎是动物的一种,即有老虎的特性也有动物的共性。
【箭头指向】:带三角箭头的实线,箭头指向父类
2、实现(Realization)
【实现关系】:是一种类与接口的关系,表示类是接口所有特征和行为的实现
【箭头指向】:带三角箭头的虚线,箭头指向接口

3、关联(Association)
【关联关系】:是一种拥有的关系,它使一个类知道另一个类的属性和方法;如:老师与学生,丈夫与妻子关联可以是双向的,也可以是单向的。双向的关联可以有两个箭头或者没有箭头,单向的关联有一个箭头。
【代码体现】:成员变量
【箭头及指向】:带普通箭头的实心线,指向被拥有者

上图中,老师与学生是双向关联,老师有多名学生,学生也可能有多名老师。但学生与某课程间的关系为单向关联,一名学生可能要上多门课程,课程是个抽象的东西它不拥有学生。
下图为自身关联:

4、聚合(Aggregation)
【聚合关系】:是整体与部分的关系,且部分可以离开整体而单独存在。如车和轮胎是整体和部分的关系,轮胎离开车仍然可以存在。
聚合关系是关联关系的一种,是强的关联关系;关联和聚合在语法上无法区分,必须考察具体的逻辑关系。
【代码体现】:成员变量
【箭头及指向】:带空心菱形的实心线,菱形指向整体

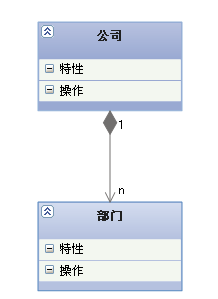
5、组合(Composition)
【组合关系】:是整体与部分的关系,但部分不能离开整体而单独存在。如公司和部门是整体和部分的关系,没有公司就不存在部门。
组合关系是关联关系的一种,是比聚合关系还要强的关系,它要求普通的聚合关系中代表整体的对象负责代表部分的对象的生命周期。
【代码体现】:成员变量
【箭头及指向】:带实心菱形的实线,菱形指向整体
- 依赖(Dependency)
【依赖关系】:是一种使用的关系,即一个类的实现需要另一个类的协助,所以要尽量不使用双向的互相依赖.
【代码表现】:局部变量、方法的参数或者对静态方法的调用
【箭头及指向】:带箭头的虚线,指向被使用者

(2)时序图
时序图(Sequence Diagram),又名序列图、循序图,是一种 UML交互图。它通过描述对象之间发送消息的时间顺序显示多个对象之间的动态协作。它可以表示用例的行为顺序,当执行一个用例行为时,其中的每条消息对应一个类操作或状态机中引起转换的触发事件。

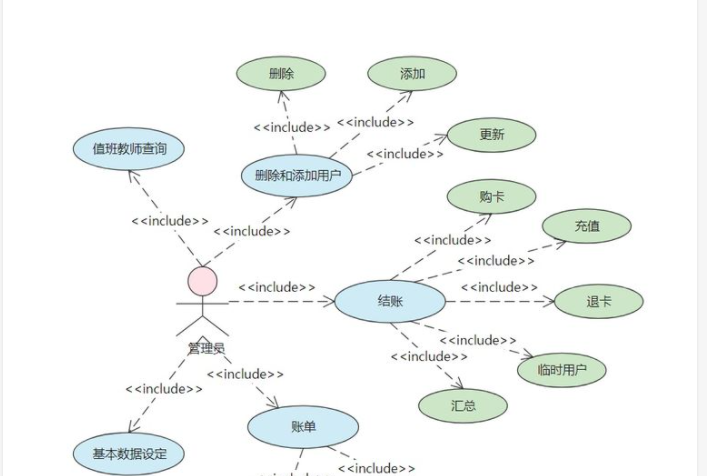
(3)用例图
是用户与系统交互的最简表示形式,展现了用户和与他相关的用例之间的关系。通过用例图,人们可以获知系统不同种类的用户和用例。用例图也经常和其他图表配合使用。
二、工厂设计模式
工厂模式分为简单工厂模式,工厂方法模式和抽象工厂模式,它们都属于设计模式中的创建型模式。其主要功能都是帮助我们把对象的实例化部分抽取了出来,目的是降低系统中代码耦合度,并且增强了系统的扩展性。
还有一个很重要的原因,就是对象的创建过程比较复杂,使用工厂模式进行封装,同时可以屏蔽掉对象的复杂的创建过程。
(1)简单工厂设计模式
简单工厂模式最大的优点在于实现对象的创建和对象的使用分离,将对象的创建交给专门的工厂类负责,但是其最大的缺点在于工厂类不够灵活,增加新的具体产品需要修改工厂类的判断逻辑代码,而且产品较多时,工厂方法代码将会非常复杂。
简单工厂模式包含如下角色:
- Factory:工厂角色工厂角色负责实现创建所有实例的内部逻辑
- Product:抽象产品角色抽象产品角色是所创建的所有对象的父类,负责描述所有实例所共有的公共接口
- ConcreteProduct:具体产品角色具体产品角色是创建目标,所有创建的对象都充当这个角色的某个具体类的实例。
类图:

1、定义一个接口
/**
 * @author itnanls(微信)
 * 我们的服务: 一路陪跑,顺利就业
 */
public interface HuaweiPhone {
    /**
     * 打电话的方法
     */
    void call();
}
创建一个奔驰类
/**
 * @author itnanls(微信)
 * 我们的服务: 一路陪跑,顺利就业
 */
public class Mate50 implements HuaweiPhone {
    public void call() {
        System.out.println("use a mate50 to make a call.");
    }
}
/**
 * @author itnanls(微信)
 * 我们的服务: 一路陪跑,顺利就业
 */
public class P50 implements HuaweiPhone {
    public void call() {
        System.out.println("use a p50 to make a call.");
    }
}
创建一个工厂
/**
 * @author itnanls(微信)
 * 我们的服务: 一路陪跑,顺利就业
 */
public class PhoneFactory {
    public static HuaweiPhone getCar(String type){
        if("p50".equalsIgnoreCase(type)){
            //其中可能有很复杂的操作
            return new P50();
        }else if("mate50".equalsIgnoreCase(type)){
            //其中可能有很复杂的操作
            return new Mate50();
        }else {
            throw new RuntimeException("There are no cell phones of this brand!");
        }
    }
}
测试
/**
 * @author itnanls(微信)
 * 我们的服务: 一路陪跑,顺利就业
 */
public class Client {
    public static void main(String[] args) {
        HuaweiPhone p50 = PhoneFactory.getCar("p50");
        p50.call();
        HuaweiPhone mate50 = PhoneFactory.getCar("mate50");
        mate50.call();
    }
}
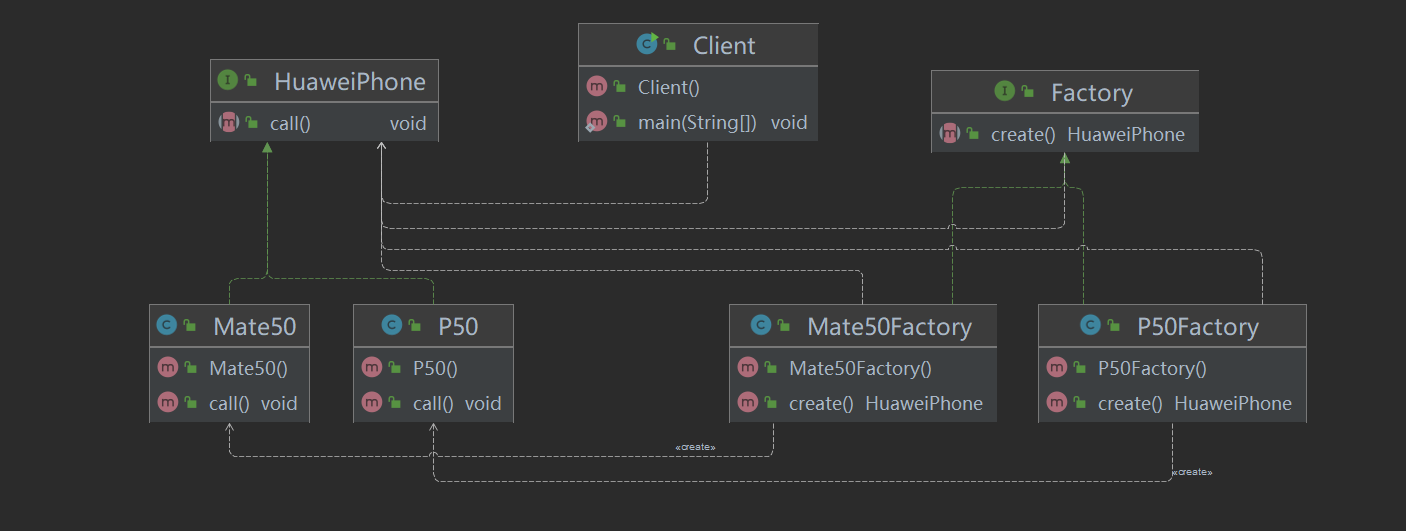
(2)工厂方法模式
我们说过 java 开发中要遵循开闭原则,如果将来有一天我想增加一个新的车,那么必须修改 CarFactory,就不太灵活。解决方案是使用工厂方法模式。
工厂方法模式包含如下角色:
- Product:抽象产品
- ConcreteProduct:具体产品
- Factory:抽象工厂
- ConcreteFactory:具体工厂

我们为每一个车都构建成一个工厂:
先抽象一个工厂接口
/**
 * @author itnanls(微信)
 * 我们的服务: 一路陪跑,顺利就业
 */
public interface Factory {
    /**
     * 统一的创建方法
     * @return
     */
    HuaweiPhone create();
}
然后针对每一个产品构建一个工厂方法
/**
 * @author itnanls(微信)
 * 我们的服务: 一路陪跑,顺利就业
 */
public class Mate50Factory implements Factory {
    public HuaweiPhone create() {
        //中间省略一万行代码
        return new Mate50();
    }
}
/**
 * @author itnanls(微信)
 * 我们的服务: 一路陪跑,顺利就业
 */
public class P50Factory implements Factory {
    public HuaweiPhone create() {
        //中间省略一万行代码
        return new P50();
    }
}
应用场景
public class Client {
    public static void main(String[] args) {
        Factory benzFactory = new BenzFactory();
        Car benz = benzFactory.create();
        benz.run();
        Factory bmwFactory = new BmwFactory();
        Car bmw = bmwFactory.create();
        bmw.run();
    }
}
好处
此模式中,通过定义一个抽象的核心工厂类,并定义创建产品对象的接口,创建具体产品实例的工作延迟到其工厂子类去完成。这样做的好处是核心类只关注工厂类的接口定义,而具体的产品实例交给具体的工厂子类去创建。当系统需要新增一个产品是,无需修改现有系统代码,只需要添加一个具体产品类和其对应的工厂子类,使系统的扩展性变得很好,符合面向对象编程的开闭原则。
缺点
工厂方法模式虽然扩展性好,但是增加了编码难度,大量增加了类的数量,所以怎么选择还是看实际的需求。
(3)抽象工厂设计模式
抽象工厂模式包含如下角色:
- AbstractFactory:抽象工厂
- ConcreteFactory:具体工厂
- AbstractProduct:抽象产品
- Product:具体产品
抽象工厂模式是工厂方法模式的升级版本,在有多个业务品种、业务、分类时,通过抽象工厂模式产生需要的对象是一种非常好的解决方式。
类图:

1、定义产品抽象类
电脑产品线
/**
 * @author itnanls(微信)
 * 我们的服务: 一路陪跑,顺利就业
 */
public abstract class AbstractComputerProduct {

    // 生产电脑产品的共享方法
    public void sharedMethod(){
        System.out.println("这是生产电脑的产品线。");
    }

    abstract void networking();
}
手机产品线
/**
 * @author itnanls(微信)
 * 我们的服务: 一路陪跑,顺利就业
 */
public abstract class AbstractPhoneProduct {

    // 添加loge标签
    public void labelling(){
        System.out.println("这是小米的产品。");
    }

    abstract void networking();
}
2、定于具体产品
我们定义两个华为的产品
public class MateBook16 extends AbstractComputerProduct {
    @Override
    public void networking() {
        System.out.println("Use a mateBook16 to connect to the Internet");
    }
}
public class Mate60 extends AbstractPhoneProduct {
    @Override
    public void networking() {
        System.out.println("Use a Mate60 to connect to the Internet");
    }
}
定义两个小米的产品
public class Mi12 extends AbstractPhoneProduct {
    @Override
    public void networking() {
        System.out.println("Use a Mi12 to connect to the Internet");
    }
}
public class MiBookPro15 extends AbstractComputerProduct {
    @Override
    public void networking() {
        System.out.println("Use a MiBookPro15 to connect to the Internet");
    }
}
3、定义抽象工厂
public abstract class AbstractFactory {
    /**
     * 生产手机的方法
     * @return
     */
    abstract AbstractPhoneProduct createPhone();

    /**
     * 生产电脑的方法
     * @return
     */
    abstract AbstractComputerProduct createComputer();
}
4、定义举起的产品工厂
小米产品线的工厂
public class MiFactory extends AbstractFactory {

    @Override
    AbstractPhoneProduct createPhone() {
        return new Mi12();
    }

    @Override
    AbstractComputerProduct createComputer() {
        return new MiBookPro15();
    }
}
华为产品线的工厂
public class HuaweiFactory extends AbstractFactory {

    @Override
    AbstractPhoneProduct createPhone() {
        return new Mate60();
    }

    @Override
    AbstractComputerProduct createComputer() {
        return new MateBook16();
    }
}
测试
public class Client {
    public static void main(String[] args) {
        AbstractFactory factory = new MiFactory();
        AbstractPhoneProduct phone = factory.createPhone();
        phone.networking();
    }
}
这一次我们的设计相对来说比较复杂,增加了产品一族的概念。如果我们想在某一个产品线下新增一个产品,和之前的工厂方法设计模式一样,只需要增加相应的产品和工厂类即可,必会影响其他任何产品。但是我们因为我们的设计会导致产品无法独立于产品族单独存在。如果我们想增加一条的的产品线,比如联想,也不需要对其他代码进行修改。
三、创建者设计模式
分离对象子组件的单独构造(由 Buider 来负责)和装配(由 Director 负责)。从而可以构造出复杂的对象。这个模式适用于:某个对象的构建过程复杂的情况下使用。
由于实现构造和装配的解耦。不同的构造器,相同的装配,也可以做出不同的对象;相同的构造器,不同的装配顺序也可以做出不同的对象。也就是实现了构建算法、装配算法的解耦,实现了更好的复用。
最典型的就是我们的 StringBuilder 和 StringBuffer。
建造者模式包含如下角色:
- Builder:抽象建造者
- ConcreteBuilder:具体建造者
- Director:指挥者
- Product:产品角色

1、模拟一个复杂对象
public class Computer {
    // 鼠标
    public String mouse;
    // 键盘
    public String keyboard;
    // cpu
    public String cpu;
    // 内存
    public String memoryBank;
    // 主板
    public String mainBoard;

 ...省略getter和setter
}
2、我们可以在 Computer 类中添加一个静态内部类,专门负责构建工作
public static class Builder{

    private final Computer computer = new Computer();

    public Builder buildMouse(String type){
        computer.setMouse("安装了一个"+ type +"鼠标");
        return this;
    }

    public Builder buildKeyboard(String type){
        computer.setKeyboard("安装了一个"+ type +"键盘");
        return this;
    }

    public Builder buildCpu(String type){
        computer.setCpu("安装了一个"+ type +"Cpu");
        return this;
    }


    public Builder buildMemoryBank(String type){
        computer.setMemoryBank("安装了一个"+ type +"MemoryBank");
        return this;
    }

    public Builder buildMainBoard(String type){
        computer.setMainBoard("安装了一个"+ type +"mainBoard");
        return this;
    }

    public Computer build(){
        return computer;
    }
}
我们在构造电脑的时候,就可以使用这种方案了。
public static void main(String[] args) {
    Computer computer = new Builder()
        .buildMainBoard("华硕")
        .buildCpu("英特尔")
        .buildMemoryBank("三星")
        .buildKeyboard("雷柏")
        .buildMouse("罗技")
        .build();
    System.out.println(computer);
}
思考这种构造方法和普通的方法有什么区别呢?
1、当我们要构造的对象相对来说比较复杂,成员变量比较多,使用构造器不容易进行灵活配置。
2、构造的过程可以进行灵活的编排,可以随时舍掉或新增过程,有些时候可能出现对顺序性的要求,构建的顺序不同,结果不同。
3、单个的构建过程其实也比较复杂,比如,主板的构建,本身也是一个复杂过程,cpu 的选型也是复杂过程,使用 setter 方法不容易表达复杂性。
创建者模式是一个对对象的构建过程“精细化”的构建过程,每个部分的构建可能是变化的,但是对象的组织过程是固定的,通过这种统一的创建方式,无疑增加了我们设计上的灵活性,当我们在构建复杂对象的时候,我们如果发现每个部分可能都是变化的,并且是多个不同的构建步骤的时候,我们可以考虑使用创建者模式。
相比工厂和抽象工厂模式区别还是很大的,创建者适合这类复杂对象的创建,对于抽象工厂可能就无法完成这样的组装工作,而且创建者模式是把复杂对象的内部创建方法进行调用,组织协调了对象的各个部分前后顺序的控制。简单的描述创建者就是这样的情况。
四、代理设计模式
代理模式分为静态代理和动态代理。代理的核心功能是方法增强。
1、静态代理
静态代理角色分析
- 抽象角色 : 一般使用接口或者抽象类来实现
- 真实角色 : 被代理的角色
- 代理角色 : 代理真实角色 ; 代理真实角色后 , 一般会做一些附属的操作
- 客户 : 使用代理角色来进行一些操作 .
代码实现
写一个接口
public interface Singer {
    /**
     * 歌星都能唱歌
     */
    void sing();
}
定义男歌手
public class MaleSinger implements Singer{

    private String name;

    public MaleSinger(String name) {
        this.name = name;
    }

    @Override
    public void sing() {
        System.out.println(this.name + "开始唱歌了!");
    }
}
定义经纪人
/**
 * @author IT楠老师
 * @date 2020/5/28
 */
public class Agent implements Singer {

    private Singer singer;

    public Agent(Singer singer) {
        this.singer = singer;
    }

    @Override
    public void sing() {
        System.out.println("节目组找过来!需要演出,谈好演出费用。。。。。");
        singer.sing();
        System.out.println("结算费用,下一次合作预约。。。。。。");
    }
}
Client . java 即客户
/**
 * @author IT楠老师
 * @date 2020/5/28
 */
public class Client {

    public static void main(String[] args) {
        Singer singer = new MaleSinger("鹿晗");
        Singer agent = new Agent(singer);
        agent.sing();
    }
}
分析:在这个过程中,你直接接触的就是鹿晗的经济人,经纪人在鹿晗演出的前后跑前跑后发挥了巨大的作用。
除了实现共同的接口,我们还能使用继承类的方式
public class Agent extends MaleSinger {

    private MaleSinger maleSinger;

    public void setMaleSinger(MaleSinger maleSinger) {
        this.maleSinger = maleSinger;
    }

    @Override
    public void sing() {
        System.out.println("开始唱歌了-----------");
        maleSinger.sing();
        System.out.println("结束唱歌了-----------");
    }
}
public static void main(String[] args) {
    MaleSinger maleSinger = new MaleSinger("鹿晗");
    Agent agent = new Agent();
    agent.setMaleSinger(maleSinger);
    agent.sing();
}
优点
- 鹿晗还是鹿晗,没有必要为了一下前置后置工作改变鹿晗这个类
- 公共的统一问题交给代理处理
- 公共业务进行扩展或变更时,可以更加方便
- 这不就是更加符合开闭原则,单一原则吗?
缺点 :
- 每个类都写个代理,麻烦死了。
2、动态代理
动态代理的角色和静态代理的一样
动态代理的代理类是动态生成的 ,静态代理的代理类是我们写的
动态代理分为两类 : 一类是基于接口动态代理 , 一类是基于类的动态代理
基于接口的动态代理----JDK 动态代理
基于类的动态代理--cglib
动态代理就是当有大量的类需要执行一些共同代码时,我们自己写太麻烦,那能不能直接使用 java 代码,自动生成一个类帮助我们批量的增强某些方法。
(1)JDK 原生的动态代理
JDK 的动态代理需要了解两个类
核心 : InvocationHandler 和 Proxy , 打开 JDK 帮助文档看看
【InvocationHandler:调用处理程序】
Object invoke(Object proxy, 方法 method, Object[] args);
//参数
//proxy - 调用该方法的代理实例
//method -所述方法对应于调用代理实例上的接口方法的实例。方法对象的声明类将是该方法声明的接口,它可以是代理类继承该方法的代理接口的超级接口。
//args -包含的方法调用传递代理实例的参数值的对象的阵列,或null如果接口方法没有参数。原始类型的参数包含在适当的原始包装器类的实例中,例如java.lang.Integer或java.lang.Boolean 。
【Proxy : 代理】
Proxy.newProxyInstance(ClassLoader loader,
                       Class<?>[] interfaces,
                       InvocationHandler h)
代码实现
抽象角色和真实角色和之前的一样!
还是歌星和男歌星
Agent. java 即经纪人
/**
 * @author IT楠老师
 * @date 2020/5/21
 * 经纪人
 */
public class Agent implements InvocationHandler {

    private Singer singer;

    /**
     * 设置代理的经济人
     * @param singer
     */
    public void setSinger(Singer singer) {
        this.singer = singer;
    }

    @Override
    public Object invoke(Object proxy, Method method, Object[] args) throws Throwable {
        System.out.println("---------------经纪人把把关--------------");
        Object returnObj = method.invoke(singer, args);
        System.out.println("---------------唱完了收收钱------------------------");
        return returnObj;
    }

    /**
     * 获取一个代理对象
     * @return
     */
    public Object getProxy(){
        return Proxy.newProxyInstance(this.getClass().getClassLoader(),
                new Class[]{Singer.class},this);
    }
}
Client.java
/**
 * @author IT楠老师
 * @date 2020/5/21
 */
public class Client {
    public static void main(String[] args) {

        MaleSinger luhan = new MaleSinger();

        Agent agent = new Agent();
        agent.setSinger(luhan);
        Singer singer = (Singer)agent.getProxy();

        singer.sing();
    }
}
核心:一个动态代理 , 一般代理某一类业务 , 一个动态代理可以代理多个类,代理的是接口!
// 该设置用于输出jdk动态代理产生的类(jdk8及之前的设置)
System.getProperties().put("sun.misc.ProxyGenerator.saveGeneratedFiles", "true");
// jdk8之后的设置
System.setProperty("jdk.proxy.ProxyGenerator.saveGeneratedFiles", "true");
(2)基于 cglib
<dependencies>
    <dependency>
        <groupId>cglib</groupId>
        <artifactId>cglib</artifactId>
        <version>3.3.0</version>
    </dependency>
</dependencies>

<build>
    <plugins>
        <plugin>
            <groupId>org.apache.maven.plugins</groupId>
            <artifactId>maven-compiler-plugin</artifactId>
            <version>3.8.1</version>
            <configuration>
                <source>1.8</source>
                <target>1.8</target>
                <encoding>utf-8</encoding>
            </configuration>
        </plugin>
    </plugins>
</build>
// 运行本类时,需在 VM options 添加:--add-opens java.base/java.lang=ALL-UNNAMED
public class Client {
 public static void main(String[] args) {

  ManSinger singer = new ManSinger("王一博");

  Enhancer enhancer = new Enhancer();
  enhancer.setSuperclass(ManSinger.class);
  enhancer.setCallback(new MethodInterceptor() {
   @Override
   public Object intercept(Object o, Method method, Object[] objects, MethodProxy methodProxy) throws Throwable {
    System.out.println("---------");
    singer.sing();
    System.out.println("++++++++++");
    return null;
   }
  });
  ManSinger proxy = (ManSinger) enhancer.create();
  proxy.sing();
 }
}
 /**
     * All generated proxied methods call this method instead of the original method.
     * The original method may either be invoked by normal reflection using the Method object,
     * or by using the MethodProxy (faster).
     * @param obj "this", the enhanced object
     * @param method intercepted Method
     * @param args argument array; primitive types are wrapped
     * @param proxy used to invoke super (non-intercepted method); may be called
     * as many times as needed
     * @throws Throwable any exception may be thrown; if so, super method will not be invoked
     * @return any value compatible with the signature of the proxied method. Method returning void will ignore this value.
     * @see MethodProxy
     */
    public Object intercept(Object obj, java.lang.reflect.Method method, Object[] args,
                               MethodProxy proxy) throws Throwable;
//该设置用于输出cglib动态代理产生的类
System.setProperty(DebuggingClassWriter.DEBUG_LOCATION_PROPERTY, "D:\\class");
- Java 动态代理只能够对接口进行代理,不能对普通的类进行代理(因为所有生成的代理类的父类为 Proxy,Java 类继承机制不允许多重继承);
- CGLIB 能够代理普通类;
- Java 动态代理使用 Java 原生的反射 API 进行操作,在生成类上比较高效;CGLIB 使用 ASM 框架直接对字节码进行操作,在类的执行过程中比较高效。
3、ASM 畅聊动态代理的本质
1、介绍
ASM 是一个 java 字节码操纵和分析框架,它可以直接以二进制的形式修改 class 或动态生成 class。官网
2、使用
接下来我们使用 asm 框架实现一个和 JDK 动态代理同样的功能。
3、引入 maven 依赖
<dependency>
   <groupId>org.ow2.asm</groupId>
   <artifactId>asm-util</artifactId>
   <version>8.0.1</version>
</dependency>
<dependency>
   <groupId>org.ow2.asm</groupId>
   <artifactId>asm</artifactId>
   <version>8.0.1</version>
</dependency>
4、定义目标对象接口
/**
 * 可以唱歌的
 */
public interface Singable {
  /**
   * 唱歌
   */
  void sing();
}
5、定义目标对象
/**
 * 歌手
 */
public class Singer implements Singable {
  @Override
  public void sing() {
    System.out.println("I am singing...");
  }
}
6、定义自己的类加载器
/**
 * 自定义类加载器
 */
public class MyClassLoader extends ClassLoader {
  public MyClassLoader() {
    super(Thread.currentThread().getContextClassLoader());
  }

  /**
   * 将字节数组转化为Class对象
   *
   * @param name 类全名
   * @param data class数组
   * @return
   */
  public Class<?> defineClassForName(String name, byte[] data) {
    return this.defineClass(name, data, 0, data.length);
  }

}
7、创建代理
/**
 * @author itnanls(微信)
 * 我们的服务: 一路陪跑,顺利就业
 */
public class SingerAgentDump implements Opcodes {

    // 生成一个class的字节数组
    public static byte[] dump() throws Exception {

        ClassWriter classWriter = new ClassWriter(0);
        FieldVisitor fieldVisitor;
        RecordComponentVisitor recordComponentVisitor;
        MethodVisitor methodVisitor;
        AnnotationVisitor annotationVisitor0;

        // 定义class版本1.8,访问权限,类名,继承类,实现接口等信息
        classWriter.visit(V1_8, ACC_PUBLIC | ACC_SUPER, "com/ydlclass/SingerAgent", null, "java/lang/Object", new String[]{"com/ydlclass/Singable"});

        classWriter.visitSource("SingerAgent.java", null);

        {
        // 定义私有属性
            fieldVisitor = classWriter.visitField(ACC_PRIVATE, "delegate", "Lcom/ydlclass/Singable;", null, null);
            fieldVisitor.visitEnd();
        }
        {
        // 定义构造器
            methodVisitor = classWriter.visitMethod(ACC_PUBLIC, "<init>", "(Lcom/ydlclass/Singable;)V", null, null);
            methodVisitor.visitParameter("delegate", 0);
            methodVisitor.visitCode();
            Label label0 = new Label();
            methodVisitor.visitLabel(label0);
            methodVisitor.visitLineNumber(10, label0);
            methodVisitor.visitVarInsn(ALOAD, 0);
            methodVisitor.visitMethodInsn(INVOKESPECIAL, "java/lang/Object", "<init>", "()V", false);
            Label label1 = new Label();
            methodVisitor.visitLabel(label1);
            methodVisitor.visitLineNumber(11, label1);
            methodVisitor.visitVarInsn(ALOAD, 0);
            methodVisitor.visitVarInsn(ALOAD, 1);
            methodVisitor.visitFieldInsn(PUTFIELD, "com/ydlclass/SingerAgent", "delegate", "Lcom/ydlclass/Singable;");
            Label label2 = new Label();
            methodVisitor.visitLabel(label2);
            methodVisitor.visitLineNumber(12, label2);
            methodVisitor.visitInsn(RETURN);
            Label label3 = new Label();
            methodVisitor.visitLabel(label3);
            methodVisitor.visitLocalVariable("this", "Lcom/ydlclass/SingerAgent;", null, label0, label3, 0);
            methodVisitor.visitLocalVariable("delegate", "Lcom/ydlclass/Singable;", null, label0, label3, 1);
            methodVisitor.visitMaxs(2, 2);
            methodVisitor.visitEnd();
        }
        {
// 定义方法sing
            methodVisitor = classWriter.visitMethod(ACC_PUBLIC, "sing", "()V", null, null);
            methodVisitor.visitCode();
            Label label0 = new Label();
            methodVisitor.visitLabel(label0);
            methodVisitor.visitLineNumber(16, label0);
            methodVisitor.visitFieldInsn(GETSTATIC, "java/lang/System", "out", "Ljava/io/PrintStream;");
            methodVisitor.visitLdcInsn("before sing...");
            methodVisitor.visitMethodInsn(INVOKEVIRTUAL, "java/io/PrintStream", "println", "(Ljava/lang/String;)V", false);
            Label label1 = new Label();
            methodVisitor.visitLabel(label1);
            methodVisitor.visitLineNumber(17, label1);
            methodVisitor.visitVarInsn(ALOAD, 0);
            methodVisitor.visitFieldInsn(GETFIELD, "com/ydlclass/SingerAgent", "delegate", "Lcom/ydlclass/Singable;");
            methodVisitor.visitMethodInsn(INVOKEINTERFACE, "com/ydlclass/Singable", "sing", "()V", true);
            Label label2 = new Label();
            methodVisitor.visitLabel(label2);
            methodVisitor.visitLineNumber(18, label2);
            methodVisitor.visitFieldInsn(GETSTATIC, "java/lang/System", "out", "Ljava/io/PrintStream;");
            methodVisitor.visitLdcInsn("after sing...");
            methodVisitor.visitMethodInsn(INVOKEVIRTUAL, "java/io/PrintStream", "println", "(Ljava/lang/String;)V", false);
            Label label3 = new Label();
            methodVisitor.visitLabel(label3);
            methodVisitor.visitLineNumber(19, label3);
            methodVisitor.visitInsn(RETURN);
            Label label4 = new Label();
            methodVisitor.visitLabel(label4);
            methodVisitor.visitLocalVariable("this", "Lcom/ydlclass/SingerAgent;", null, label0, label4, 0);
            methodVisitor.visitMaxs(2, 1);
            methodVisitor.visitEnd();
        }
        classWriter.visitEnd();

        return classWriter.toByteArray();
    }

    // 将字节数组加载为class
    public static Singable newProxyInstance(Singable delegate) throws Exception {
        String className = "com.ydlclass.SingerAgent";
        byte[] classData = dump();
        Class<?> aClass = new MyClassLoader().defineClassForName(className, classData);
        return (Singable) aClass.getDeclaredConstructor(Singable.class).newInstance(delegate);
    }
}
ASM 提供了一个功能,可以将普通的 java 代码转换成 ASM 代码,上面的代码就是通过转换得到的。
8、定义要转换的 java 代码
/**
 * 歌手经纪人
 */
public class SingerAgent implements Singable {

  private Singable delegate;

  public SingerAgent(Singable delegate) {
    this.delegate = delegate;
  }

  @Override
  public void sing() {
    System.out.println("before sing...");
    delegate.sing();
    System.out.println("after sing...");
  }
}
9、转换
public class Client {
  public static void main(String[] args) throws IOException {
    ASMifier.main(new String[]{SingerAgent.class.getName()});
  }
}
10、客户端调用
public class Client {
  public static void main(String[] args) throws Exception {
    Singable singerAgent = SingerAgentDump.newProxyInstance(new Singer());
    singerAgent.sing();
  }

}
输出结果为
before sing...
I am singing...
after sing...
符合预期,说明我们通过 ASM 创建的 class 是可以正常工作的,但对比 JDK 创建动态代理,ASM 涉及到大量对 java 底层字节码的操作,我们对字节码越熟悉,使用 ASM 就会越容易。
11、遇到的问题
// 将字节数组加载为class
public static SingerAgent newProxyInstance(Singable delegate) throws Exception {
    String className = "com.imooc.sourcecode.java.dynamicproxy.asm.test3.SingerAgent";
    byte[] classData = dump();
    Class<?> aClass = new MyClassLoader().defineClassForName(className, classData);
    return (SingerAgent) aClass.getDeclaredConstructor(Singable.class).newInstance(delegate);
  }
刚开始我将加载后的 class 强转为了 SingerAgent 类,但报异常
Exception in thread "main" java.lang.ClassCastException: class com.imooc.sourcecode.java.dynamicproxy.asm.test3.SingerAgent cannot be cast to class com.imooc.sourcecode.java.dynamicproxy.asm.test3.SingerAgent (com.imooc.sourcecode.java.dynamicproxy.asm.test3.SingerAgent is in unnamed module of loader com.imooc.sourcecode.java.dynamicproxy.asm.test3.MyClassLoader @4590c9c3; com.imooc.sourcecode.java.dynamicproxy.asm.test3.SingerAgent is in unnamed module of loader 'app')
 at com.imooc.sourcecode.java.dynamicproxy.asm.test3.SingerAgentDump.newProxyInstance(SingerAgentDump.java:98)
 at com.imooc.sourcecode.java.dynamicproxy.asm.test3.Client.main(Client.java:5)
原因是因为生成的 SingerAgent 类和原有的 SingerAgent 类不是同一个类加载器加载的,所以不能转换。
12、ASM 使用场景
ASM 是一个非常强大的字节码工具,以下都使用到了 ASM
- the OpenJDK, to generate the lambda call sites, and also in the Nashorn compiler, OpenJDK 对 lambda 的实现
- the Groovy compiler and the Kotlin compiler,Cobertura and Jacoco, to instrument classes in order to measure code coverage, Groovy 和 Kotlin 的编译器
- CGLIB, to dynamically generate proxy classes (which are used in other projects such as Mockito and EasyMock), Cglib 框架
- Gradle, to generate some classes at runtime. Gradle 框架
五、实战
1、hikari.properties
username=root
password=root
jdbcUrl=jdbc:mysql://127.0.0.1:3306/ssm?useUnicode=true&characterEncoding=utf8&serverTimezone=Asia/Shanghai&allowPublicKeyRetrieval=true&useSSL=false
driverClassName=com.mysql.cj.jdbc.Driver
druid.properties
url=jdbc:mysql://127.0.0.1:3306/ssm?useUnicode=true&characterEncoding=utf8&serverTimezone=Asia/Shanghai&allowPublicKeyRetrieval=true&useSSL=false
username=root
password=root
driverClassName=com.mysql.cj.jdbc.Driver
2、mybatis-config.properties
<mybatis>
    <dataSource>hikari</dataSource>
    <mapper>mapper/userMapper.xml</mapper>
    <mapper>mapper/studentMapper.xml</mapper>
</mybatis>
3、UserMapper.xml
<mapper namespace="cn.itnanls.UserDao">
    <insert id="saveUser" resultType="cn.itnanls.User" paramType="cn.itnanls.User">
        insert into user values(?,?,?)
    </insert>
    <select id="findUser" resultType="cn.itnanls.User" paramType="cn.itnanls.User">
        select * from user where id = ?
    </select>
</mapper>
4、User
/**
 * @author zn
 * @date 2021/1/25
 */


public class User implements Serializable {
    private int id;
    private String username;
    private String password;

    public User() {
    }

    public User(int id, String username, String password) {
        this.id = id;
        this.username = username;
        this.password = password;
    }

    public int getId() {
        return id;
    }

    public void setId(int id) {
        this.id = id;
    }

    public String getUsername() {
        return username;
    }

    public void setUsername(String username) {
        this.username = username;
    }

    public String getPassword() {
        return password;
    }

    public void setPassword(String password) {
        this.password = password;
    }

    @Override
    public String toString() {
        return "User{" +
                "id=" + id +
                ", username='" + username + '\'' +
                ", password='" + password + '\'' +
                '}';
    }
}
5、UserDao
/**
 * @author zn
 * @date 2021/1/25
 */
public interface UserDao {

    Integer saveUser(User user);

    List<User> findUser(Integer id);
}
6、DaoWrapper
/**
 * 用于描述一个Dao的方法的必要条件
 * @author zn
 * @date 2021/1/25
 */
public class DaoWrapper {

    /**
     * 类型,insert|update|delete
     */
    private String type;
    /**
     * 返回值的类型
     */
    private String resultType;
    /**
     * 参数的类型
     */
    private String paramType;
    /**
     * sql语句
     */
    private String sql;

    public DaoWrapper(String type, String resultType, String paramType, String sql) {
        this.type = type;
        this.resultType = resultType;
        this.paramType = paramType;
        this.sql = sql;
    }

    public String getType() {
        return type;
    }

    public void setType(String type) {
        this.type = type;
    }

    public String getResultType() {
        return resultType;
    }

    public void setResultType(String resultType) {
        this.resultType = resultType;
    }

    public String getParamType() {
        return paramType;
    }

    public void setParamType(String paramType) {
        this.paramType = paramType;
    }

    public String getSql() {
        return sql;
    }

    public void setSql(String sql) {
        this.sql = sql;
    }

    @Override
    public String toString() {
        return "DaoWrapper{" +
                "type='" + type + '\'' +
                ", resultType='" + resultType + '\'' +
                ", paramType='" + paramType + '\'' +
                ", sql='" + sql + '\'' +
                '}';
    }
}
7、DataSourceFactory
/**
 * 数据源工厂
 * 简单工厂的应用
 * @author zn
 * @date 2021/1/25
 */
public class DataSourceFactory {

    public static DataSource createDataSource(String type){

        DataSource dataSource = null;
        Properties properties = new Properties();
        if("hikari".equals(type)){
            try {
                properties.load(DataSourceFactory.class.getClassLoader().getResourceAsStream("hikari.properties"));
            } catch (IOException e) {
                e.printStackTrace();
            }
            HikariConfig hikariConfig = new HikariConfig(properties);
            dataSource = new HikariDataSource(hikariConfig);

        } else if ("druid".equals(type)){
            try {
                properties.load(DataSourceFactory.class.getClassLoader().getResourceAsStream("druid.properties"));
            } catch (IOException e) {
                e.printStackTrace();
            }
            DruidDataSource druidDataSource = new DruidDataSource();
            druidDataSource.configFromPropety(properties);
            dataSource = druidDataSource;
        }

        return dataSource;
    }

}
8、Session
/**
 * 会话对象
 * @author zn
 * @date 2021/1/25
 */
public class Session {

    /**
     * 每个会话持有一个链接
     */
    private Connection connection;
    /**
     * 当前会话的上下文
     */
    private Map<String, Map<String, DaoWrapper>> env = new HashMap<>(8);

    public Session(Connection connection,Map<String, Map<String, DaoWrapper>> env) {
        this.connection = connection;
        this.env = env;
    }

    /**
     * 拿到一个包装类
     * @param clazz
     * @param <T>
     * @return
     */
    public <T> T getMapper(Class<T> clazz) {
        T t = (T) Proxy.newProxyInstance(this.getClass().getClassLoader(),
                new Class[]{clazz},
                new SQLHandler(connection, clazz,env.get(clazz.getName())));
        return t;
    }

    // 开始会话
    public void begin() {
        try {
            connection.setAutoCommit(false);
        } catch (SQLException e) {
            e.printStackTrace();
        }
    }

    // 提交
    public void commit() {
        try {
            connection.commit();
        } catch (SQLException e) {
            e.printStackTrace();
        }
    }


    // 回滚
    public void rollback() {
        try {
            connection.rollback();
        } catch (SQLException e) {
            e.printStackTrace();
        }
    }

}
9、SessionFactory
/**
 * @author zn
 * @date 2021/1/25
 */
public class SessionFactory {

    private DataSource dataSource;

    private Map<String, Map<String, DaoWrapper>> env = new HashMap<>(8);

    public SessionFactory(String config) {
        loadXml(config);
    }

    // 打开一个会话
    public Session openSession() {
        Connection connection = null;
        try {
            connection = dataSource.getConnection();
        } catch (SQLException e) {
            e.printStackTrace();
        }
        return new Session(connection, env);
    }

    // 加载资源环境
    public void loadXml(String config) {
        try {
            SAXReader reader = new SAXReader();
            Document configDom = reader.read(Session.class.getClassLoader().getResourceAsStream(config));
            Element configRoot = configDom.getRootElement();
            String dataSourceType = configRoot.element("dataSource").getTextTrim();
            dataSource = DataSourceFactory.createDataSource(dataSourceType);

            List mapperElements = configRoot.elements("mapper");
            List<String> mapperPaths = new ArrayList<>();
            for (Object element : mapperElements) {
                Element mapper = (Element) element;
                mapperPaths.add(mapper.getTextTrim());
            }

            for (String mapperPath : mapperPaths) {
                Map<String, DaoWrapper> wrapper = new HashMap<>(2);
                Document document = reader.read(Session.class.getClassLoader().getResourceAsStream(mapperPath));
                Element root = document.getRootElement();
                String namespace = root.attribute("namespace").getValue();
                Iterator iterator = root.elementIterator();
                while (iterator.hasNext()) {
                    Element el = (Element) iterator.next();
                    String type = el.getName();
                    String id = el.attribute("id").getValue();
                    String resultType = el.attribute("resultType").getValue();
                    String paramType = el.attribute("paramType").getValue();
                    String sqlStr = el.getTextTrim();

                    wrapper.put(id, new DaoWrapper(type, resultType, paramType, sqlStr));
                }
                env.put(namespace, wrapper);
            }
        } catch (DocumentException e) {
            e.printStackTrace();
        }

    }
}
10、SQLHandler
/**
 * @author zn
 * @date 2021/1/25
 */
public class SQLHandler implements InvocationHandler {

    /**
     * 需传入一个链接
     */
    private Connection connection;
    /**
     * 需传入一个dao的类型
     */
    private Class clazz;
    /**
     * 需传入一个独立的环境
     */
    private Map<String, DaoWrapper> env;


    public SQLHandler(Connection connection, Class clazz,Map<String, DaoWrapper> env) {
        this.connection = connection;
        this.clazz = clazz;
        this.env = env;
    }

    /**
     * 生成代理对象
     * @param proxy
     * @param method
     * @param args
     * @return
     * @throws Throwable
     */
    @Override
    public Object invoke(Object proxy, Method method, Object[] args) throws Throwable {

        // 拿到包装
        DaoWrapper wrapper = env.get(method.getName());

        PreparedStatement statement = connection.prepareStatement(wrapper.getSql());

        // 对每一种sql语句进行独立的操作
        if ("insert".equals(wrapper.getType())) {
            String paramType = wrapper.getParamType();
            // 暂定传入一个对象
            Class<?> clazz = args[0].getClass();
            Field[] fields = clazz.getDeclaredFields();
            for (int i = 0; i < fields.length; i++) {
                fields[i].setAccessible(true);
                statement.setObject(i + 1, fields[i].get(args[0]));
            }
            return statement.executeUpdate();

        } else if ("delete".equals(wrapper.getType())) {
            for (int i = 0; i < args.length; i++) {
                statement.setObject(i + 1, args[i]);
            }
            return statement.executeUpdate();

        } else if ("select".equals(wrapper.getType())) {
            for (int i = 0; i < args.length; i++) {
                statement.setObject(i + 1, args[i]);
            }
            ResultSet result = statement.executeQuery();
            List list = new ArrayList();
            while (result.next()) {
                Class<?> clazz = Class.forName(wrapper.getResultType());
                Object object = clazz.newInstance();
                Field[] fields = clazz.getDeclaredFields();
                for (int i = 0; i < fields.length; i++) {
                    fields[i].setAccessible(true);
                    fields[i].set(object, result.getObject(fields[i].getName()));

                }
                list.add(object);
            }
            return list;
        }
        return null;
    }
}