Spring 框架
第一章 概述
一、Why Spring?(为什么使用 spring)

官网是这么解释的:
1、Spring is everywhere
Spring 框架的足够灵活受到世界各地开发人员的信任。 无论是流媒体电视、在线购物、还是无数其他创新的解决方案,Spring 每天都为数百万终端用户提供愉快的体验。 Spring 也有来自所有科技巨头的贡献,包括阿里巴巴、亚马逊、谷歌、微软等。
2、Spring is flexible
Spring 灵活而全面的扩展能力和第三方库让开发人员可以构建几乎任何可以想象到的应用程序。 Spring 框架的 控制反转(IoC) 和 依赖注入(DI) 特性为一系列广泛的特性和功能提供了基础。 无论您是在为 web 构建安全的、响应式的、基于云的微服务,还是为企业构建复杂的流数据流,Spring 都有工具可以提供帮助。
3、Spring is productive
Spring Boot(这是我们以后要学习的框架)改变了您处理 Java 编程任务的方式,从根本上简化了您的体验。 Spring Boot 结合了应用程序上下文和自动配置的嵌入式 web 服务器等必要条件,使 microservice 开发变得轻而易举。 为了更快,您可以将 Spring Boot 与 Spring Cloud 丰富的支持库、服务器、模式和模板组合在一起,以创纪录的时间将整个基于微服务的架构安全地部署到云中。
4、Spring is fast
我们的工程师非常关心性能。 在 Spring 中,默认情况下,您会注意到快速启动、快速关闭和优化执行。 Spring 项目也越来越多地支持 reactive(nonblocking) 编程模型,以获得更高的效率。 开发人员的生产力是 Spring 的超级力量。 Spring Boot 帮助开发人员轻松地构建应用程序,而且比其他竞争方式要轻松得多。
5、Spring is secure
Spring 在处理安全问题方面十分可靠。 Spring 代码的贡献者与安全专业人员一起修补和测试任何报告的漏洞。 第三方依赖关系也被密切监控,并定期发布更新,以帮助您的数据和应用程序尽可能安全。 此外,Spring Security 使您更容易集成行业标准的安全方案,并交付可靠的默认安全解决方案。
6、Spring is supportive
Spring 社区是一个庞大的、全球性的、多样化的社区,涵盖了所有年龄和能力的人,从完全的初学者到经验丰富的专业人士。 无论你处在人生的哪个阶段,你都能找到帮助你进入下一个阶段的支持和资源。
二、Spring 的特性
- Core technologies: dependency injection, event, resources, i18n, validation, data binding, type conversion, SpEL, AOP.
核心技术:包括依赖注入、事件模型、资源处理、国际化、数据绑定和验证、类型转化、spring 表达式、面向切面编程。核心技术是一切的关键,后边衍生的多个特性都是依托于核心技术。
- Testing: mock objects, TestContext framework, Spring MVC Test.
整合单元测试。
- Data Access: transactions, DAO support, JDBC, ORM, Marshalling XML.
数据访问,有独立的持久层 api(jdbctemplate),我们主要学习他的事务管理。
Spring MVC and Spring WebFlux web frameworks.
Integration: remoting, JMS, JCA, JMX, email, tasks, scheduling, cache.
整合其他的第三方组件。
- Languages: Kotlin,Groovy,dynamic languages.
三、版本关系
目前市场上常用的版本为 5.x 和 6.x,6.x 的 GA 版本(正式发行的稳定通用版)发行时间是 2022 年 11 月份,所以只有这个时间点之后的新项目才有可能选用 spring6.x 作为项目的基础框架选型。Spring6.0 已迁移到 Jakarta EE 9+(在 jakarta 命名空间中取代了以前基于 javax 的 EE API),这个知识我们在学习 tomcat 的时候学习过。
| spring 框架的版本 | jdk 版本 | Jakarta EE | Servlet | tomcat 版本 | 发布时间 |
|---|---|---|---|---|---|
| Spring Framework 6.x | JDK17 | Jakarta EE 9 | Servlet 5.0+ | tomcat10 | 2022 年 |
| Spring Framework 5.x | JDK 8/11 | Java EE 7/8 | Servlet 3.1/4.0 | Tomcat 8/9 | 2018 年 |
注意:在学习和使用上 5.x 和 6.x 几乎没有什么区别。
第二章 IOC 容器
我们在学习本章知识之前首先需要了解一些常见的名词:
小知识:众所周知,java 是一种咖啡的名字,而咖啡是由咖啡豆制作而成的,在制作咖啡的时候我们需要将咖啡豆放入咖啡机,此时咖啡机就是一个容器,咖啡豆就是原料,也叫 bean。
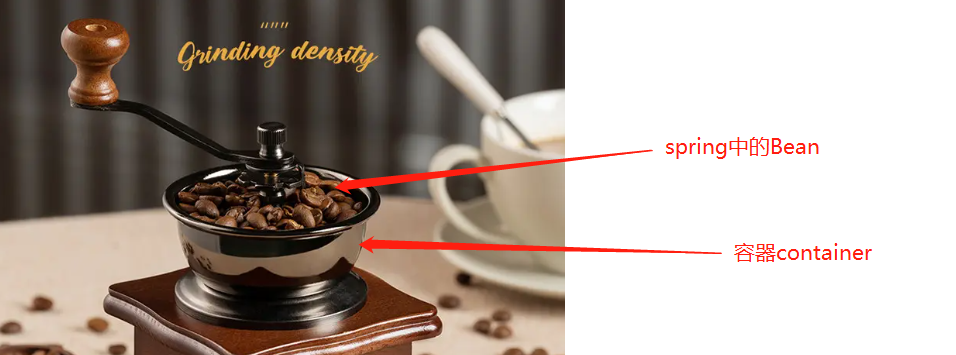
容器:可以管理对象的生命周期、对象与对象之间的依赖关系。
POJO:(Plain Old Java Object)这种叫法是 Martin Fowler、Rebecca Parsons 和 Josh MacKenzie 在 2000 年的一次演讲的时候提出来的。按照 Martin Fowler 的解释是“Plain Old Java Object”,从字面上翻译为“纯洁老式的 Java 对象”,但大家都使用“简单 java 对象”来称呼它。POJO 的内在含义是指:那些没有继承任何类、也没有实现任何接口,更没有被其它框架侵入的 java 对象。不允许有业务方法,也不能携带 connection 之类的方法,实际就是普通 JavaBeans。
JavaBean:JavaBean 是一种 JAVA 语言写成的可重用组件。JavaBean 符合一定规范编写的 Java 类,不是一种技术,而是一种规范。大家针对这种规范,总结了很多开发技巧、工具函数。符合这种规范的类,可以被其它的程序员或者框架使用。它的方法命名,构造及行为必须符合特定的约定:
所有属性为 private。
这个类必须有一个公共的缺省构造函数。即是提供无参数的构造器。
这个类的属性使用 getter 和 setter 来访问,其他方法遵从标准命名规范
这个类应是可序列化的。实现 serializable 接口。
因为这些要求主要是靠约定而不是靠实现接口,所以许多开发者把 JavaBean 看作遵从特定命名约定 POJO。
SpringBean:SpringBean 是受 Spring 管理的对象,所有能受 Spring 容器管理的对象都可以成 SpringBean。Spring 中的 bean,是通过配置文件、javaconfig 等的设置,由 Spring 自动实例化,用完后自动销毁的对象。
EntityBean:Entity Bean 是域模型对象,用于实现 O/R 映射,负责将数据库中的表记录映射为内存中的 Entity 对象,事实上,创建一个 Entity Bean 对象相当于新建一条记录,删除一个 Entity Bean 会同时从数据库中删除对应记录,修改一个 Entity Bean 时,容器会自动将 Entity Bean 的状态和数据库同步。
注:POJO 与 Java Bean 的区别
| POJO | JAVABean |
|---|---|
| 除了 Java 语言强加的限制外,它没有其他特殊限制。 | 这是一个特殊的 POJO,它有一些限制。 |
| 它没有对成员提供太多控制。 | 它提供对成员的完全控制。 |
| 它可以实现 Serializable 接口。 | 它应该实现可序列化的接口。 |
| 可以通过字段名称访问字段。 | 字段只能由 getter 和 setter 访问。 |
| 字段可以具有任何可见性。 | 字段只有私人可见性。 |
| 可能/可能没有 no-arg 构造函数。 | 它必须具有无参数构造函数。 |
| 当您不想限制成员并让用户完全访问您的实体时使用它 | 当您要向用户提供您的实体,但仅向实体的一部分提供服务时,将使用它。 |
注
SpringBean 和 JavaBean 的区别:
- 用处不同:传统 javabean 更多地作为值传递参数,而 spring 中的 bean 用处几乎无处不在,任何组件都可以被称为 bean。
- 生命周期不同:传统 javabean 作为值对象传递,不接受任何容器管理其生命周期;spring 中的 bean 有 spring 管理其生命周期行为。
一、概述
编写 spring 代码,我们需要创建一个 maven 工程,并加入以下依赖:
<!-- Spring的核心组件 -->
<dependency>
   <groupId>org.springframework</groupId>
   <artifactId>spring-core</artifactId>
   <version>5.2.18.RELEASE</version>
</dependency>
<!-- SpringIoC(依赖注入)的基础实现 -->
<dependency>
   <groupId>org.springframework</groupId>
   <artifactId>spring-beans</artifactId>
   <version>5.2.18.RELEASE</version>
</dependency>
<!--Spring提供在基础IoC功能上的扩展服务,此外还提供许多企业级服务的支持,如邮件服务、任务调度、JNDI定位、EJB集成、远程访问、缓存以及各种视图层框架的封装等 -->
<dependency>
   <groupId>org.springframework</groupId>
   <artifactId>spring-context</artifactId>
   <version>5.2.18.RELEASE</version>
</dependency>
注:如果使用了 jdk17,也可以使用 spring 的 6.x 版本,但是要注意,多个 spring 相关的依赖版本必须一致。
依赖如下:
<!-- Spring的核心组件 -->
<dependency>
   <groupId>org.springframework</groupId>
   <artifactId>spring-core</artifactId>
   <version>6.0.2</version>
</dependency>
<!-- SpringIoC(依赖注入)的基础实现 -->
<dependency>
   <groupId>org.springframework</groupId>
   <artifactId>spring-beans</artifactId>
   <version>6.0.2</version>
</dependency>
<!--Spring提供在基础IoC功能上的扩展服务,此外还提供许多企业级服务的支持,如邮件服务、任务调度、JNDI定位、EJB集成、远程访问、缓存以及各种视图层框架的封装等 -->
<dependency>
   <groupId>org.springframework</groupId>
   <artifactId>spring-context</artifactId>
   <version>6.0.2</version>
</dependency>
本章介绍了 Spring 框架实现控制反转(IoC)的原理, IoC 也称为依赖注入(DI)。
org.springframework.beans 和 org.springframework.context 包是 Spring 框架的 IoC 容器的基础。其中 BeanFactory 接口提供了容器的基本功能,而 ApplicationContext 添加了更多特定于企业的功能。ApplicationContext 是 BeanFactory 的一个完整超集。
beanFactory 和 ApplicationContext 接口展示如下:
public interface BeanFactory {}
public interface ApplicationContext extends EnvironmentCapable, ListableBeanFactory, HierarchicalBeanFactory, MessageSource, ApplicationEventPublisher, ResourcePatternResolver {}
BeanFactory 接口 提供了一种高级的配置机制,能够管理任何类型的对象。 ApplicationContext 是 BeanFactory 的子接口。 它对 BeanFactory 进行了补充:
- 更容易与 Spring 的 AOP 特性集成 。
- ``MessageSource
接口用于消息资源处理(用于国际化) ,解析消息的能力,支持国际化。 - ``ApplicationEventPublisher
接口事件发布,向注册侦听器发布事件的能力。 - 应用程序层特定的上下文,如
WebApplicationContext用于 web 应用程序。 - ``ResourceLoader
接口拥有以通用方式加载文件资源的能力。
我们可以阅读以下内容,并在后面的学习中认真思考:
1、由 Spring IoC 容器管理的构成应用程序主干的对象称为 bean 。
2、bean 是由 Spring IoC 容器实例化、组装和管理的对象。
3、bean 及其之间的依赖关系反映在容器使用的配置元数据中,元数据可以是配置文件,也可以使用 Java 注解或代码申明。
4、 容器通过读取配置元数据获得关于要实例化、配置和组装哪些对象的指令。 配置元数据以 XML、Java 注解或 Java 代码表示。元数据表达了组成应用程序的对象以及这些对象之间丰富的相互依赖关系。
二、配置元数据
构建【Spring IoC 容器】可以通过配置文件的形式提供元数据。
这个配置元数据说的是:作为应用程序开发人员,您要告诉 Spring 容器如何去实例化、配置和组装应用程序中的对象。 元数据传统上以简单而直观的 XML 格式提供,本章的大部分内容都使用这种格式来传达 Spring IoC 容器的关键概念和特性。
下面的示例展示了基于 xml 的配置元数据的基本结构:
<?xml version="1.0" encoding="UTF-8"?>
<beans xmlns="http://www.springframework.org/schema/beans"
   xmlns:xsi="http://www.w3.org/2001/XMLSchema-instance"
   xsi:schemaLocation="http://www.springframework.org/schema/beans
       https://www.springframework.org/schema/beans/spring-beans.xsd">

   <bean id="..." class="...">
       <!-- collaborators and configuration for this bean go here -->
   </bean>

   <bean id="..." class="...">
       <!-- collaborators and configuration for this bean go here -->
   </bean>

   <!-- more bean definitions go here -->

</beans>
- 'id' 属性是标识单个 beanDefinition 的字符串。
- ' class ' 属性定义 bean 的类型,并使用完全限定的类名。
三、实例化一个容器
ApplicationContext 的构造函数可以是xml 文件的位置路径的字符串,它允许容器从各种外部资源(如本地文件系统、Java 的 ' CLASSPATH ' 等)加载配置元数据。
ApplicationContext context = new ClassPathXmlApplicationContext("services.xml", "daos.xml");
下面的示例展示了服务层对象(services.xml)的配置文件:
<?xml version="1.0" encoding="UTF-8"?>
<beans xmlns="http://www.springframework.org/schema/beans"
   xmlns:xsi="http://www.w3.org/2001/XMLSchema-instance"
   xsi:schemaLocation="http://www.springframework.org/schema/beans
       https://www.springframework.org/schema/beans/spring-beans.xsd">

   <!-- services -->

   <bean id="petStore" class="org.springframework.samples.jpetstore.services.PetStoreServiceImpl">
       <property name="accountDao" ref="accountDao"/>
       <property name="itemDao" ref="itemDao"/>
       <!-- additional collaborators and configuration for this bean go here -->
   </bean>

   <!-- more bean definitions for services go here -->

</beans>
下面的例子展示了数据访问对象(dao.xml)的配置文件:
<?xml version="1.0" encoding="UTF-8"?>
<beans xmlns="http://www.springframework.org/schema/beans"
   xmlns:xsi="http://www.w3.org/2001/XMLSchema-instance"
   xsi:schemaLocation="http://www.springframework.org/schema/beans
       https://www.springframework.org/schema/beans/spring-beans.xsd">

   <bean id="accountDao"
       class="org.springframework.samples.jpetstore.dao.jpa.JpaAccountDao">
       <!-- additional collaborators and configuration for this bean go here -->
   </bean>

   <bean id="itemDao" class="org.springframework.samples.jpetstore.dao.jpa.JpaItemDao">
       <!-- additional collaborators and configuration for this bean go here -->
   </bean>

   <!-- more bean definitions for data access objects go here -->

</beans>
四、使用容器
ApplicationContext 是一个高级工厂的接口,它维护了一个 bean 的注册列表,保存了容器产生的所有 bean 对象。 通过使用方法 T getBean(String name, Class<T> requiredType),您可以检索 bean 的实例。
ApplicationContext 允许你读取和访问 bean,如下面的示例所示:
// create and configure beans
ApplicationContext context = new ClassPathXmlApplicationContext("services.xml", "daos.xml");

// retrieve configured instance,这里使用bean的标识符活class对象检索bean的实例。
PetStoreService service = context.getBean("petStore", PetStoreService.class);

// use configured instance
List<String> userList = service.getUsernameList();
五、Bean 的概述
Spring IoC 容器管理一个或多个 bean。 这些 bean 是使用您提供给容器的配置元数据创建的(例如,以 XML <bean/> 定义的形式)。
在容器本身中,这些定义好的**bean 的元数据(描述 bean 的数据)**被表示为 BeanDefinition 对象,其中包含但不限于以下元数据:
- 全限定类名:通常是被定义的 bean 的实际实现类 。
- Bean 的行为配置元素:它声明 Bean 在容器中应该存在哪些行为(作用范围、生命周期回调等等)。
- bean 所需的其他 bean 的引用(成员变量):这些引用也称为协作者或依赖项 。
接下来我们对其一一进行讲解:
1、bean 的命名
每个 bean 都有一个或多个标识符。 这些标识符在 spring 容器(ioc 容器)中必须是唯一的。 bean 通常只有一个标识符。 但是,如果需要多个,则可以考虑使用别名。
在基于 xml 的配置元数据中,可以使用 'id' 属性、'name' 属性或两者同时使用,来指定 bean 的标识符。 'id' 属性允许您指定一个 id,通常,这些名称是字母数字('myBean', 'someService'等),但它们也可以包含特殊字符。 如果想为 bean 引入其他别名(一个或者多个都可以),还可以在 'name' 属性中指定它们,由逗号(',')、分号(';')或空格分隔。
您甚至不需要为 bean 提供 'name' 或 'id'。 如果您没有显式地提供 'name' 或 'id',容器将为该 bean 生成唯一的名称。 但是,如果您想通过名称引用该 bean,则必须通过使用 'ref' 元素来提供名称。 xml 中默认的名字是类的全限定名称#数字 ,如(com.ydlclass.dao.UserDao#1)。
【bean 命名约定】
在命名 bean 时,bean 名称以小写字母开头,并从那里开始采用驼峰式大小写。 这类名称的例子包括 'accountManager'、'accountService'、'userDao'、'loginController' 等等。
一致地命名 bean 可以使您的配置更容易阅读和理解。
2、bean 的别名
在 bean 的定义中,您可以为 bean 提供多个名称,方法是使用'id'属性指定的最多一个名称和'name'属性中任意数量的其他名称的组合。 这些名称可以是相同 bean 的等效别名,在某些情况下很有用,例如允许应用程序中的每个组件使用特定于该组件本身的 bean 名称来引用公共依赖项。 举一个简单的例子,一个人在家叫【狗蛋】,在公司叫【小刘】。
然而,在实际定义 bean 的地方指定所有别名并不一定能满足所有需求,有时需要为别处定义的 bean(比如引入的 jar 包)引入别名。 这种情况在大型系统中很常见,其中配置在每个子系统之间被分割,每个子系统都有自己的一组对象定义。 在基于 xml 的配置元数据中,可以使用 <alias/> 元素来实现这一点。 下面的例子展示了如何做到这一点:
<alias name="fromName" alias="toName"/>
在这种情况下,一个名为 fromName 的 bean 被定义了一个新的别名 toName 。
例如,子系统 A 的配置元数据可以以 subsystemA-dataSource 的名称引用数据源。 子系统 B 的配置元数据可以以 subsystemB-dataSource 的名称引用数据源。 当编写使用这两个子系统的主应用程序时,主应用程序以 myApp-dataSource 的名称引用数据源。 要使这三个名称都指向同一个对象,您可以向配置元数据添加以下别名定义:
<alias name="myApp-dataSource" alias="subsystemA-dataSource"/>
<alias name="myApp-dataSource" alias="subsystemB-dataSource"/>
现在,每个组件和主应用程序都可以通过唯一的名称来引用 dataSource,并且保证不会与任何其他定义(有效地创建了一个名称空间)发生冲突,但它们引用的是相同的 bean。
3、实例化 bean
beanDefinition 本质上是描述了一个 bean 是如何被创建的。 当被请求时,容器会查看指定 bean 的定义,并使用由该 beanDefinition 封装的配置元数据来创建(或获取)实际对象。
如果使用基于 xml 配置的元数据,则要在 <bean/>元 素的 class 属性中指定实例化的对象的类型。 这个 'class' 属性(在内部是 'BeanDefinition' 实例上的 'class' 属性,一个 bean 的配置加载到内存会形成一个 BeanDefinition 事例)通常是强制性的。 你可以通过以下两种方式使用 Class 属性:
- 在容器中,如果是通过反射调用其构造函数直接创建 bean,则要指定 bean 的类型,这有点类似于使用 “new” 操作符的 Java 代码。
- 这个类同样可以是用于创建对象的“静态”工厂方法的实际类,在这种情况下,容器调用该类上的静态工厂方法来创建 bean 。 调用静态工厂方法返回的对象类型可能是同一个类,也可能完全是另一个类,这要看你的工厂方法的具体实现。
(1)使用构造函数实例化
当您通过构造函数方法创建 bean 时,所有普通类都可以被 Spring 使用并与 Spring 兼容。 也就是说,正在开发的类不需要实现任何特定的接口,也不需要以特定的方式编码。 只需指定 bean 类就足够了。 但是,这种情况下您可能需要一个默认(无参)构造函数。
其实就是 spring 通过 class 全限定名使用反射进行构造实例。
使用基于 xml 的配置元数据,您可以使用如下方法,指定您的 bean 类:
<bean id="exampleBean" class="examples.ExampleBean"/>
<bean name="anotherExample" class="examples.ExampleBeanTwo"/>
(2)使用静态工厂方法实例化
在使用静态工厂方法创建的 bean 时,使用 class 属性指定包含一个静态工厂方法的类,并使用名为 factory-method 的属性指定工厂方法本身的名称。 我们应该能够调用这个方法并返回一个对象实例。
下面的 beanDefinition 指定通过调用工厂方法创建 bean:
在这个例子中,createInstance() 方法必须是一个静态方法,下面的示例演示如何指定工厂方法:
<bean id="clientService" class="examples.ClientService" factory-method="createInstance"/>
下面的示例显示了一个具有静态工厂方法的类:
public class ClientService {
   private static ClientService clientService = new ClientService();
   private ClientService() {}

   public static ClientService createInstance() {
       return clientService;
   }
}
(3)使用实例工厂方法实例化
该方法类似于通过(静态工厂方法)实例化所需的 bean,容器同样可以使用实例工厂方法调用非静态方法创建一个新的 bean。 要使用这种机制,请将 class 属性保留为空,并在 factory-bean 属性中指定当前容器中包含要调用的实例方法的 bean 的名称。 使用“factory-method”属性设置工厂方法本身的名称。
下面的示例演示如何配置这样的 bean:
<!-- the factory bean, which contains a method called createInstance() -->
<bean id="serviceLocator" class="examples.DefaultServiceLocator">
   <!-- inject any dependencies required by this locator bean -->
</bean>

<!-- the bean to be created via the factory bean -->
<bean id="clientService" factory-bean="serviceLocator" factory-method="createClientServiceInstance"/>
下面的例子显示了相应的类:
public class DefaultServiceLocator {

   private static ClientService clientService = new ClientServiceImpl();

   public ClientService createClientServiceInstance() {
       return clientService;
   }
}
一个工厂类也可以包含多个工厂方法,如下例所示:
<bean id="serviceLocator" class="examples.DefaultServiceLocator">
   <!-- inject any dependencies required by this locator bean -->
</bean>

<bean id="clientService" factory-bean="serviceLocator" factory-method="createClientServiceInstance"/>

<bean id="accountService" factory-bean="serviceLocator" factory-method="createAccountServiceInstance"/>
下面的例子显示了相应的类:
public class DefaultServiceLocator {

   private static ClientService clientService = new ClientServiceImpl();

   private static AccountService accountService = new AccountServiceImpl();

   public ClientService createClientServiceInstance() {
       return clientService;
   }

   public AccountService createAccountServiceInstance() {
       return accountService;
   }
}
注:其实我们这样明白一点,静态工厂方法可以直接调用,实例工厂方法需要容器先构建好实例再进行调用。
六、依赖注入 Dependency Injection
依赖注入(DI)是一个过程(目前可以理解为给成员变量赋值的过程),在此过程中,对象仅通过构造函数参数、工厂方法参数等来确定它们的依赖项。 然后容器在创建 bean 时注入这些依赖项。 从根本上说,这个过程与 bean 本身相反(因此得名“控制反转”)。
使用依赖注入的代码更清晰,并且在向对象提供依赖时解耦更有效。
DI 主要有以下两种方式:
- Constructor-based 依赖注入,基于构造器的依赖注入,本质上是使用构造器给成员变量赋值。
- Setter-based 依赖注入,基于 setter 方法的依赖注入,本质上是使用 set 方法给成员变量赋值。
1、基于构造函数的依赖注入
基于构造器的依赖注入是通过容器调用带有许多参数的构造器来实现的,每个参数表示一个依赖项:
public class SimpleMovieLister {

   // the SimpleMovieLister has a dependency on a MovieFinder
   private final MovieFinder movieFinder;

   // a constructor so that the Spring container can inject a MovieFinder
   public SimpleMovieLister(MovieFinder movieFinder) {
       this.movieFinder = movieFinder;
   }

   // business logic that actually uses the injected MovieFinder is omitted...
}
注意,这个类没有什么特别之处。 它是一个 POJO,不依赖于容器特定的接口、基类或注解。
1、使用参数的顺序实现
如果 beanDefinition 的构造函数参数中不存在潜在的歧义,那么在 beanDefinition 中定义构造函数参数的顺序就是在实例化 bean 时将这些参数提供给适当构造函数的顺序,我们可以看一下下边这个类:
package x.y;

public class ThingOne {

   public ThingOne(ThingTwo thingTwo,ThingThree thingThree) {
       // ...
   }
}
假设 ThingTwo 和 ThingThree 类没有继承关系,就不存在潜在的歧义。 因此,下面的配置工作正常,并且您不需要在 <constructor-arg/> 元素中显式指定构造函数参数索引或类型。
<beans>
   <bean id="beanOne" class="x.y.ThingOne">
       <!-- 直接写就可以 -->
       <constructor-arg ref="beanTwo"/>
       <constructor-arg ref="beanThree"/>
   </bean>

   <bean id="beanTwo" class="x.y.ThingTwo"/>
   <bean id="beanThree" class="x.y.ThingThree"/>
</beans>
2、构造函数参数类型匹配
当引用另一个 bean 时,类型是已知的,可以进行匹配(如上例所示)。 当使用简单类型时,例如<value>true</value>, Spring 无法确定值的类型,因此在没有帮助的情况下无法按类型匹配。 考虑以下官网提供的类:
package examples;

public class ExampleBean {

   // Number of years to calculate the Ultimate Answer
   private final int years;

   // The Answer to Life, the Universe, and Everything
   private final String ultimateAnswer;

   public ExampleBean(int years,String ultimateAnswer) {
       this.years = years;
       this.ultimateAnswer = ultimateAnswer;
   }
}
在前面的场景中,如果你通过使用 type 属性显式指定构造函数参数的类型,容器可以使用与简单类型匹配的类型,如下面的示例所示:
<bean id="exampleBean" class="examples.ExampleBean">
   <constructor-arg type="int" value="7500000"/>
   <constructor-arg type="java.lang.String" value="42"/>
</bean>
3、按照构造函数参数的下标匹配
你可以使用 index 属性显式指定构造函数参数的索引,如下例所示:
<bean id="exampleBean" class="examples.ExampleBean">
   <constructor-arg index="0" value="7500000"/>
   <constructor-arg index="1" value="42"/>
</bean>
除了解决多个简单值的歧义之外,指定索引还解决构造函数具有相同类型的两个参数的歧义。
4、按照构造函数参数的名字匹配
还可以使用构造函数参数名来消除值的歧义,如下面的示例所示:
<bean id="exampleBean" class="examples.ExampleBean">
   <constructor-arg name="years" value="7500000"/>
   <constructor-arg name="ultimateAnswer" value="42"/>
</bean>
2、基于 setter 的注入
基于 setter 的 DI 是通过容器在调用无参数构造函数或无参数“静态”工厂方法实例化 bean 后调用 bean 上的 setter 方法来实现的。
下面的示例展示了一个只能通过使用纯 setter 注入进行依赖注入的类。 这个类是传统的 Java。 它是一个 POJO,不依赖于容器特定的接口、基类或注解。
public class SimpleMovieLister {

   // the SimpleMovieLister has a dependency on the MovieFinder
   private MovieFinder movieFinder;

   // a setter method so that the Spring container can inject a MovieFinder
   public void setMovieFinder(MovieFinder movieFinder) {
       this.movieFinder = movieFinder;
   }

   // business logic that actually uses the injected MovieFinder is omitted...
}
ApplicationContext 支持它管理的 bean 的基于构造函数和基于 setter的依赖注入。 在已经通过构造函数方法注入了一些依赖项之后,它还支持基于 setter 的 DI。也就意味着先通过有参构造构建对象,再通过 setter 方法进行特殊值的赋值。
下面的元数据配置示例为基于 setter 的 DI 方式:
<bean id="exampleBean" class="examples.ExampleBean">
   <!-- setter injection using the nested ref element -->
   <property name="beanOne">
       <ref bean="anotherExampleBean"/>
   </property>

   <!-- setter injection using the neater ref attribute -->
   <property name="beanTwo" ref="yetAnotherBean"/>
   <property name="integerProperty" value="1"/>
</bean>

<bean id="anotherExampleBean" class="examples.AnotherBean"/>
<bean id="yetAnotherBean" class="examples.YetAnotherBean"/>
下面的示例显示了相应的 ExampleBean 类:
public class ExampleBean {

   private AnotherBean beanOne;

   private YetAnotherBean beanTwo;

   private int i;

   public void setBeanOne(AnotherBean beanOne) {
       this.beanOne = beanOne;
   }

   public void setBeanTwo(YetAnotherBean beanTwo) {
       this.beanTwo = beanTwo;
   }

   public void setIntegerProperty(int i) {
       this.i = i;
   }
}
其他情况
现在考虑这个例子的一个变体,在这里,Spring 不是使用构造函数,而是被告知调用一个 static 工厂方法来返回对象的一个实例:
<bean id="exampleBean" class="examples.ExampleBean" factory-method="createInstance">
   <constructor-arg ref="anotherExampleBean"/>
   <constructor-arg ref="yetAnotherBean"/>
   <constructor-arg value="1"/>
</bean>

<bean id="anotherExampleBean" class="examples.AnotherBean"/>
<bean id="yetAnotherBean" class="examples.YetAnotherBean"/>
下面的示例显示了相应的 'ExampleBean' 类:
public class ExampleBean {

   // a private constructor
   private ExampleBean(...) {
       ...
   }

   // a static factory method; the arguments to this method can be
   // considered the dependencies of the bean that is returned,
   // regardless of how those arguments are actually used.
   public static ExampleBean createInstance (
       AnotherBean anotherBean, YetAnotherBean yetAnotherBean, int i) {

       ExampleBean eb = new ExampleBean (...);
       // some other operations...
       return eb;
   }
}
static 工厂方法的参数是由 <constructor-arg/> 元素提供的,就像实际使用了构造函数一样。spring 会根据元数据构造工厂对象,再由工厂对象创建实例,创建的实例交由 spring 容器管理。
3、基于构造函数还是基于 setter 的依赖注入?
我们可以混合使用基于构造函数和 setter的 DI,一般情况下,我们对于强制性依赖项使用构造函数,对于可选依赖项使用 setter 方法注入,这是一个很好的经验法则。 注意,在 setter 方法上使用 @Required 注解可以使属性成为必需依赖项。
Spring 团队更提倡使用构造函数注入,因为它允许你将应用程序组件实现为不可变的对象,并确保所需的依赖项不是”空“的,这样会更加的安全可靠。 而且,构造函数注入的组件总是以完全初始化的状态返回给客户端(调用)代码。
Setter 注入主要应该只用于可选依赖项,这些依赖项可以在类中分配合理的默认值。 setter 注入的一个好处是,setter 方法使该类的对象能够在稍后进行重新配置或重新注入。
有时,在处理您没有源代码的第三方类时,您可以自行选择。 例如,如果第三方类不公开任何 setter 方法,那么构造函数注入可能是 DI 的唯一可用形式。
4、依赖关系和配置细节
从上边的课程我们知道,可以将 bean 属性和构造函数参数定义为对其他合作者 bean(合作者)的引用。 Spring 基于 xml 配置的元数据应该为其 <property/> 和 <constructor-arg/> 元素中支持多样的元素类型。
(1)直接值(原语、字符串等)
<property/> 元素的 value 属性将 属性或构造函数参数 指定为人类可读的字符串表示形式。 Spring 的类型转化器用于将这些值从 'String' 转换为属性或参数的实际类型(比如数字类型,甚至是对象)。
下面的示例显示了正在设置的各种值:
<bean id="myDataSource" class="org.apache.commons.dbcp.BasicDataSource" destroy-method="close">
   <!-- results in a setDriverClassName(String) call -->
   <property name="driverClassName" value="com.mysql.jdbc.Driver"/>
   <property name="url" value="jdbc:mysql://localhost:3306/mydb"/>
   <property name="username" value="root"/>
   <property name="password" value="misterkaoli"/>
</bean>
(2)idref 元素
idref 元素只是将容器中另一个 bean 的id 字符串值-不是引用传递给 <constructor-arg/> 或 <property/> 元素的一种防错误方法。 下面的例子展示了如何使用它:
<bean id="theTargetBean" class="..."/>

<bean id="theClientBean" class="...">
   <property name="targetName">
       <idref bean="theTargetBean"/>
   </property>
</bean>
前面的 beanDefinition 代码段(在运行时)与下面的代码段完全相同:
<bean id="theTargetBean" class="..." />

<bean id="client" class="...">
   <property name="targetName" value="theTargetBean"/>
</bean>
第一种形式比第二种形式更可取,因为使用 idref 标记可以让容器在部署时验证所引用的已命名 bean 是否实际存在。 在第二个变体中,没有对传递给 "theClientBean" 的 targetName 属性的值执行验证。 只有在实际实例化 theClientBean 时才会发现拼写错误(很可能导致致命的结果)。 如果“客户端” bean 是一 prototype bean 马上要讲到,那么这个错误和由此产生的异常可能只有在容器部署很久之后才会被发现。
(3)对其他 bean 的引用(Collaborators 合作者)
ref 元素是 <constructor-arg/> 或 <property/> 定义元素中的最后一个元素。 在这里,您将 bean 的指定属性的值设置为容器管理的另一个 bean(合作者 bean)的引用。 被引用的 bean 是要设置其属性的 bean 的依赖项,并且在设置属性之前根据需要初始化它。
通过 <ref/> 标记的 bean 属性指定目标 bean 是最常用的一种形式,它允许创建同一容器中的任何 bean 的引用,而不管它是否在同一 XML 文件中。 bean 属性的值可以与目标 bean 的 id 属性相同,也可以与目标 bean 的 name 属性中的一个值相同。 下面的例子展示了如何使用 ref 元素:
<bean id="accountService" class="com.something.SimpleAccountService">
   <!-- insert dependencies as required here -->
</bean>

<bean id="accountService" <!-- bean name is the same as the parent bean -->
   class="org.springframework.aop.framework.ProxyFactoryBean">
   <property name="target">
       <ref bean="accountService"/> <!-- notice how we refer to the parent bean -->
   </property>
   <!-- insert other configuration and dependencies as required here -->
</bean>
(4)内部 bean
在 <property/> 或 <constructor-arg/> 元素内部的 <bean/> 元素定义了一个内部 bean,如下面的例子所示:
<bean id="outer" class="...">
   <!-- instead of using a reference to a target bean, simply define the target bean inline -->
   <property name="target">
       <bean class="com.example.Person"> <!-- this is the inner bean -->
           <property name="name" value="Fiona Apple"/>
           <property name="age" value="25"/>
       </bean>
   </property>
</bean>
内部 bean 总是匿名的,并且总是与外部 bean 一起创建的。 不可能独立地访问内部 bean,也不可能将它们注入到外围 bean 之外的协作 bean 中。
(5)集合
<list/>, <set/>, <map/>, 和 <props/> 元素分别设置 Java Collection 类型 List, Set, Map,和 Properties 的属性和参数。 下面的例子展示了如何使用它们:
<bean id="moreComplexObject" class="example.ComplexObject">
   <!-- results in a setAdminEmails(java.util.Properties) call -->
   <property name="adminEmails">
       <props>
           <prop key="administrator">[email protected]</prop>
           <prop key="support">[email protected]</prop>
           <prop key="development">[email protected]</prop>
       </props>
   </property>
   <!-- results in a setSomeList(java.util.List) call -->
   <property name="someList">
       <list>
           <value>a list element followed by a reference</value>
           <ref bean="myDataSource" />
       </list>
   </property>
   <!-- results in a setSomeMap(java.util.Map) call -->
   <property name="someMap">
       <map>
           <entry key="an entry" value="just some string"/>
           <entry key="a ref" value-ref="myDataSource"/>
       </map>
   </property>
   <!-- results in a setSomeSet(java.util.Set) call -->
   <property name="someSet">
       <set>
           <value>just some string</value>
           <ref bean="myDataSource" />
       </set>
   </property>
</bean>
映射键或值或集合值的值也可以是以下元素中的任何一个:
bean | ref | idref | list | set | map | props | value | null
(6)null 值和空字符串
Spring 将属性的空参数等作为空字符串处理,以下基于 xml 的配置元数据片段将' email '属性设置为空字符("")。
<bean class="ExampleBean">
   <property name="email" value=""/>
</bean>
上面的例子等价于下面的 Java 代码:
exampleBean.setEmail("");
<null/> 元素处理 null 值。 下面的例子显示了一个示例:
<bean class="ExampleBean">
   <property name="email">
       <null/>
   </property>
</bean>
上述配置相当于以下 Java 代码:
exampleBean.setEmail(null);
(7)带有 p 命名空间的 XML 配置方式
p-名称空间允许您使用bean 元素的属性(而不是嵌套的 <property/> 元素)来描述协作 bean 的属性值,或者两者都使用。说的简单一点就是另外一种写法。
下面的示例显示了两个 XML 片段(第一个使用标准 XML 格式,第二个使用 p-名称空间),它们解析相同的结果:
<beans xmlns="http://www.springframework.org/schema/beans"
   xmlns:xsi="http://www.w3.org/2001/XMLSchema-instance"
   xmlns:p="http://www.springframework.org/schema/p"
   xsi:schemaLocation="http://www.springframework.org/schema/beans
       https://www.springframework.org/schema/beans/spring-beans.xsd">

   <bean name="classic" class="com.example.ExampleBean">
       <property name="email" value="[email protected]"/>
   </bean>

   <bean name="p-namespace" class="com.example.ExampleBean"
       p:email="[email protected]"/>
</beans>
下一个例子包括另外两个 beanDefinition,它们都引用了另一个 bean:
<beans xmlns="http://www.springframework.org/schema/beans"
   xmlns:xsi="http://www.w3.org/2001/XMLSchema-instance"
   xmlns:p="http://www.springframework.org/schema/p"
   xsi:schemaLocation="http://www.springframework.org/schema/beans
       https://www.springframework.org/schema/beans/spring-beans.xsd">

   <bean name="john-classic" class="com.example.Person">
       <property name="name" value="John Doe"/>
       <property name="spouse" ref="jane"/>
   </bean>

   <bean name="john-modern"
       class="com.example.Person"
       p:name="John Doe"
       <!--p命名空间支持这样定义的bean的引用-->
       p:spouse-ref="jane"/>

   <bean name="jane" class="com.example.Person">
       <property name="name" value="Jane Doe"/>
   </bean>
</beans>
我们建议您仔细选择方法,并将其告知您的团队成员,用以形成规范的统一的 XML 文档。
(8)带有 c 命名空间的 XML 快捷方式
与带有 p-名称空间的 XML 配置方式类似,在 Spring 3.1 中引入的c-名称空间允许内联属性来配置构造函数参数,而不是嵌套的 constructor-arg 元素。
下面的例子使用了c: 命名空间来完成与基于构造器的依赖注入:
<beans xmlns="http://www.springframework.org/schema/beans"
   xmlns:xsi="http://www.w3.org/2001/XMLSchema-instance"
   xmlns:c="http://www.springframework.org/schema/c"
   xsi:schemaLocation="http://www.springframework.org/schema/beans
       https://www.springframework.org/schema/beans/spring-beans.xsd">

   <bean id="beanTwo" class="x.y.ThingTwo"/>
   <bean id="beanThree" class="x.y.ThingThree"/>

   <!-- traditional declaration with optional argument names -->
   <bean id="beanOne" class="x.y.ThingOne">
       <constructor-arg name="thingTwo" ref="beanTwo"/>
       <constructor-arg name="thingThree" ref="beanThree"/>
       <constructor-arg name="email" value="[email protected]"/>
   </bean>

   <!-- c-namespace declaration with argument names -->
   <bean id="beanOne" class="x.y.ThingOne" c:thingTwo-ref="beanTwo"
       c:thingThree-ref="beanThree" c:email="[email protected]"/>

</beans>
c: 命名空间通过名称设置构造函数参数。 类似地,它需要在 XML 文件中声明对应的命名空间。
对于构造函数参数名不可用的罕见情况(通常是在没有调试信息的情况下编译字节码),可以使用回退参数索引,如下所示:
<!-- c-namespace index declaration -->
<bean id="beanOne" class="x.y.ThingOne" c:_0-ref="beanTwo" c:_1-ref="beanThree"
   c:_2="[email protected]"/>
由于 XML 语法的原因,索引表示法要求出现前导 '_' ,因为 XML 属性名不能以数字开头(尽管一些 ide 允许它)。 对于 <constructor-arg> 元素也有相应的索引表示法,但不常用,因为一般的声明顺序就足够了。
实际上,构造函数解析机制在匹配参数方面非常有效,所以除非真的需要,否则我们建议在整个配置中使用名称表示法。
(9)复合属性名
当您设置 bean 属性时,您可以使用复合或嵌套属性名,只要路径的所有组件(除了最终属性名)不为 'null'。 考虑以下 beanDefinition:
<bean id="something" class="things.ThingOne">
   <property name="fred.bob.sammy" value="123" />
</bean>
something bean 有一个 fred 属性,fred 属性有一个 bob 属性,bob 属性有一个 sammy '属性,最后的 sammy 属性的值被设置为'123'。 为了使其工作,在构造 bean 之后,something 的 'fred' 属性和 'fred' 的 'bob' 属性不能为 'null'。 否则,抛出一个 NullPointerException。
(10)延迟初始化的 Bean
默认情况下, ApplicationContext 实现会作为初始化过程的一部分,会在容器初始化的时候急切地创建和配置所有 singleton bean 。 通常,这种预实例化是可取的,因为配置或周围环境中的错误可以被立马发现,而不是几个小时甚至几天之后(调用一个方法,创建一个实例的时候等)。 当这种行为不可取时,您可以通过将 beanDefinition 标记为惰性初始化来防止单例 bean 的预实例化。 延迟初始化的 bean 告诉 IoC 容器在第一次请求时创建 bean 实例,而不是在启动时。
在 XML 中,这种行为是由 <bean/> 元素上的 lazy-init 属性控制的,如下面的示例所示:
<bean id="lazy" class="com.something.ExpensiveToCreateBean" lazy-init="true"/>
<bean name="not.lazy" class="com.something.AnotherBean"/>
然而,当一个延迟初始化的 bean是一个没有延迟初始化的单例 bean 的依赖时,ApplicationContext 会在启动时创建这个延迟初始化的 bean,因为它必须满足单例 bean 的依赖, 延迟初始化的 bean 会被注入到没有延迟初始化的其他单例 bean 中。
你也可以在容器级通过在 <beans/> 元素上使用 “default-lazy-init” 属性来控制延迟初始化,如下面的例子所示:
<beans default-lazy-init="true">
   <!-- no beans will be pre-instantiated... -->
</beans>
5、自动装配
Spring 容器可以自动装配协作 bean 之间的关系。 自动装配具有以下优点:
- 自动装配可以显著减少指定属性或构造函数参数的需要。
- 自动装配可以随着对象的发展更新配置。 例如,如果您需要向类添加依赖项,则无需修改配置即可自动满足该依赖项。
当使用基于 xml 的配置元数据时,您可以使用 <bean/> 元素的 autowire 属性为 beanDefinition 指定自动装配模式。 自动装配功能有四种模式。 您可以指定每个 bean 的自动装配,从而可以选择要自动装配哪些 bean,自动装配的四种模式如下表所示:
| 运行方式 | 解释 |
|---|---|
no | (默认)没有自动装配。 Bean 引用必须由 ref 元素定义。 对于较大的部署,不建议更改默认设置,因为明确指定协作者可以提供更大的控制和清晰度。 在某种程度上,它记录了系统的结构。 |
byName | 通过属性名自动装配。 Spring 寻找与需要自动连接的属性同名的 bean。 例如,如果一个 beanDefinition 被设置为按名称自动装配,并且它包含一个“master”属性(也就是说,它有一个 “setMaster(..)” 方法),Spring 会寻找一个名为“master”的 beanDefinition 并使用它来设置属性。 |
byType | 如果容器中恰好有一个属性类型的 bean,则允许自动连接属性。 如果存在多个,则抛出异常,这表明您不能对该 bean 使用 'byType' 自动装配。 如果没有匹配的 bean,则不会发生任何事情(没有设置属性)。 |
constructor | 类似于 'byType',但适用于构造函数参数。 如果容器中没有一个构造函数参数类型的 bean,则会引发致命错误。 |
通过 'byType' 或 'constructor' 自动装配模式,您可以连接数组和类型化集合。 在这种情况下,容器中所有匹配预期类型的自动装配候选对象都将被提供以满足依赖关系。其中,自动连接的 “Map” 实例的值包含所有与期望类型匹配的 bean 实例,而 “Map” 实例的键包含相应的 bean 名称。
从自动装配中排除 Bean
在每个 bean 的基础上,您可以将一个 bean 排除在自动装配之外。 在 Spring 的 XML 格式中,将 <bean/> 元素的 autowire-candidate 属性设置为 'false'。
“autowire-candidate” 属性被设计成只影响 基于类型 的自动装配。 它不会影响按名称的显式引用,即使指定的 bean 没有被标记为自动连接候选对象,也会解析该引用。 因此,如果名称匹配,按名称自动装配仍然会注入一个 bean。
您还可以根据 bean 名称的模式匹配来限制自动装配候选对象。 顶级元素 <beans/> 在其 default-autowire-candidates 属性中接受一个或多个匹配规则。 例如,要将自动装配候选状态限制为名称以 'Repository' 结尾的任何 bean,可以提供 *Repository 值。 要提供多个规则,请在逗号分隔的列表中定义它们。 beanDefinition 的 autowire-candidate 属性的值“true”或“false”总是优先。 对于这样的 bean,模式匹配规则不适用。
这些技术对于那些永远不想通过自动装配将其注入到其他 bean 中的 bean非常有用。 但这并不意味着被排除的 bean 本身不能通过使用自动装配来配置。
6、循环依赖
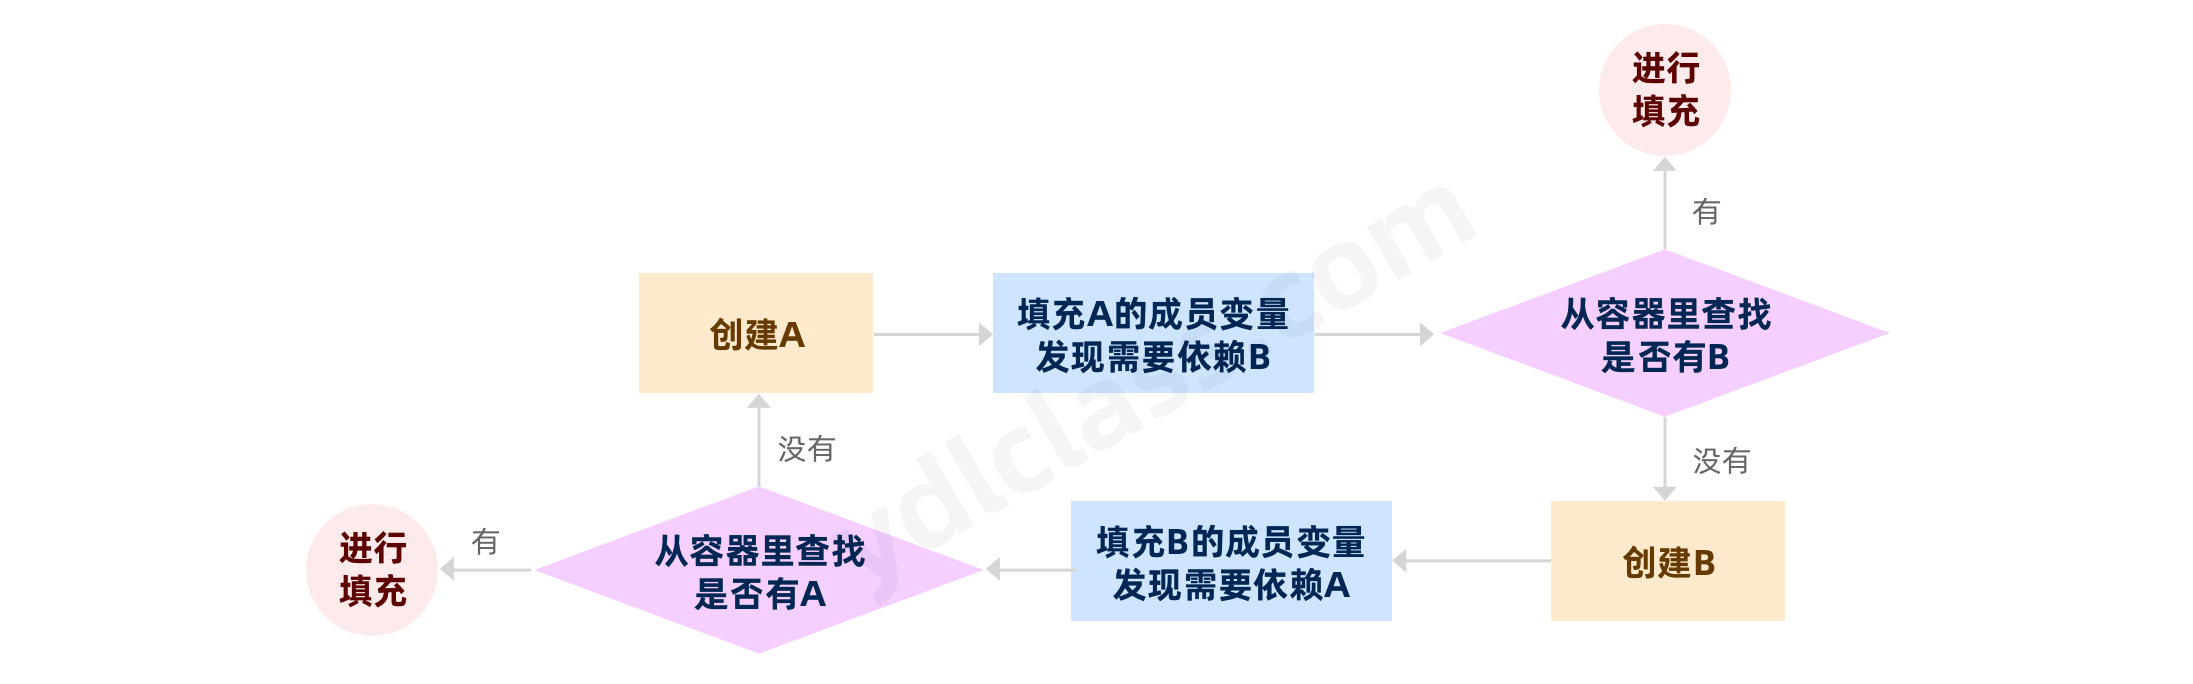
容器会按照如下方式执行 bean 依赖关系解析:
- 使用描述所有 bean 的配置元数据创建和初始化
ApplicationContext。 配置元数据可以由 XML、Java 代码或注解指定。 - 对于每个 bean,其依赖关系都以属性、构造函数参数或静态工厂方法参数的形式表示。 这些依赖项是在实际创建 bean 时提供给 bean 的。
- 每个属性或构造函数参数的值将从其指定的格式转换为该属性或构造函数参数的实际类型。 默认情况下,Spring 可以将字符串格式提供的值转换为所有内置类型,比如 'int'、'long'、'string'、'boolean' 等等。
Spring 会在需要的时候实例化一个 bean,我们说的简单一点,Spring 创建 A 对象,创建后会注入一个依赖项 B,注入时发现依赖的 bean 不存在,于是就开始创建依赖的 B 对象,这是一个典型的控制翻转,循环依赖的问题就是实例化 B 时发现,B 竟然依赖 A,这是两个对象的互相依赖,组成了一个圆环,循环依赖可能是三个或是更多对象组成。
使用 setter 注入的循环依赖是可以解决的,通常是采用三级缓存的方式。
-----循环依赖的问题
但如果主要使用构造函数注入,可能会创建不可解析的循环依赖场景。
七、Bean 作用范围(作用域)
当您创建一个 beanDefinition 时,其实是在为这个 bean 的定义创建描述它的元数据。 beanDefinition 是元数据的想法很重要,因为这意味着,与类一样,您可以从一份元数据中创建许多对象实例。
您不仅可以控制 beanDefinition 的对象中的各种依赖项和配置值,还可以控制从特定的 bean 的定义中创建的对象的作用范围。 这种方法功能强大且灵活,因为您可以通过配置,选择创建的对象的作用范围,而不必在 Java 类级别上确定对象的作用范围。 Spring 框架支持六个作用域,其中四个只有在你使用 web 感知的 ApplicationContext 时才可用:
下表描述了支持的范围:
| scope | 描述 |
|---|---|
| singleton | 每个 bean 在 ioc 容器中都是独一无二的单例形式。 |
| prototype | 将单个 beanDefinition 定义为,spring 容器可以实例化任意数量的对象实例。 |
| request | 将单个 beanDefinition 限定为单个 HTTP 请求的生命周期。 也就是说,每个 HTTP 请求都有自己的 bean 实例,它是在单个 beanDefinition 的后面创建的。 仅在 web 环境中的 Spring ApplicationContext 的上下文中有效。 |
| session | 将单个 beanDefinition 定义为 HTTP Session 的生命周期。 仅在 web 环境中的 Spring ApplicationContext 的上下文中有效。 |
| application | 将单个 beanDefinition 定义为 ServletContext 的生命周期。 仅在 web 环境中的 Spring ApplicationContext 的上下文中有效。 |
| websocket | 将单个 beanDefinition 作用域定义为 WebSocket 的生命周期。 仅在 web 环境中的 Spring ApplicationContext 的上下文中有效。 |
1、单例的作用域
容器只管理一个 bean 的共享实例,所有对具有一个或多个标识符的 bean 的请求都将导致 Spring 容器返回一个特定唯一的 bean 实例。
换句话说,当您定义一个 beanDefinition 并且它的作用域为单例时,Spring IoC 容器会创建由该 beanDefinition 定义的对象的一个实例。 这个实例对象会存储单例 bean 的缓存中,对该命名 bean 的所有后续请求和引用都会返回缓存的对象。 下面的图片展示了单例作用域是如何工作的:
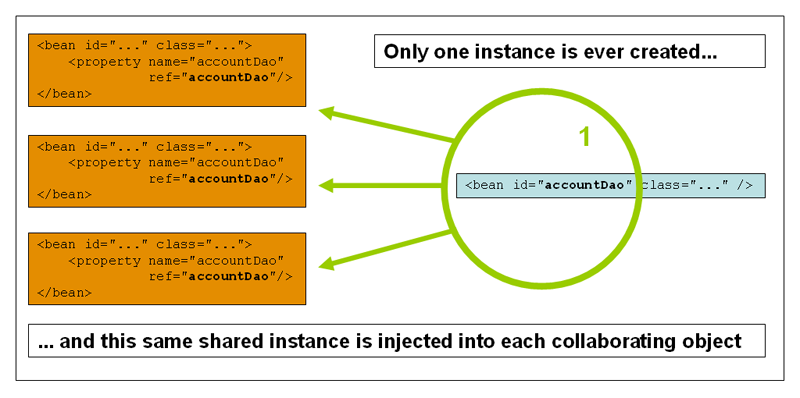
Spring 的单例 bean 概念不同于设计模式书中定义的单例模式。 单例设计模式对对象的作用域进行硬编码,使得每个 ClassLoader 只创建一个特定类的实例。 Spring 单例的作用域最好描述为每个容器和每个 bean,这并不影响我们手动创建更多个实例。 单例作用域是 Spring 中的默认作用域。 要在 XML 中将 beanDefinition 为单例,可以定义如下示例所示的 bean:
<bean id="accountService" class="com.something.DefaultAccountService"/>

<!-- the following is equivalent, though redundant (singleton scope is the default) -->
<bean id="accountService" class="com.something.DefaultAccountService" scope="singleton"/>
2、原型作用域
非单例原型作用域导致每次对特定 bean 发出请求时都要创建一个新的 bean 实例。 也就是说,该 bean 被注入到另一个 bean 中,或者您通过容器上的 getBean()方法调用请求它,都会创建一个新的 bean。 作为一条规则,您应该对所有有状态 bean使用原型作用域,对无状态 bean使用单例作用域。
下图说明了 Spring 原型的作用域:
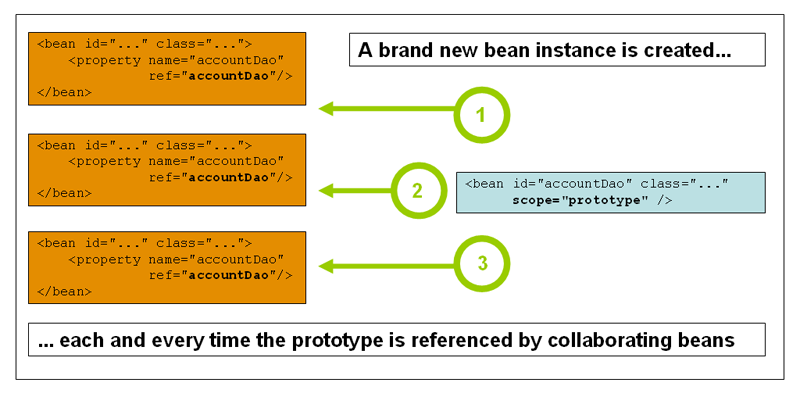
下面的示例用 XML 将 beanDefinition 为原型:
<bean id="accountService" class="com.something.DefaultAccountService" scope="prototype"/>
与其他作用域相比,Spring 并不管理原型 bean 的完整生命周期。 容器实例化、配置和组装一个原型对象,并将其传递给客户端,而不需要进一步记录该原型实例,不会缓存,不会管理他的后续生命周期。 因此,尽管初始化生命周期回调方法在所有对象上都被调用但在原型的情况下,配置的销毁生命周期回调不会被调用(这个小知识下个小节讲)。
在某些方面,Spring 容器在原型作用域 bean 中的角色是 Java new 操作符的替代。 超过这一点的所有生命周期管理都必须由客户端处理。
3、会话、应用和 WebSocket 作用域
request , session , application 和 websocket 作用域只有在你使用 web 项目中的 Spring ApplicationContext 实现(如 XmlWebApplicationContext)时才可用。 如果您将这些作用域与常规 Spring IoC 容器一起使用,例如“ClassPathXmlApplicationContext”,则会抛出一个“IllegalStateException”,该异常会告知一个未知的 bean 作用域。
4、自定义范围
bean 作用域机制是可扩展的,您可以定义自己的作用域,甚至可以重新定义现有的作用域,尽管后者被认为是不好的做法,而且您不能覆盖内置的 'singleton' 和 'prototype' 作用域。
八、更多 bean 的特性
Spring 框架提供了许多接口,您可以使用这些接口自定义 bean 的性质。将它们归类如下:
- 生命周期回调
ApplicationContextAware和BeanNameAware- 其他 rAware 接口
1、生命周期回调
初始化回调
org.springframework.beans.factory.InitializingBean 的接口允许 bean 在容器设置了 bean 上的所有必要属性之后执行初始化工作。 InitializingBean 接口指定了一个方法:
void afterPropertiesSet() throws Exception;
我们建议您不要使用 InitializingBean 接口,因为这将你的代码与 Spring 的代码耦合在一起。 我们更推荐使用 @PostConstruct 注解或指定 POJO 初始化方法。
在基于 xml 的配置元数据的情况下,您可以使用 init-method 属性指定具有 void 无参数签名的方法的名称。 在 Java 配置中,您可以使用 @Bean 的 initMethod 属性。可以看看下面的例子:
<bean id="exampleInitBean" class="examples.ExampleBean" init-method="init"/>
public class ExampleBean {

   public void init() {
       // do some initialization work
   }
}
前面的示例几乎与下面的示例(包含两个例子)具有完全相同的效果:
<bean id="exampleInitBean" class="examples.AnotherExampleBean"/>
public class AnotherExampleBean implements InitializingBean {

   @Override
   public void afterPropertiesSet() {
       // do some initialization work
   }
}
然而,前面两个示例中的第一个并没有将代码与 Spring 耦合起来。
2、销毁回调
实现 org.springframework.beans.factory.DisposableBean 接口可以让 bean 在管理它的容器被销毁时获得回调。 'DisposableBean' 接口指定了一个方法:
void destroy() throws Exception;
同样,我们并不建议您使用 DisposableBean 回调接口,因为我们没有必要将自己的代码与 Spring 耦合在一起。 另外,我们建议使用 @PreDestroy 注解或指定 beanDefinition 支持的销毁方法。 对于基于 xml 的配置元数据,您可以在 <bean/> 上使用' destroy-method '属性。 在 Java 配置中,您可以使用 @Bean 的 destroyMethod 属性。如下所示:
<bean id="exampleInitBean" class="examples.ExampleBean" destroy-method="cleanup"/>
public class ExampleBean {

   public void cleanup() {
       // do some destruction work (like releasing pooled connections)
   }
}
前面的定义与下面的定义几乎完全相同:
<bean id="exampleInitBean" class="examples.AnotherExampleBean"/>
public class AnotherExampleBean implements DisposableBean {

   @Override
   public void destroy() {
       // do some destruction work (like releasing pooled connections)
   }
}
3、默认初始化和销毁方法
当我们不使用 spring 特有的 InitializingBean 和 disapablebean 回调接口进行初始化和销毁时,我们通常会编写名为 init() 、 initialize() 、 dispose() 等的方法。 理想情况下,这种生命周期回调方法的名称在项目中应该是标准化的(项目经理规定了都必须这么写),以便所有开发人员使用相同的方法名称,并确保一致性。
您可以配置统一的 bean 的初始化和销毁方法。 这意味着,作为应用程序开发人员,您可以仅仅声明一个名为 init() 的初始化方法即可,而不必为每个 beanDefinition 配置一个 init-method="init" 属性。
假设你的初始化回调方法名为 init(),你的 destroy 回调方法名为 destroy()。 你的类就像下面这个例子中的类:
public class DefaultBlogService implements BlogService {

   private BlogDao blogDao;

   public void setBlogDao(BlogDao blogDao) {
       this.blogDao = blogDao;
   }

   // this is (unsurprisingly) the initialization callback method
   public void init() {
       if (this.blogDao == null) {
           throw new IllegalStateException("The [blogDao] property must be set.");
       }
   }
}
然后,您可以在 bean 中使用该类,类似如下:
<beans default-init-method="init">

   <bean id="blogService" class="com.something.DefaultBlogService">
       <property name="blogDao" ref="blogDao" />
   </bean>

</beans>
顶层 <beans/> 元素属性上的 default-init-method 属性导致 Spring IoC 容器将 bean 类上的一个名为 init 的方法识别为初始化方法回调。 在创建和组装 bean 时,如果 bean 类有这样的方法,就会在适当的时候调用它。
如果现有的 bean 类已经有按约定命名的回调方法,那么您可以通过使用 <bean/> 本身的 init-method 和 destroy-method 属性指定对应方法来覆盖默认值。
4、总结
从 Spring 2.5 开始,你有三个选项来控制 bean 的生命周期行为:
- InitializingBean 和 DisposableBean 和 DisposableBean 回调接口
- 自定义
init()和destroy()方法 @PostConstruct和@PreDestroy您可以组合这些机制来控制给定的 bean。
为同一个 bean 配置的多个生命周期机制(具有不同的初始化方法),调用顺序如下:
- 用
@PostConstruct注解的方法 afterPropertiesSet()由 InitializingBean 回调接口- 自定义配置的
init()方法
Destroy 方法的调用顺序相同:
- 用
@PreDestroy注解的方法 destroy()由 DisposableBean 回调接口定义- 自定义配置的
destroy()方法
5、ApplicationContextAware 和 BeanNameAware
下面显示了 ApplicationContextAware 接口的定义:
public interface ApplicationContextAware {

 void setApplicationContext(ApplicationContext applicationContext) throws BeansException;
}
因此,bean 可以通过 ApplicationContextAware 接口,以编程方式操作创建它们的 ApplicationContext 。 其中一个用途是对其他 bean 进行编程检索, 有时这种能力是有用的。 但是,一般来说,您应该避免使用它,因为它将代码与 Spring 耦合在一起,而不遵循控制反转(Inversion of Control)风格,在这种风格中,协作者作为属性提供给 bean。 ApplicationContext 的其他方法提供了对文件资源的访问、发布应用程序事件和访问 MessageSource。
当 ApplicationContext 创建一个实现了 BeanNameAware 接口的类时。 他提供了对其关联对象定义中定义的名称的引用。 下面的例子显示了 BeanNameAware 接口的定义:
public interface BeanNameAware {

   void setBeanName(String name) throws BeansException;
}
回调在填充普通 bean 属性之后,但在初始化回调(如 InitializingBean.afterPropertiesSet() 或自定义初始化方法之前调用。
总结:实现了 aware 相关的接口,ioc 容器不在遵循 ioc 风格,意思就是不在遵循按需初始化并注入依赖,而是在统一的地方统一注入,这个在源码中有所体现,后边的内容会涉及。
6、Other Aware Interfaces
除了 “ApplicationContextAware” 和 “BeanNameAware”,spring 提供了一个广泛的 “aware” 回调接口,让 bean 指示容器,他们需要一定基础设施的依赖。 作为一般规则,名称指示了所需依赖项的类型。 下表总结了一些最重要的 “Aware” 接口:
| 命名 | 依赖注入 |
|---|---|
| ApplicationContextAware | 将 ApplicationContext 注入 bean 当中 |
| ApplicationEventPublisherAware | 将 ApplicationEventPublisherAware 注入 bean 当中 |
| BeanClassLoaderAware | 将类加载器用于装入 bean 类 |
| BeanFactoryAware | 将 BeanFactory 注入 bean 当中 |
| BeanNameAware | 将 bean 的名称注入 bean 中 |
| ResourceLoaderAware | 配置了用于访问资源的加载器 |
| ServletConfigAware | 当前的 'ServletConfig' 容器运行。 仅在 web 感知的 Spring 'ApplicationContext' 中有效。 |
| ServletContextAware | 当前运行容器的 “ServletContext”。 仅在 web 感知的 Spring 'ApplicationContext'中有效。 |
再次注意,使用这些接口将您的代码与 Spring API 绑定在一起,而不是遵循控制反转风格。 因此,我们将它们推荐给需要对容器进行编程访问的基础架构 bean。
7、Bean 的继承
bean 的定义可以包含大量配置信息,包括构造函数参数、属性值和特定于容器的信息,比如初始化方法、静态工厂方法名,等等。 子 beanDefinition 可以从父 beanDefinition 继承配置数据。 子 beanDefinition 可以根据需要覆盖一些值或添加其他值。 使用父 beanDefinition 和子 beanDefinition 可以节省大量输入。 实际上,这是模板的一种形式。
当您使用基于 xml 的配置元数据时,您可以通过使用“parent”属性来指示子 beanDefinition,下面的例子展示了如何做到这一点:
<bean id="inheritedTestBean" abstract="true"
       class="org.springframework.beans.TestBean">
   <property name="name" value="parent"/>
   <property name="age" value="1"/>
</bean>

<bean id="inheritsWithDifferentClass"
       class="org.springframework.beans.DerivedTestBean"
       parent="inheritedTestBean" init-method="initialize">
   <property name="name" value="override"/>
   <!-- the age property value of 1 will be inherited from parent -->
</bean>
如果没有指定,子 beanDefinition 将使用来自父 beanDefinition 的 bean 类,但也可以覆盖它。 在后一种情况下,子 bean 类必须与父 bean 兼容(也就是说,它必须接受父 bean 的属性值)。
子 beanDefinition 从父 bean 继承范围、构造函数参数值、属性值和方法覆盖,并可选择添加新值。 您指定的任何 scope、初始化方法、销毁方法或“静态”工厂方法设置都会覆盖相应的父方法设置。
其余的设置总是取自子定义:依赖、自动装配模式、依赖项检查、单例和延迟初始化。
前面的示例通过使用 abstract 属性显式地将父 beanDefinition 标记为抽象。 如果父 beanDefinition 没有指定类,则需要显式地将父 beanDefinition 标记为抽象,如下例所示:
<bean id="inheritedTestBeanWithoutClass" abstract="true">
   <property name="name" value="parent"/>
   <property name="age" value="1"/>
</bean>

<bean id="inheritsWithClass" class="org.springframework.beans.DerivedTestBean"
       parent="inheritedTestBeanWithoutClass" init-method="initialize">
   <property name="name" value="override"/>
   <!-- age will inherit the value of 1 from the parent bean definition-->
</bean>
父 bean 不能单独实例化,因为它是不完整的,而且它也显式地被标记为“抽象”。 当定义是抽象的时,它只能作为作为一个父 beanDefinition 的纯模板 beanDefinition 使用。 试图单独使用这样一个抽象的父 bean,通过将其作为另一个 bean 的 ref 属性引用,或使用父 bean ID 执行显式的 getBean() 调用,将返回错误。 类似地,容器内部的 preinstantiatesingleton() 方法会忽略定义为抽象的 beanDefinition。
九、基于注解的容器配置
在配置 Spring 时,注解比 XML 更好吗?
引入基于注解的配置提出了这样一个问题:这种方法是否比 XML “更好”, 简短的回答是“视情况而定”。 长期的答案是,每种方法都有其优点和缺点。通常,由开发人员决定哪种策略更适合他们。 由于注解在其声明中提供了大量上下文,从而导致配置更简短、更简洁。 然而,XML 擅长连接组件,而无需修改它们的源代码或重新编译它们。 一些开发人员更喜欢接近源代码进行连接,而另一些开发人员则认为带注解的类不再是 pojo,而且配置变得分散且更难控制。
使用注解配置,我们需要开启以下的配置:
<?xml version="1.0" encoding="UTF-8"?>
<beans xmlns="http://www.springframework.org/schema/beans"
   xmlns:xsi="http://www.w3.org/2001/XMLSchema-instance"
   xmlns:context="http://www.springframework.org/schema/context"
   xsi:schemaLocation="http://www.springframework.org/schema/beans
       https://www.springframework.org/schema/beans/spring-beans.xsd
       http://www.springframework.org/schema/context
       https://www.springframework.org/schema/context/spring-context.xsd">

   <context:annotation-config/>

</beans>
1、使用 @Autowired
作用就是自动装配,有 byType 的语义。你可以将@Autowired 注解应用到构造函数中,如下面的例子所示:
public class MovieRecommender {

   private final CustomerPreferenceDao customerPreferenceDao;

   @Autowired
   public MovieRecommender(CustomerPreferenceDao customerPreferenceDao) {
       this.customerPreferenceDao = customerPreferenceDao;
   }

   // ...
}
注意:从 Spring Framework 4.3 开始,如果目标 bean 只定义了一个构造函数,就不再需要在这样的构造函数上添加 @Autowired 注解。 然而,如果有几个构造函数可用,并且没有主/默认构造函数,那么至少其中一个构造函数必须用 @Autowired 注解,以便告诉容器使用哪个构造函数。
你也可以将 @Autowired 注解应用到传统的 setter 方法,如下面的例子所示:
public class SimpleMovieLister {

   private MovieFinder movieFinder;

   @Autowired
   public void setMovieFinder(MovieFinder movieFinder) {
       this.movieFinder = movieFinder;
   }

   // ...
}
你还可以将注解应用到具有任意名称和多个参数的方法,如下面的示例所示:
public class MovieRecommender {

   private MovieCatalog movieCatalog;

   private CustomerPreferenceDao customerPreferenceDao;

   @Autowired
   public void prepare(MovieCatalog movieCatalog,
           CustomerPreferenceDao customerPreferenceDao) {
       this.movieCatalog = movieCatalog;
       this.customerPreferenceDao = customerPreferenceDao;
   }

   // ...
}
用的最多的但 spring 官方并不推荐的方法是,你也可以将 @Autowired 应用到字段上,甚至可以将它与构造函数混合使用,如下面的示例所示:
public class MovieRecommender {

   private final CustomerPreferenceDao customerPreferenceDao;

   @Autowired
   private MovieCatalog movieCatalog;

   @Autowired
   public MovieRecommender(CustomerPreferenceDao customerPreferenceDao) {
       this.customerPreferenceDao = customerPreferenceDao;
   }

   // ...
}
你也可以通过在一个字段或方法中添加 @Autowired 注解来指示 Spring 从 ApplicationContext 中提供所有特定类型的 bean,该字段或方法需要该类型的数组,如下面的例子所示:
public class MovieRecommender {

   @Autowired
   private MovieCatalog[] movieCatalogs;

   // ...
}
这同样适用于类型化的集合,如下例所示:
public class MovieRecommender {

   private Set<MovieCatalog> movieCatalogs;

   @Autowired
   public void setMovieCatalogs(Set<MovieCatalog> movieCatalogs) {
       this.movieCatalogs = movieCatalogs;
   }

   // ...
}
即使是类型化的“Map”实例,只要期望的键类型是“String”,也可以自动连接。 映射值包含预期类型的所有 bean,键包含相应的 bean 名,如下例所示:
public class MovieRecommender {

   private Map<String, MovieCatalog> movieCatalogs;

   @Autowired
   public void setMovieCatalogs(Map<String, MovieCatalog> movieCatalogs) {
       this.movieCatalogs = movieCatalogs;
   }

   // ...
}
注意:默认情况下,当给定注入点没有可用的匹配候选 bean 时,自动装配将失败。 对于声明的数组、集合或映射,至少需要一个匹配元素。
默认行为是将带注解的方法和字段视为指示所需的依赖关系。 你可以像下面的例子一样改变这种行为,通过将一个不满足的注入点标记为非必需的(例如,通过将 @Autowired 中的' required '属性设置为' false ')来让框架跳过它:
public class SimpleMovieLister {

   private MovieFinder movieFinder;

   @Autowired(required = false)
   public void setMovieFinder(MovieFinder movieFinder) {
       this.movieFinder = movieFinder;
   }

   // ...
}
2、使用 @Primary 微调基于注解的自动装配
由于按类型自动装配可能会导致多个候选者,因此通常需要对选择过程进行更多的控制。 实现这一点的一种方法是使用 Spring 的 @Primary 注解。 @Primary 表示当多个 bean 可以作为一个依赖项的候选 bean 时,应该优先考虑某个特定 bean。 如果在候选 bean 中恰好存在一个主要的 bean,那么它将成为自动连接的值。
考虑以下配置,将 'firstMovieCatalog' 定义为主要的 'MovieCatalog':
以下内容 @Bean 是下个章节的:
@Configuration
public class MovieConfiguration {

   @Bean
   @Primary
   public MovieCatalog firstMovieCatalog() { ... }

   @Bean
   public MovieCatalog secondMovieCatalog() { ... }

   // ...
}
通过上述配置,下面的 “MovieRecommender” 将自动与 “firstMovieCatalog” 连接:
public class MovieRecommender {

   @Autowired
   private MovieCatalog movieCatalog;

   // ...
}
当然在 xml 中我们可以如下配置、相应的 beanDefinition 如下,效果是等价的:
<?xml version="1.0" encoding="UTF-8"?>
<beans xmlns="http://www.springframework.org/schema/beans"
   xmlns:xsi="http://www.w3.org/2001/XMLSchema-instance"
   xmlns:context="http://www.springframework.org/schema/context"
   xsi:schemaLocation="http://www.springframework.org/schema/beans
       https://www.springframework.org/schema/beans/spring-beans.xsd
       http://www.springframework.org/schema/context
       https://www.springframework.org/schema/context/spring-context.xsd">

   <context:annotation-config/>

   <bean class="example.SimpleMovieCatalog" primary="true">
       <!-- inject any dependencies required by this bean -->
   </bean>

   <bean class="example.SimpleMovieCatalog">
       <!-- inject any dependencies required by this bean -->
   </bean>

   <bean id="movieRecommender" class="example.MovieRecommender"/>

</beans>
3、使用 @Qualifier 微调基于注解的自动装配
当可以确定一个主要候选时, @Primary 注解可以轻松完成这个工作。 当您需要对选择过程进行更多控制时,可以使用 Spring 的 @Qualifier 注解。 您可以将限定符值与特定的参数关联起来,从而缩小类型匹配的集合,以便为每个参数选择特定的 bean。 在最简单的情况下,这可以是一个简单的描述性值,如下例所示:
public class MovieRecommender {

   @Autowired
   @Qualifier("main")
   private MovieCatalog movieCatalog;

   // ...
}
您还可以在单个构造函数参数或方法参数上指定 @Qualifier 注解,如下面的示例所示:
public class MovieRecommender {

   private MovieCatalog movieCatalog;

   private CustomerPreferenceDao customerPreferenceDao;

   @Autowired
   public void prepare(@Qualifier("main") MovieCatalog movieCatalog,
           CustomerPreferenceDao customerPreferenceDao) {
       this.movieCatalog = movieCatalog;
       this.customerPreferenceDao = customerPreferenceDao;
   }

   // ...
}
下面的示例显示了相应的 beanDefinition:
<?xml version="1.0" encoding="UTF-8"?>
<beans xmlns="http://www.springframework.org/schema/beans"
   xmlns:xsi="http://www.w3.org/2001/XMLSchema-instance"
   xmlns:context="http://www.springframework.org/schema/context"
   xsi:schemaLocation="http://www.springframework.org/schema/beans
       https://www.springframework.org/schema/beans/spring-beans.xsd
       http://www.springframework.org/schema/context
       https://www.springframework.org/schema/context/spring-context.xsd">

   <context:annotation-config/>

   <bean class="example.SimpleMovieCatalog">
       <qualifier value="main"/>

       <!-- inject any dependencies required by this bean -->
   </bean>

   <bean class="example.SimpleMovieCatalog">
       <qualifier value="action"/>

       <!-- inject any dependencies required by this bean -->
   </bean>

   <bean id="movieRecommender" class="example.MovieRecommender"/>

</beans>
注意:除了使用 qualifier 标签决定,其实 @Qualifier 可以使用 id,name 等属性定义的任何标识符。
其实,如果您打算按名称标识符完成的注入,那么就可以不使用 @Autowired ,即使它能够在类型匹配的候选对象中按 bean 名称进行选择(需要配合 @Qualifier 同时使用)。 有一个更好的选择是使用 JSR-250 的 @Resource 注解,该注解在语义上定义为通过惟一的名称标识选择特定的目标组件,声明的类型与匹配过程无关。
4、使用 @Resource
Spring 还通过在字段或 bean 属性设置方法上使用 JSR-250 的 @Resource 注解( javax.annotation.Resource )来支持注入。 这是 Java EE 中的常见模式, Spring 也支持这种模式用于 Spring 管理的对象。
@Resource 带有一个 name 属性。 默认情况下,Spring 将该值解释为要注入的 bean 名。 换句话说,它遵循 by-name 语义,如下面的示例所示:
public class SimpleMovieLister {

   private MovieFinder movieFinder;

   @Resource(name="myMovieFinder")
   public void setMovieFinder(MovieFinder movieFinder) {
       this.movieFinder = movieFinder;
   }
}
如果没有显式指定名称,则默认名称为 字段名或 setter 方法的参数名 。 对于字段,它接受字段名。 对于 setter 方法,它采用 bean 属性名。 下面的例子将把名为 movieFinder 的 bean 注入到它的 setter 方法中:
public class SimpleMovieLister {

   private MovieFinder movieFinder;

   @Resource
   public void setMovieFinder(MovieFinder movieFinder) {
       this.movieFinder = movieFinder;
   }
}
因此,在下面的示例中,'customerPreferenceDao' 字段首先查找名为 "customerPreferenceDao" 的 bean,然后按照类型 'customerPreferenceDao' 的主类型匹配:
public class MovieRecommender {

   @Resource
   private CustomerPreferenceDao customerPreferenceDao;

   @Resource
   private ApplicationContext context;

   public MovieRecommender() {
   }

   // ...
}
十、容器的启动过程
核心方法:refresh()
@Override
public void refresh() throws BeansException, IllegalStateException {
   synchronized (this.startupShutdownMonitor) {
       // 准备刷新,准备开店,检查环境,是不是适合开店,比如我选用哪个日志
       prepareRefresh();

       // 把门面租下来,获得一个bean工厂,loadBeanDefinitions(beanFactory)获取蛋糕的制作流程
       ConfigurableListableBeanFactory beanFactory = obtainFreshBeanFactory();

       // Prepare the bean factory for use in this context.
       prepareBeanFactory(beanFactory);
       // 忽略对应的自动装配
           //beanFactory.ignoreDependencyInterface(EnvironmentAware.class);

       try {
           // Allows post-processing of the bean factory in context subclasses.
           postProcessBeanFactory(beanFactory);

           // bean工厂已经基本好了,后置处理器
           invokeBeanFactoryPostProcessors(beanFactory);

           // Register bean processors that intercept bean creation.
           registerBeanPostProcessors(beanFactory);

           // Initialize message source for this context.
           initMessageSource();

           // Initialize event multicaster for this context.
           initApplicationEventMulticaster();

           // Initialize other special beans in specific context subclasses.
           onRefresh();

           // Check for listener beans and register them.
           registerListeners();

           // 初始化bean
           finishBeanFactoryInitialization(beanFactory);

           // Last step: publish corresponding event.
           finishRefresh();
       }

       catch (BeansException ex) {
           if (logger.isWarnEnabled()) {
               logger.warn("Exception encountered during context initialization - " +
                           "cancelling refresh attempt: " + ex);
           }

           // Destroy already created singletons to avoid dangling resources.
           destroyBeans();

           // Reset 'active' flag.
           cancelRefresh(ex);

           // Propagate exception to caller.
           throw ex;
       }

       finally {
           // Reset common introspection caches in Spring's core, since we
           // might not ever need metadata for singleton beans anymore...
           resetCommonCaches();
       }
   }
}
// 已经完成了创建和属性填充给你的工作
protected Object initializeBean(String beanName, Object bean, @Nullable RootBeanDefinition mbd) {
 if (System.getSecurityManager() != null) {
  AccessController.doPrivileged((PrivilegedAction<Object>) () -> {
   invokeAwareMethods(beanName, bean);
   return null;
  }, getAccessControlContext());
 }
 else {
 // 1、调用实现的aware接口
          invokeAwareMethods(beanName, bean);
 }

 Object wrappedBean = bean;
 if (mbd == null || !mbd.isSynthetic()) {
           // 调用beanpostproccessor的BeforeInitialization方法
  wrappedBean = applyBeanPostProcessorsBeforeInitialization(wrappedBean, beanName);
 }

 try {
           // 调用初始化方法在这里
  invokeInitMethods(beanName, wrappedBean, mbd);
 }
 catch (Throwable ex) {
  throw new BeanCreationException(
    (mbd != null ? mbd.getResourceDescription() : null),
    beanName, "Invocation of init method failed", ex);
 }
 if (mbd == null || !mbd.isSynthetic()) {
           // 调用beanpostproccessor的AfterInitialization
  wrappedBean = applyBeanPostProcessorsAfterInitialization(wrappedBean, beanName);
 }

 return wrappedBean;
}
1、初始化 Spring 容器
这个阶段相当于考察一下地理环境怎么样
prepareRefresh():做一些准备阶段做的是:标记容器为 active 状态,以及检查当前的运行环境,比如使用 log4j,还是 jdklog 等。
2、获得一个新的容器
这个阶段相当于租一个门面,同时准备好产品的制作流程
ConfigurableListableBeanFactory beanFactory = obtainFreshBeanFactory();
如果有旧的容器,那么清空容器和容器中注册了的 bean,创建新的容器 DefaultListableBeanFactory。
protected final void refreshBeanFactory() throws BeansException {
 if (hasBeanFactory()) {
  destroyBeans();
  closeBeanFactory();
 }
 try {
  DefaultListableBeanFactory beanFactory = createBeanFactory();
  beanFactory.setSerializationId(getId());
  customizeBeanFactory(beanFactory);
  loadBeanDefinitions(beanFactory);
  this.beanFactory = beanFactory;
 }
 catch (IOException ex) {
  throw new ApplicationContextException("I/O error parsing bean definition source for " + getDisplayName(), ex);
 }
}
3、bean 工厂的准备阶段
相当于做一些基础装修,比如设备的采购
prepareBeanFactory(beanFactory);
设置一些处理器
tandardBeanExpressionResolver
ResourceEditorRegistrar
4、调用所有的 BeanFactory 后置处理器
这是留给我们进行扩展的,同事 spring 在也有很多的扩展实现。
执行
// Invoke factory processors registered as beans in the context.
invokeBeanFactoryPostProcessors(beanFactory);
5、注册 BeanPostProcessors
6、完成 bean 的创建
beanFactory.preInstantiateSingletons();
在创建 bean 的过程中,会执行如下流程:
(1)创建 bean
(3)执行 BeanPostProcessors
postProcessBeforeInitialization();
(4)执行配置的初始化方法
(5)执行 BeanPostProcessors
postProcessAfterInitialization
protected Object initializeBean(String beanName, Object bean, @Nullable RootBeanDefinition mbd) {
  if (System.getSecurityManager() != null) {
     AccessController.doPrivileged((PrivilegedAction<Object>) () -> {
        invokeAwareMethods(beanName, bean);
        return null;
     }, getAccessControlContext());
  }
  else {
     invokeAwareMethods(beanName, bean);
  }

  Object wrappedBean = bean;
  if (mbd == null || !mbd.isSynthetic()) {
     wrappedBean = applyBeanPostProcessorsBeforeInitialization(wrappedBean, beanName);
  }

  try {
     invokeInitMethods(beanName, wrappedBean, mbd);
  }
  catch (Throwable ex) {
     throw new BeanCreationException(
           (mbd != null ? mbd.getResourceDescription() : null),
           beanName, "Invocation of init method failed", ex);
  }
  if (mbd == null || !mbd.isSynthetic()) {
     wrappedBean = applyBeanPostProcessorsAfterInitialization(wrappedBean, beanName);
  }
  return wrappedBean;
}
一些重要的 BeanFactory 后置处理器
BeanFactoryPostProcessor:BeanFactory 后置处理器ConfigurationClassPostProcessor:解析配置类的 BeanFactory 后置处理器
一些重要的 BeanFactory
InstantiationAwareBeanPostProcessor:Bean 实例化前后运行的后置处理器,还负责设置属性值populateBean()AutowiredAnnotationBeanPostProcessor:对注解@Autowired的实现CommonAnnotationBeanPostProcessor:对注解@Resource的实现InitDestroyAnnotationBeanPostProcessor:主要是实现了 Bean 的@PostConstruct和@PreDestroy方法。AnnotationAwareAspectJAutoProxyCreator:AOP 代理的后置处理器,AOP 生成代理的地方就是在后置处理器 postProcessAfterInitialization 方法中实现的。InfrastructureAdvisorAutoProxyCreator:自动代理创建器,仅考虑基础结构 Advisor Bean,而忽略任何应用程序定义的 Advisor。Spring 的事务使用的是这个后置处理器。
十一、classpath 扫描和组件管理
本章中的大多数例子都使用XML 来指定配置元数据,这些元数据在 Spring 容器启动时被扫描,每一个 bean 的元数据对应生成一个 “BeanDefinition”。
本节我们可以通过扫描类路径隐式检测候选组件。候选组件指的是通过扫描筛选并在容器中注册了相应 beanDefinition 的类。 这样就不需要使用 XML 来执行 bean 注册。 相反,您可以使用注解(例如, @Component )。
更多操作从 Spring 3.0 开始,Spring JavaConfig 项目提供的许多特性都是核心 Spring 框架的一部分。 这允许您使用 Java 而不是使用传统的 XML 文件来定义 bean。
1、@Component 和及其派生出的其他注解注解
@Component是任何 spring 管理组件的通用注解。@Repository、@Service和@Controller是@Component用于更具体用例的注解(分别在持久性、服务和表示层中)。这些注解对于我们后期对特定 bean 进行批量处理时是有帮助的。
2、自动检测类和注册 beanDefinition
Spring 可以自动检测类的信息,并将相应的 BeanDefinition 实例注册到 ApplicationContext 中。 例如,以下两个类适合这样的自动检测:
@Service
public class SimpleMovieLister {

   private MovieFinder movieFinder;

   public SimpleMovieLister(MovieFinder movieFinder) {
       this.movieFinder = movieFinder;
   }
}
@Repository
public class JpaMovieFinder implements MovieFinder {
   // implementation elided for clarity
}
要自动检测这些类并注册相应的 bean,您需要将 @ComponentScan 添加到您的 @Configuration 类中,其中 basePackages 属性是这两个类的公共父包。说人话就是:指定一个包名,自动扫描会检测这个包及其子包下的所有类信息。
@Configuration
@ComponentScan(basePackages = "org.example")
public class AppConfig  {
   // ...
}
为简单起见,前面的示例可能使用了注解的 value 属性 (即 @ComponentScan("org.example"))。
当然我们可以使用以下 XML 代替,他们是等效的:
<?xml version="1.0" encoding="UTF-8"?>
<beans xmlns="http://www.springframework.org/schema/beans"
   xmlns:xsi="http://www.w3.org/2001/XMLSchema-instance"
   xmlns:context="http://www.springframework.org/schema/context"
   xsi:schemaLocation="http://www.springframework.org/schema/beans
       https://www.springframework.org/schema/beans/spring-beans.xsd
       http://www.springframework.org/schema/context
       https://www.springframework.org/schema/context/spring-context.xsd">

   <context:component-scan base-package="org.example"/>
</beans>
注:<context:component-scan> 的使用会隐式启用 <context:annotation-config>,当使用 <context:component-scan> 时,通常不需要包含 <context:annotation-config> 元素。
3、组件命名
当组件作为扫描过程的一部分被自动检测时,它的 bean 名是由该扫描器所知道的“BeanNameGenerator”策略生成的。
默认情况下,会使用 @Component , @Repository , @Service 和 @Controller 注解的 value 值,因此将该名称会提供给相应的 beanDefination。 如果你的注解不包含任何名称属性,会有默认 bean 名称生成器将返回非首字母大写的非全限定类名。 例如,如果检测到以下组件类,则名称为 myMovieLister 和 movieFinderImp ,这个和 xml 自动生成的标识符名称不同:
@Service("myMovieLister")
public class SimpleMovieLister {
   // ...
}
@Repository
public class MovieFinderImpl implements MovieFinder {
   // ...
}
4、为自动检测组件提供 scope
与 spring 管理的组件一样,自动检测组件的默认和最常见的作用域是“单例”。 然而,有时您需要一个不同的范围,可以由 @Scope 注解指定。 您可以在注解中提供作用域的名称,如下面的示例所示:
@Scope("prototype")
@Repository
public class MovieFinderImpl implements MovieFinder {
   // ...
}
5、使用过滤器自定义扫描
默认情况下,带有 @Component 、 @Repository 、 @Service 、 @Controller 、 @Configuration 注解的类是一定能被筛选器选中并进行注册的候选组件。 但是,您可以通过应用自定义过滤器来修改和扩展此行为,自由定制筛选哪些或不包含那些组件。 将它们作为@ComponentScan 注解的 includeFilters 或 excludeFilters 属性添加(或者作为 XML 配置中 <context:include-filter /> 或 <context:exclude-filter /> 元素的子元素)。 每个筛选器元素都需要 'type' 和 'expression' 属性。 下表描述了过滤选项:
| 过滤方式 | 示例表达式 | 描述 |
|---|---|---|
| annotation (默认) | org.example.SomeAnnotation | 要在目标组件的类型级别上“存在”或“元注解存在”的注解。 |
| assignable | org.example.SomeClass | 指定要排除的 bean 的类 |
| aspectj | org.example..*Service+ | 要被目标组件匹配的 AspectJ 类型表达式,后边会学习 |
| regex | org.example.Default.* | 由目标组件的类名匹配的正则表达式 |
| custom | org.example.MyTypeFilter | ' org.springframework.core.type 的自定义实现,TypeFilter”接口。 |
下面的示例显示了忽略所有 @Repository 注解,而使用 stub 包下的类进行替换:
@Configuration
@ComponentScan(basePackages = "org.example",
       includeFilters = @Filter(type = FilterType.REGEX, pattern = ".*Stub.*Repository"),
       excludeFilters = @Filter(Repository.class))
public class AppConfig {
   // ...
}
下面的例子显示了等效的 XML:
<beans>
   <context:component-scan base-package="org.example">
       <context:include-filter type="regex"
               expression=".*Stub.*Repository"/>
       <context:exclude-filter type="annotation"
               expression="org.springframework.stereotype.Repository"/>
   </context:component-scan>
</beans>
【小知识】:您还可以通过在注解上设置 useDefaultFilters=false 或通过提供 use-default-filters="false" 作为 <component-scan/> 元素的属性来禁用默认过滤器。 这将有效地禁用使用 @Component 、 @Repository 、 @Service 、 @Controller 、 @Configuration 注解或元注解的类的自动检测。
6、在组件中定义 Bean 元数据
Spring 组件还可以向容器提供 beanDefinition 元数据。 可以使用 @Bean 注解来实现这一点。
@Component
public class FactoryMethodComponent {

   @Bean
   @Qualifier("public")
   public TestBean publicInstance() {
       return new TestBean("publicInstance");
   }

   public void doWork() {
       // Component method implementation omitted
   }
}
前面的类是一个 Spring 组件,它的 doWork() 方法中包含特定于应用程序的代码。 然而,它还提供了一个 beanDefinition,该 beanDefinition 有一个引用方法 public Instance() 的工厂方法。@Bean 注解标识工厂方法,通过 @Qualifier 注解标识一个限定符值。 其他可以指定的方法级注解有 @Scope , @Lazy 等。
下面的例子展示了如何做到这一点:
@Component
public class FactoryMethodComponent {

   private static int i;

   @Bean
   @Qualifier("public")
   public TestBean publicInstance() {
       return new TestBean("publicInstance");
   }

   // use of a custom qualifier and autowiring of method parameters
   @Bean
   protected TestBean protectedInstance(
           @Qualifier("public") TestBean spouse,
           @Value("#{privateInstance.age}") String country) {
       TestBean tb = new TestBean("protectedInstance", 1);
       tb.setSpouse(spouse);
       tb.setCountry(country);
       return tb;
   }

   @Bean
   private TestBean privateInstance() {
       return new TestBean("privateInstance", i++);
   }

}
7、基于 Java 的容器配置
(1) @Bean 和 @Configuration
Spring 新的 java 配置支持的中心组件是带注解的 @Configuration 类和带注解的 @Bean 方法。
@Bean 注解用于指示一个方法,该方法负责实例化、配置和初始化一个由 Spring IoC 容器管理的新对象。 对于那些熟悉 Spring <beans/> XML 配置的人来说,@Bean 注解扮演着与 <bean/> 元素相同的角色。 你可以在任何 Spring @Component 中使用 @Bean 注解方法。 但是,它们最常与 @Configuration 一起使用。
用@Configuration 注解的一个类表明它的主要目的是作为 beanDefinition 的源,我们通常称之为配置类。 此外, @Configuration 类允许通过调用同一类中的其他 @Bean 方法来定义 bean 间的依赖关系 。 最简单的 @Configuration 类如下所示:
@Configuration
public class AppConfig {

   @Bean
   public MyService myService() {
       return new MyServiceImpl();
   }
}
前面的' AppConfig '类等价于下面的 Spring <beans/> XML:
<beans>
   <bean id="myService" class="com.acme.services.MyServiceImpl"/>
</beans>
注
@Configurable 的作用
@Configurable 是 Spring 框架中的一个注解,主要用于解决非 Spring 容器管理的对象无法进行依赖注入的问题。通常情况下,通过 new 关键字创建的对象不会被 Spring 容器管理,因此无法自动注入依赖。而使用 @Configurable 可以让这些对象也支持依赖注入。
使用场景
当需要对非 Spring 容器管理的对象进行依赖注入时,可以使用 @Configurable 注解。例如,在手动创建的对象中注入 Spring 容器中的 Bean。
以下是一个示例:
@Configurable(preConstruction = true)
@Component
public class Car {
 @Autowired
 private Engine engine;

 @Autowired
 private Transmission transmission;

     public void startCar() {
          transmission.setGear(1);
          engine.engineOn();
          System.out.println("Car started");
     }
}
在上述代码中,即使通过 new Car() 创建对象,Spring 也会在构造函数运行之前完成依赖注入。
实现原理
@Configurable 的核心作用是通过 AspectJ 或类似的代理机制,在对象实例化时拦截并注入依赖。需要注意以下配置:
- 添加 AspectJ 相关依赖,例如 aspectjweaver.jar。
- 在运行时添加 Java 代理参数:-javaagent:path/to/spring-instrument.jar。
注意事项
- 性能开销:由于使用了代理机制,可能会带来一定的性能开销。
- 配置复杂性:需要额外配置 AspectJ 和代理参数。
- 适用场景:仅在必须对非 Spring 管理的对象进行依赖注入时使用,避免滥用。
通过 @Configurable,可以在特殊场景下实现更灵活的依赖注入,但应根据实际需求权衡其使用场景和复杂性。
(2)使用 AnnotationConfigApplicationContext 实例化 Spring 容器
下面的章节记录了 Spring 3.0 中引入的 AnnotationConfigApplicationContext 。 这个通用的 ApplicationContext 实现不仅能够接受 @Configuration 类作为输入,还能够接受普通的 @Component 类和用 JSR-330 元数据注解的类。
当提供 @Configuration 类作为输入时, @Configuration 类本身被注册为一个 beanDefinition,并且类中所有声明的 @Bean 方法也被注册为 beanDefinition。
当提供 @Component 和 JSR-330 相关的注解类时,它们被注册为 beanDefinition。
a、结构简洁
就像 Spring XML 文件在实例化 ClassPathXmlApplicationContext 时被用作输入一样,当实例化 AnnotationConfigApplicationContext 时,你可以使用 @Configuration 类作为输入。 这允许 Spring 容器完全不使用 xml,如下例所示:
public static void main(String[] args) {
   ApplicationContext ctx = new AnnotationConfigApplicationContext(AppConfig.class);
   MyService myService = ctx.getBean(MyService.class);
   myService.doStuff();
}
正如前面提到的, AnnotationConfigApplicationContext 并不局限于只与 @Configuration 类一起工作。 任何 @Component 或 JSR-330 注解类都可以作为输入提供给构造函数,如下面的例子所示:
public static void main(String[] args) {
   ApplicationContext ctx = new AnnotationConfigApplicationContext(MyServiceImpl.class, Dependency1.class, Dependency2.class);
   MyService myService = ctx.getBean(MyService.class);
   myService.doStuff();
}
前面的例子假设 MyServiceImpl 、 Dependency1 和 Dependency2 使用 Spring 依赖注入注解,比如 @Autowired 。
b、通过使用 register(Class<?>…) 以编程方式构建容器
你可以使用一个没有参数的构造函数来实例化一个 AnnotationConfigApplicationContext ,然后使用 register() 方法来配置它。 当以编程方式构建一个“AnnotationConfigApplicationContext”时,这种方法特别有用。 下面的例子展示了如何做到这一点:
public static void main(String[] args) {
   AnnotationConfigApplicationContext ctx = new AnnotationConfigApplicationContext();
   ctx.register(AppConfig.class, OtherConfig.class);
   ctx.register(AdditionalConfig.class);
   ctx.refresh();
   MyService myService = ctx.getBean(MyService.class);
   myService.doStuff();
}
c、使用 scan(String…) 启用组件扫描
要启用组件扫描,你可以像下面这样注解你的 @Configuration 类:
@Configuration
@ComponentScan(basePackages = "com.acme")
public class AppConfig  {
   // ...
}
<beans>
<context:component-scan base-package="com.ydlclass" / >
</beans>”
同时,AnnotationConfigApplicationContext 也暴露了 scan(String…) 方法来允许相同的组件扫描功能,如下例所示:
public static void main(String[] args) {
   AnnotationConfigApplicationContext ctx = new AnnotationConfigApplicationContext();
   ctx.scan("com.acme");
   ctx.refresh();
   MyService myService = ctx.getBean(MyService.class);
}
请记住, @Configuration 类是带有 @Component 元注解的一个注解,因此它们是组件扫描的候选对象。 在前面的例子中,假设 AppConfig 在 "com.acme" 中声明。 在 refresh() 之后,它的所有 @Bean 方法都被处理并注册为容器中的 beanDefinition。
(3) @Bean 注解
@Bean 是一个方法级注解,与 XML <bean/> 元素具有相同的能力。 注解支持 <bean/> 提供的一些属性,例如:
- init-method
- destroy-method
- autowiring
- name
你可以在带有 @Configuration 注解的类或带有 @Component 注解的类中使用 @Bean 注解。
a、声明一个 Bean
使用 @Bean 对方法进行注解可以帮助我们申明一个 bean。 您可以使用此方法在 ApplicationContext 中注册一个 beanDefinition,该 bean 的类型会被指定为 方法的返回值类型 ,而具体的返回值则是交由 spring 管理的 bean 实例。 默认情况下,bean 名与方法名相同。 下面的例子显示了一个 @Bean 方法声明:
@Configuration
public class AppConfig {

   @Bean
   public TransferServiceImpl transferService() {
       return new TransferServiceImpl();
   }
}
上面的配置与下面的 Spring XML 完全相同:
<beans>
   <bean id="transferService" class="com.acme.TransferServiceImpl"/>
</beans>
注:你也可以使用接口(或基类)作为返回类型来声明你的 @Bean 方法,如下面的例子所示:
@Configuration
public class AppConfig {

   @Bean
   public TransferService transferService() {
       return new TransferServiceImpl();
   }
}
b、Bean 的依赖关系
带注解的 @Bean 方法可以有任意数量的参数,这些参数描述构建该 bean 所需的依赖关系。 例如,如果我们的 TransferService 需要一个 AccountRepository ,我们可以用一个方法参数来实现这个依赖,如下例所示:
@Configuration
public class AppConfig {

   @Bean
   public TransferService transferService(AccountRepository accountRepository) {
       return new TransferServiceImpl(accountRepository);
   }
}
c、接受生命周期回调
- 任何用
@Bean注解定义的类都支持常规的生命周期回调,并且可以使用 JSR-250 的@PostConstruct和@PreDestroy注解。 - 也完全支持常规的 Spring lifecycle 回调。 如果一个 bean 实现了 'InitializingBean'、'DisposableBean' 或 'Lifecycle',则容器会调用它们各自的方法。
- 标准的
Aware接口也完全支持。
@Bean 注解支持指定任意的初始化和销毁回调方法,就像 Spring XML 在 'bean' 元素上的 'init-method' 和 'destroy-method' 属性一样,如下面的示例所示:
public class BeanOne {

   public void init() {
       // initialization logic
   }
}

public class BeanTwo {

   public void cleanup() {
       // destruction logic
   }
}

@Configuration
public class AppConfig {

   @Bean(initMethod = "init")
   public BeanOne beanOne() {
       return new BeanOne();
   }

   @Bean(destroyMethod = "cleanup")
   public BeanTwo beanTwo() {
       return new BeanTwo();
   }
}
小知识:对于上面例子中的 'BeanOne',在构造过程中直接调用 init() 方法同样有效,如下例所示:
@Configuration
public class AppConfig {

   @Bean
   public BeanOne beanOne() {
       BeanOne beanOne = new BeanOne();
       beanOne.init();
       return beanOne;
   }

   // ...
}
当您直接在代码中进行配置时,您可以对您的对象做任何您想做的事情,而不总是需要依赖于容器生命周期。
d、指定 Bean 范围
Spring 包含了 @Scope 注解,以便您可以指定 bean 的范围。
默认的作用域是 'singleton' ,但是你可以用 '@Scope' 注解来覆盖它,如下面的例子所示:
@Configuration
public class MyConfiguration {

   @Bean
   @Scope("prototype")
   public Encryptor encryptor() {
       // ...
   }
}
e、定制 Bean 命名
默认情况下,配置类使用 @Bean 方法的名称作为结果 bean 的名称。 但是,可以使用 'name' 属性覆盖该功能,如下例所示:
@Configuration
public class AppConfig {

   @Bean("myThing")
   public Thing thing() {
       return new Thing();
   }
}
有时需要为单个 bean 提供多个名称,或者称为 bean 别名。 @Bean 注解的 'name' 属性为此接受 String 数组。 下面的例子展示了如何为一个 bean 设置多个别名:
@Configuration
public class AppConfig {

   @Bean({"dataSource", "subsystemA-dataSource", "subsystemB-dataSource"})
   public DataSource dataSource() {
       // instantiate, configure and return DataSource bean...
   }
}
f、Bean 描述
有时,提供 bean 的更详细的文本描述是很有帮助的。 当 bean 被公开(可能通过 JMX)用于监视目的时,这可能特别有用。
要向 @Bean 添加描述,可以使用 @Description 注解,如下面的示例所示:
@Configuration
public class AppConfig {

   @Bean
   @Description("Provides a basic example of a bean")
   public Thing thing() {
       return new Thing();
   }
}
(4) @Configuration
@Configuration 是一个类级注解,指示一个对象是 beanDefinition 的源。 @Configuration 类通过 @Bean 带注解的方法声明 bean。在 @Configuration 类上调用 @Bean 方法也可以用来定义 bean 间的依赖关系。
注入 bean 之间的依赖
当 @Bean 方法在没有标注 @Configuration 的类中声明时,它们被认为是在 lite 模式下处理的。 在 @Component 中声明的 Bean 方法甚至在一个普通的类中声明的 Bean 方法都被认为是 lite 。在这样的场景中, @Bean 方法是一种通用工厂方法机制。
与 @Configuration 不同, lite 模式下 @Bean 方法不能声明 bean 间的依赖关系。 因此,这样的 @Bean 方法不应该调用其他 @Bean 下的方法。 每个这样的方法实际上只是特定 bean 引用的工厂方法,没有任何特殊的运行时语义。
在一般情况下,@Bean 方法要在 @Configuration 类中声明,这种功能情况下,会使用 full 模式,因此交叉方法引用会被重定向到容器的生命周期管理。 这可以防止通过常规 Java 调用意外调用相同的 Bean,这有助于减少在 lite 模式下操作时难以跟踪的微妙错误。
@Bean 和 @Configuration 注解将在下面几节中深入讨论。 不过,我们首先介绍通过使用基于 java 的配置创建 spring 容器的各种方法。
当 bean 相互依赖时,表示这种依赖就像让一个 bean 方法调用另一个 bean 方法一样简单,如下面的示例所示:
@Configuration
public class AppConfig {

   @Bean
   public BeanOne beanOne() {
       // full模式可以直接调用方法,这个调用过程由容器管理,lite模式这就是普通方法调用,多次调用会产生多个实例。
       return new BeanOne(beanTwo());
   }

   @Bean
   public BeanTwo beanTwo() {
       return new BeanTwo();
   }
}
在前面的例子中, beanOne 通过构造函数注入接收对 beanTwo 的引用。
考虑下面的例子,它显示了一个带注解的 @Bean 方法被调用两次:
@Configuration
public class AppConfig {

   @Bean
   public ClientService clientService1() {
       ClientServiceImpl clientService = new ClientServiceImpl();
       clientService.setClientDao(clientDao());
       return clientService;
   }

   @Bean
   public ClientService clientService2() {
       ClientServiceImpl clientService = new ClientServiceImpl();
       clientService.setClientDao(clientDao());
       return clientService;
   }

   @Bean
   public ClientDao clientDao() {
       return new ClientDaoImpl();
   }
}
clientDao() 在 clientService1() 和 clientService2() 中分别被调用一次。 由于该方法创建了一个新的 ClientDaoImpl 实例并返回它,所以通常期望有两个实例(每个服务一个)。 这肯定会有问题。在 Spring 中,实例化的 bean 默认有一个单例作用域,在调用父方法并创建新实例之前,首先检查容器中是否有缓存的(有作用域的)bean。
我们目前学习的描述候选组件的注解很多,但是仔细意思考,其实很简单:
我们自己的写代码通常使用以下注解来标识一个组件:
@Component,组件的通用注解@Repository,持久层@Service,业务层@Controller,控制层
配置类通常是我们不能修改源代码,但是需要注入别人写的类。例如向容器注入一个德鲁伊数据源的 bean,我们是绝对不能给这个类加个 @Component 注解的。
@Configuration + @Bean
(5) 使用 @Import 注解
就像在 Spring XML 文件中使用 <import/> 元素来实现模块化配置一样,@Import 注解允许从另一个配置类加载 @Bean 定义,如下面的示例所示:
@Configuration
public class ConfigA {

   @Bean
   public A a() {
       return new A();
   }
}

@Configuration
@Import(ConfigA.class)
public class ConfigB {

   @Bean
   public B b() {
       return new B();
   }
}
现在,在实例化上下文时不需要同时指定 ConfigA.class 和 ConfigB.class,只需要显式地提供 ConfigB ,如下面的示例所示:
public static void main(String[] args) {
   ApplicationContext ctx = new AnnotationConfigApplicationContext(ConfigB.class);

   // now both beans A and B will be available...
   A a = ctx.getBean(A.class);
   B b = ctx.getBean(B.class);
}
这种方法简化了容器实例化,因为只需要处理一个类,而不是要求您在构造过程中记住潜在的大量 @Configuration 类。
小知识我们一样可以给该注解传入一个实现了 ImportSelector 接口的类,返回的字符串数组的 Bean 都会被加载到容器当中:
public class ConfigSelector implements ImportSelector {
   @Override
   public String[] selectImports(AnnotationMetadata importingClassMetadata) {
       return new String[]{"com.ydlclass.A","com.ydlclass.B"};
   }
}
(6)结合 Java 和 XML 配置
Spring 的 @Configuration 类支持的目标并不是 100%完全替代 Spring XML,有些场景 xml 仍然是配置容器的理想方式。
我们有如下选择:
1、容器实例化在一个“以 XML 为中心”的方式使用,例如,“ClassPathXmlApplicationContext”。
2、"以 java 编程的方式为中心”的方式,实例化它通过使用 @ImportResource 注解导入 XML。
以 xml 为中心使用 @Configuration 类
最好从 XML 引导 Spring 容器,并以一种特别的方式包含 @Configuration 类。将 @Configuration 类声明为普通的 Spring <bean/> 元素。记住, @Configuration 类最终是容器中的 beanDefinition。
下面的例子展示了 Java 中一个普通的配置类:
@Configuration
public class AppConfig {

   @Autowired
   private DataSource dataSource;

   @Bean
   public AccountRepository accountRepository() {
       return new JdbcAccountRepository(dataSource);
   }

   @Bean
   public TransferService transferService() {
       return new TransferService(accountRepository());
   }
}
下面的例子显示了一个 system-test-config.xml 文件的一部分:
<beans>
   <!-- enable processing of annotations such as @Autowired and @Configuration -->
   <context:annotation-config/>
   <context:property-placeholder location="classpath:/com/acme/jdbc.properties"/>

   <bean class="com.acme.AppConfig"/>

   <bean class="org.springframework.jdbc.datasource.DriverManagerDataSource">
       <property name="url" value="${jdbc.url}"/>
       <property name="username" value="${jdbc.username}"/>
       <property name="password" value="${jdbc.password}"/>
   </bean>
</beans>
下面的示例显示了一个可能的 'jdbc'。 属性的文件:
user=root
password=root
url=jdbc:mysql://127.0.0.1:3306/ydlclass?characterEncoding=utf8&serverTimezone=Asia/Shanghai
driverName=com.mysql.cj.jdbc.Driver
public static void main(String[] args) {
   ApplicationContext ctx = new ClassPathXmlApplicationContext("classpath:/com/acme/system-test-config.xml");
   TransferService transferService = ctx.getBean(TransferService.class);
   // ...
}
因为 @Configuration 是用 @Component 注解的,所以被 @Configuration 注解的类会自动被组件扫描。 使用与前面示例中描述的相同的场景,我们可以重新定义 system-test-config.xml 来利用组件扫描。
下面的示例显示了修改后的 system-test-config.xml 文件:
<beans>
   <!-- picks up and registers AppConfig as a bean definition -->
   <context:component-scan base-package="com.acme"/>
   <context:property-placeholder location="classpath:/com/acme/jdbc.properties"/>

   <bean class="org.springframework.jdbc.datasource.DriverManagerDataSource">
       <property name="url" value="${jdbc.url}"/>
       <property name="username" value="${jdbc.username}"/>
       <property name="password" value="${jdbc.password}"/>
   </bean>
</beans>
使用 @ImportResource 以类为中心使用 XML
在 @Configuration 类是配置容器的主要机制的应用程序中,可能仍然需要使用至少一些 XML。 在这些场景中,您可以使用 @ImportResource 注解,并只定义所需的 XML。 这样做可以实现一种“以 java 为中心”的方法来配置容器,并将 XML 最小化。
下面的例子说明了这一点:
@Configuration
@ImportResource("classpath:/com/acme/properties-config.xml")
public class AppConfig {

   @Value("${jdbc.url}")
   private String url;

   @Value("${jdbc.username}")
   private String username;

   @Value("${jdbc.password}")
   private String password;

   @Bean
   public DataSource dataSource() {
       return new DriverManagerDataSource(url, username, password);
   }
}
properties-config.xml
<beans>
   <context:property-placeholder location="classpath:/com/acme/jdbc.properties"/>
</beans>
jdbc.properties:
jdbc.url=jdbc:hsqldb:hsql://localhost/xdb
jdbc.username=sa
jdbc.password=
启动容器:
public static void main(String[] args) {
   ApplicationContext ctx = new AnnotationConfigApplicationContext(AppConfig.class);
   TransferService transferService = ctx.getBean(TransferService.class);
   // ...
}
8、BeanFactory 和 FactoryBean
FactoryBean 通常用来创建一个复杂对象:
public interface FactoryBean<T> {

    String OBJECT_TYPE_ATTRIBUTE = "factoryBeanObjectType";

    @Nullable
    T getObject() throws Exception;

    @Nullable
    Class<?> getObjectType();

    default boolean isSingleton() {
        return true;
    }

}
9、环境抽象
Environment接口是一个抽象,集成在容器中,它模拟了应用程序环境的两个关键方面:profilesandproperties。- 一个 profile 是一个给定名字的,在逻辑上分了组的 beanDefinition 配置,只有在给定的 profile 是激活的情况下才向容器注册。
- properties 在几乎所有的应用程序中都扮演着重要的角色,并且可能源自各种来源:属性文件、JVM 系统属性、系统环境变量、JNDI、servlet 上下文参数、特定的
Properties对象、“Map” 对象,等等。 与属性相关的 “Environment” 对象的作用是为用户提供一个方便的服务接口,用于配置属性源并从那里解析属性。
(1)Profiles
Profiles 在核心容器中提供了一种机制,允许在不同环境中注册不同的 Bean。 “环境”这个词对不同的用户有不同的含义,
- 在开发中使用内存中的数据源,还是在生产中从 JNDI 中查找的数据源。
- 为客户 A 和客户 B 部署注册定制的 bean 实现。
考虑一个实际应用程序中的第一个用例,它需要一个“数据源”。 在测试环境中,配置可能类似如下:
@Bean
public DataSource dataSource() {
   return new EmbeddedDatabaseBuilder()
       .setType(EmbeddedDatabaseType.HSQL)
       .addScript("my-schema.sql")
       .addScript("my-test-data.sql")
       .build();
}
现在考虑如何将该应用程序部署到生产环境中,假设应用程序的数据源已注册到生产应用程序服务器的 JNDI 目录中。 我们的 'dataSource' bean 现在看起来如下所示:
@Bean
public DataSource dataSource() throws Exception {
   Context ctx = new InitialContext();
   return (DataSource) ctx.lookup("java:comp/env/jdbc/datasource");
}
重点:问题是如何根据当前环境在使用这两种数据源之间进行切换?
当然,我们可以使用 @Profile。
@Profile 注解允许您指出,当一个或多个 bean 在哪一种 Profile 被激活时被注入。 使用前面的例子,我们可以将 dataSource 配置重写如下:
@Configuration
@Profile("development")
public class StandaloneDataConfig {

   @Bean
   public DataSource dataSource() {
       return new EmbeddedDatabaseBuilder()
           .setType(EmbeddedDatabaseType.HSQL)
           .addScript("classpath:com/bank/config/sql/schema.sql")
           .addScript("classpath:com/bank/config/sql/test-data.sql")
           .build();
   }
}
@Configuration
@Profile("production")
public class JndiDataConfig {

   @Bean(destroyMethod="")
   public DataSource dataSource() throws Exception {
       Context ctx = new InitialContext();
       return (DataSource) ctx.lookup("java:comp/env/jdbc/datasource");
   }
}
@Profile 也可以在方法级别声明,只包含一个配置类的一个特定 bean(例如,对于一个特定 bean 的替代变体),如下面的示例所示:
@Configuration
public class AppConfig {

   @Bean("dataSource")
   @Profile("development")
   public DataSource standaloneDataSource() {
       return new EmbeddedDatabaseBuilder()
           .setType(EmbeddedDatabaseType.HSQL)
           .addScript("classpath:com/bank/config/sql/schema.sql")
           .addScript("classpath:com/bank/config/sql/test-data.sql")
           .build();
   }

   @Bean("dataSource")
   @Profile("production")
   public DataSource jndiDataSource() throws Exception {
       Context ctx = new InitialContext();
       return (DataSource) ctx.lookup("java:comp/env/jdbc/datasource");
   }
}
(2)XML Bean 定义环境
XML 对应的是 <beans> 元素的 'profile' 属性。 前面的示例配置可以在两个 XML 文件中重写,如下所示:
<beans profile="development"
   xmlns="http://www.springframework.org/schema/beans"
   xmlns:xsi="http://www.w3.org/2001/XMLSchema-instance"
   xmlns:jdbc="http://www.springframework.org/schema/jdbc"
   xsi:schemaLocation="...">

   <jdbc:embedded-database id="dataSource">
       <jdbc:script location="classpath:com/bank/config/sql/schema.sql"/>
       <jdbc:script location="classpath:com/bank/config/sql/test-data.sql"/>
   </jdbc:embedded-database>
</beans>

<beans profile="production"
   xmlns="http://www.springframework.org/schema/beans"
   xmlns:xsi="http://www.w3.org/2001/XMLSchema-instance"
   xmlns:jee="http://www.springframework.org/schema/jee"
   xsi:schemaLocation="...">

   <jee:jndi-lookup id="dataSource" jndi-name="java:comp/env/jdbc/datasource"/>
</beans>
也可以避免在同一个文件中分割和嵌套 <beans/> 元素,如下例所示:
<beans xmlns="http://www.springframework.org/schema/beans"
   xmlns:xsi="http://www.w3.org/2001/XMLSchema-instance"
   xmlns:jdbc="http://www.springframework.org/schema/jdbc"
   xmlns:jee="http://www.springframework.org/schema/jee"
   xsi:schemaLocation="...">

   <!-- other bean definitions -->

   <beans profile="development">
       <jdbc:embedded-database id="dataSource">
           <jdbc:script location="classpath:com/bank/config/sql/schema.sql"/>
           <jdbc:script location="classpath:com/bank/config/sql/test-data.sql"/>
       </jdbc:embedded-database>
   </beans>

   <beans profile="production">
       <jee:jndi-lookup id="dataSource" jndi-name="java:comp/env/jdbc/datasource"/>
   </beans>
</beans>
spring-beans.xsd 被限制为只允许这些元素作为文件中的最后一个元素。 这将有助于在不引起 XML 文件混乱的情况下提供灵活性。
(3)激活一个环境
现在我们已经更新了配置,我们仍然需要指示 Spring 哪个配置文件是活动的。 如果我们现在启动我们的样例应用程序,我们会看到抛出一个 NoSuchBeanDefinitionException,因为容器无法找到名为 dataSource 的 Spring bean。
激活配置文件有几种方式,但最直接的方式是通过 ApplicationContext 可用的 Environment API 以编程方式执行。 下面的例子展示了如何做到这一点:
@Test
public void testProfile(){
   // 创建容器
   AnnotationConfigApplicationContext context = new AnnotationConfigApplicationContext();
   // 激活环境
   context.getEnvironment().setActiveProfiles("development");
   // 扫包
   context.scan("com.ydlclass.datasource");
   //  刷新
   context.refresh();
   // 使用
   DataSource bean = context.getBean(DataSource.class);
   logger.info("{}", bean);
}
此外,你还可以通过 spring.profiles 来声明性地激活环境 active 属性,它可以通过系统环境变量、JVM 系统属性、servlet 上下文参数在' web.xml '中指定。
请注意,配置文件不是一个“非此即彼”的命题。 您可以一次激活多个配置文件。 通过编程方式,您可以向 setActiveProfiles() 方法提供多个配置文件名,该方法接受 String… 可变参数。 下面的示例激活多个配置文件:
加入启动参数:
-Dspring.profiles.active="profile1,profile2"
编程的方式
ctx.getEnvironment().setActiveProfiles("profile1", "profile2");
(4)porperties
Spring 的环境抽象提供了对属性的搜索操作。 考虑以下例子:
ApplicationContext ctx = new GenericApplicationContext();
Environment env = ctx.getEnvironment();
boolean containsMyProperty = env.containsProperty("my-property");
System.out.println("Does my environment contain the 'my-property' property? " + containsMyProperty);
在前面的代码片段中,我们看到了查询 Spring 是否为当前环境定义了 my-property 属性的方法。 为了回答这个问题,“Environment” 对象对一组 PropertySource 对象执行搜索。 “PropertySource” 是对任何键值对源的一个简单抽象, spring 的 StandardEnvironment 配置了两个 PropertySource 对象——一个代表 JVM 系统属性的集合(System.getProperties())和一个代表系统环境变量的设置(System.getenv())。

具体地说,当你使用 StandardEnvironment 时,如果 my-property 系统属性或 my-property 环境变量在运行时存在,对 env.containsProperty("my-property") 的调用将返回 true。
最重要的是,整个机制都是可配置的。 也许您有一个自定义的属性源,希望将其集成到此搜索中。 为此,我们可以实例化自己的 PropertySource ,并将它添加到当前 'Environment' 的 'propertyssources' 集合中。 下面的示例显示了如何这样做:
ConfigurableApplicationContext ctx = new GenericApplicationContext();
MutablePropertySources sources = ctx.getEnvironment().getPropertySources();
sources.addFirst(new MyPropertySource());
使用 @PropertySource
@PropertySource 注解提供了一种方便的声明性机制,用于向 Spring 的 Environment 中添加 PropertySource 。
给定一个名为 app 的文件。 下面的 @Configuration 类使用了 @PropertySource ,从而调用 testBean.getName() 返回 “myTestBean”:
@Configuration
@PropertySource("classpath:/com/myco/app.properties")
public class AppConfig {

   @Autowired
   Environment env;

   @Bean
   public TestBean testBean() {
       TestBean testBean = new TestBean();
       testBean.setName(env.getProperty("testbean.name"));
       return testBean;
   }
}
@Value("${}")
对于引入的 properties 文件
@Configuration
@PropertySource("classpath:config.properties")
public class MyConfig {

    @Value("${basePath}")
    private String basePath;

    @Override
    public String toString() {
        return "MyConfig{" +
               "basePath='" + basePath + '\'' +
               '}';
    }
}
basePath=D:/img
10、事件机制
为了以更面向框架的风格增强 BeanFactory 功能,ApplicationContext 还提供了以下功能:
- 通过 MessageSource 接口访问 i18n 风格的消息,实现国际化。
- 通过 ResourceLoader 接口访问资源,例如 url 和文件。
- 事件发布,即通过使用
ApplicationEventPublisher接口发布实现ApplicationListener接口的 bean。 - 通过
HierarchicalBeanFactory接口,加载多个(分层的)上下文,让每个上下文都集中在一个特定的层上,比如应用程序的 web 层。
1、自定义事件
ApplicationContext 中的事件处理是通过 ApplicationEvent 类和 ApplicationListener 接口提供的。 如果将实现 ApplicationListener 接口的 bean 部署到上下文中,那么每次将 ApplicationEvent 发布到 ApplicationContext 时,都会通知该 bean。 本质上,这是标准的 Observer 设计模式。
从 spring4.2 开始,事件基础设施得到了显著的改进,并提供了一个基于注解的事件模型以及发布任意事件的能力 。
您可以使用 spring 创建和发布自己的自定义事件。 下面的例子展示了一个简单的类,它扩展了 Spring 的 ApplicationEvent 基类:
public class BlockedListEvent extends ApplicationEvent {

   private final String address;
   private final String content;

   public BlockedListEvent(Object source, String address, String content) {
       super(source);
       this.address = address;
       this.content = content;
   }

   // accessor and other methods...
}
要发布自定义的 ApplicationEvent ,需要调用 ApplicationEventPublisher 上的 publishEvent() 方法。 通常,这是通过创建一个实现 s 的类并将其注册为 Spring bean 来实现的。 下面的例子展示了这样一个类:
public class EmailService implements ApplicationEventPublisherAware {

   private List<String> blockedList;
   private ApplicationEventPublisher publisher;

   public void setBlockedList(List<String> blockedList) {
       this.blockedList = blockedList;
   }

   public void setApplicationEventPublisher(ApplicationEventPublisher publisher) {
       this.publisher = publisher;
   }

   public void sendEmail(String address, String content) {
       if (blockedList.contains(address)) {
           publisher.publishEvent(new BlockedListEvent(this, address, content));
           return;
       }
       // send email...
   }
}
在配置时,Spring 容器检测到 EmailService 实现了 ApplicationEventPublisherAware 并自动调用 setApplicationEventPublisher() 。 实际上,传入的参数是 Spring 容器本身。 你通过它的 ApplicationEventPublisher 接口与应用上下文交互。
要接收自定义的 ApplicationEvent ,您可以创建一个类来实现 ApplicationListener 并将其注册为 Spring bean。 下面的例子展示了这样一个类:
public class BlockedListNotifier implements ApplicationListener<BlockedListEvent> {

   private String notificationAddress;

   public void setNotificationAddress(String notificationAddress) {
       this.notificationAddress = notificationAddress;
   }

   public void onApplicationEvent(BlockedListEvent event) {
       // notify appropriate parties via notificationAddress...
   }
}
将来容器只要发布这个事件,这个监听者就可以感知。
基于注解的事件监听器
您可以使用 @EventListener 注解在托管 bean 的任何方法上注册一个事件侦听器。 BlockedListNotifier 可以重写如下:
public class BlockedListNotifier {

   private String notificationAddress;

   public void setNotificationAddress(String notificationAddress) {
       this.notificationAddress = notificationAddress;
   }

   @EventListener
   public void processBlockedListEvent(BlockedListEvent event) {
       // notify appropriate parties via notificationAddress...
   }
}
方法签名再次声明它侦听的事件类型,但这一次使用了灵活的名称,而没有实现特定的侦听器接口。 只要实际事件类型在其实现层次结构中解析泛型参数,就可以通过泛型缩小事件类型。
如果您的方法应该侦听多个事件,或者您想在不带参数的情况下定义它,也可以在注解本身上指定事件类型。 下面的例子展示了如何做到这一点:
@EventListener({ContextStartedEvent.class, ContextRefreshedEvent.class})
public void handleContextStart() {
   // ...
}
2、Spring 提供的标准事件
| 事件 | 说明 |
|---|---|
| ContextRefreshedEvent | 在 ApplicationContext 被初始化或刷新时发布(例如,通过使用 ConfigurableApplicationContext 接口上的 refresh() 方法)。 这里,“初始化”意味着加载了所有 bean,检测并激活了后处理器 bean,预实例化了单例,并且 ApplicationContext 对象已经准备好使用了。 只要上下文还没有被关闭,一个刷新可以被触发多次,只要选择的 ApplicationContext 实际上支持这种”热”刷新。 例如,XmlWebApplicationContext 支持热刷新,但 GenericApplicationContext 不支持。 |
| ContextStartedEvent | 在 ConfigurableApplicationContext 接口上使用 start() 方法启动 ApplicationContext 时发布。 在这里,“started” 意味着所有的“生命周期” bean 都接收一个显式的开始信号。 通常,此信号用于在显式停止之后重新启动 bean,但它也可用于启动尚未配置为自动启动的组件(例如,在初始化时尚未启动的组件)。 |
| ContextStoppedEvent | 在 ConfigurableApplicationContext 接口上使用 stop() 方法停止 ApplicationContext 时发布。 这里,“stopped” 意味着所有 “Lifecycle” bean 都接收一个显式的停止信号。 一个停止的上下文可以通过 start() 调用重新启动。 |
| ContextClosedEvent | 在 ConfigurableApplicationContext 接口上的 close() 方法或通过 JVM 关闭钩子关闭 ApplicationContext 时发布。 这里,“closed” 意味着将销毁所有单例 bean。 一旦关闭上下文,它将到达其生命周期的结束,不能刷新或重新启动。 |
| RequestHandledEvent | 一个特定于 web 的事件,告诉所有 bean 一个 HTTP 请求已经得到了服务。 此事件在请求完成后发布。 这个事件只适用于使用 Spring DispatcherServlet 的 web 应用程序。 |
| ServletRequestHandledEvent | requestthandledevent 的子类,用于添加特定于 servlet 的上下文信息。 |
这些标准事件会在特定的时间发布,我们可以监听这些事件,并在事件发布时做我们想做的工作。
第三章:Resources
Java 拥有标准 java.net.URL 类和各种 URL 前缀的标准处理程序,不幸的是,对于所有底层资源的访问来说,还不够充分。 例如,没有标准化的 URL 用来访问需要从类路径或相对于 ServletContext 获取资源的方式,而 spring 为我们解决了这些问题。
一、Resource 接口
Spring 的 Resource 接口位于 org.springframework.core.io 包,他抽象了对资源的访问的能力。 下面提供了 Resource 接口的概述, Spring 本身广泛地使用了 Resource 接口。
public interface Resource extends InputStreamSource {

   boolean exists();
   boolean isReadable();
   boolean isOpen();
   boolean isFile();
   URL getURL() throws IOException;
   URI getURI() throws IOException;
   File getFile() throws IOException;
   ReadableByteChannel readableChannel() throws IOException;
   long contentLength() throws IOException;
   long lastModified() throws IOException;
   Resource createRelative(String relativePath) throws IOException;
   String getFilename();
   String getDescription();
}
二、内置的 Resource 的实现
Spring 包含了几个内置的 Resource 实现,如下所示:
1、UrlResource
UrlResource 包装了 java.net.URL,可以用来访问任何需要通过 URL 访问的对象,例如文件、HTTPS 目标、FTP 目标等。 所有 URL 都用一个标准化的 “String” 表示,这样就可以使用适当的标准化前缀来表示不同类型的 URL。 这包括用于访问文件系统路径的 file: ,用于通过 https 协议访问资源的 https: ,用于通过 ftp 访问资源的 ftp: 等。
2、 ClassPathResource
该类表示应该从类路径中获取的资源。 它使用线程上下文类装入器、给定的类装入器或给定的类装入资源。
3、FileSystemResource
这是 java.io 的 Resource 实现。
4、PathResource
这是一个 java.nio.file 的资源实现。
5、ServletContextResource
这是 ServletContext 资源的 Resource 实现,它解释了相关 web 应用程序根目录中的相对路径。
6、InputStreamResource
一个 InputStreamResource 是一个给定的 InputStream 的 Resource 实现。 只有当没有特定的资源实现适用时,才应该使用它。 特别是,如果可能的话,最好使用 ByteArrayResource 或任何基于文件的 Resource 实现。
7、 ByteArrayResource
这是一个给定字节数组的资源实现。 它为给定的字节数组创建一个 ByteArrayInputStream。
它可以从任何给定的字节数组加载内容,而不需要求助于一次性使用的 InputStreamResource。
三、ResourceLoader 接口
ResourceLoader 接口定义了加载资源的基本能力和方式。 下面的例子显示了 ResourceLoader 接口定义:
public interface ResourceLoader {

   Resource getResource(String location);

   ClassLoader getClassLoader();
}
所有应用程序上下文(applicationContext)都实现了 ResourceLoader 接口。 因此,可以所有的**应用程序上下文实现(ClassPathXmlA...)**都拥有加载资源的能力。
当您在特定的应用程序上下文中调用 getResource() 时,如果指定的位置路径没有特定的前缀,您将返回适合该特定应用程序上下文中的 Resource 类型。 例如,假设以下代码片段是在 ClassPathXmlApplicationContext 实例上运行的:
Resource template = ctx.getResource("some/resource/path/myTemplate.txt");
- 针对
ClassPathXmlApplicationContext,该代码返回ClassPathResource。 - 针对
FileSystemXmlApplicationContext实例运行相同的方法,它将返回FileSystemResource。 - 针对
WebApplicationContext,它会返回ServletContextResource。 它同样会为每个上下文返回适当的对象。
另一方面,你也可以通过指定特殊的 classpath: 前缀来强制使用 ClassPathResource ,无论应用程序的上下文类型是什么,如下面的示例所示:
Resource template = ctx.getResource("classpath:some/resource/path/myTemplate.txt");
类似地,您可以通过指定任何标准的 java.net.URL 前缀来强制使用 UrlResource 。 下面的例子使用了 file 和 https 前缀:
Resource template = ctx.getResource("file:///some/resource/path/myTemplate.txt");
Resource template = ctx.getResource("https://myhost.com/resource/path/myTemplate.txt");
下表总结了将' String '对象转换为' Resource '对象的策略:
| 前缀 | 举例 | 说明 |
|---|---|---|
| classpath: | classpath:com/myapp/config.xml | 从类路径加载。 |
| file: | file:///data/config.xml | 作为一个“URL”从文件系统加载。 请参见' FileSystemResource ' Caveats。 |
| https: | https://myserver/logo.png | 作为一个 URL 加载。 |
| (none) | /data/config.xml | 依赖于底层的 ApplicationContext。 |
四、 应用环境和资源路径
本节介绍如何使用资源创建应用程序上下文,包括使用 XML 的快捷方式、使用通配符以及其他细节。
1、构建应用程序上下文
应用程序上下文构造函数通常采用字符串或字符串数组作为资源的位置路径,例如组成上下文定义的 XML 文件。
当这样的位置路径没有前缀时,从该路径构建并用于加载 beanDefinition 的特定 Resource 类型取决于我们使用的这个特定的应用程序上下文。 例如,考虑下面的例子,它创建了一个 ClassPathXmlApplicationContext :
ApplicationContext ctx = new ClassPathXmlApplicationContext("conf/appContext.xml");
beanDefinition 是从类路径加载的,因此他使用了 ClassPathResource 。 但是,考虑下面的例子,它创建了一个 FileSystemXmlApplicationContext :
ApplicationContext ctx =
   new FileSystemXmlApplicationContext("conf/appContext.xml");
现在从文件系统位置加载 beanDefinition(在本例中,相对于当前工作目录)。
注意,在位置路径上使用特殊的 classpath 前缀或标准 URL 前缀会覆盖为加载 beanDefinition 而创建的默认类型 Resource。 考虑以下例子:
ApplicationContext ctx =
   new FileSystemXmlApplicationContext("classpath:conf/appContext.xml");
使用 FileSystemXmlApplicationContext 从类路径加载 beanDefinition。 然而,它仍然是一个 “FileSystemXmlApplicationContext”。 如果它随后被用作 ResourceLoader ,任何没有前缀的路径仍然被视为文件系统路径。
2、源路径中的通配符
应用程序上下文构造函数值中的资源路径可以是简单路径,每个路径都有到目标资源的一对一映射。当然,也可以包含特殊的 classpath\*: 前缀或内部 ant 模式, 后者实际上都是通配符。
注意,这种通配符特定于在应用程序上下文构造函数中使用资源路径(或直接使用 “PathMatcher” 实用程序类层次结构时),并在构造时解析。 它与“资源”类型本身无关。 你不能使用 classpath\*: 前缀来构造一个实际的 Resource,因为一个 resource 一次只指向一个资源。
Ant-style 的匹配原则
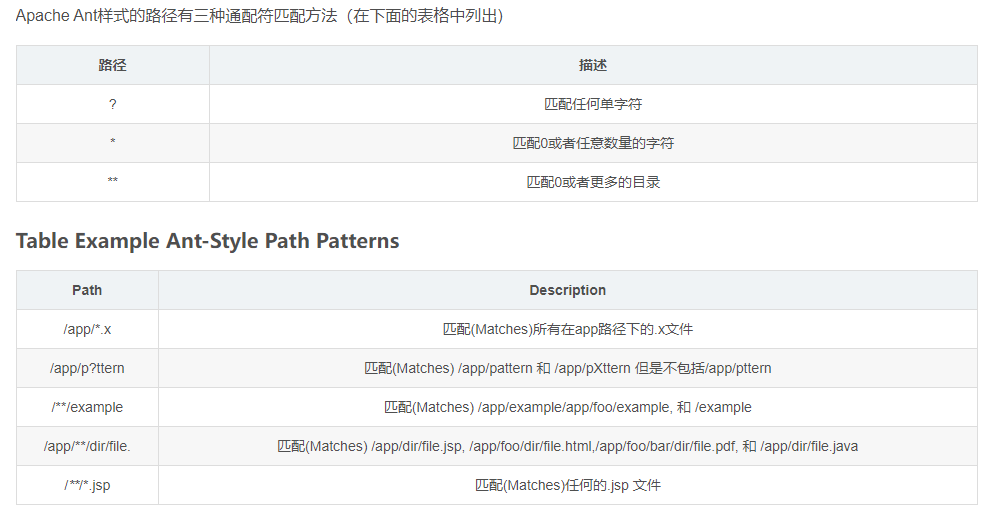
Ant-style 模式
路径位置可以包含 ant 样式的模式,如下例所示:
/WEB-INF/*-context.xml
com/mycompany/**/applicationContext.xml
file:C:/some/path/*-context.xml
classpath:com/mycompany/**/applicationContext.xml
当路径位置包含ant 样式模式时,解析器将遵循更复杂的过程来尝试解析通配符。
classpath\*:前缀
当构造基于 xml 的应用上下文时,位置字符串可以使用特殊的 classpath\*: 前缀,如下所示:
ApplicationContext ctx =
   new ClassPathXmlApplicationContext("classpath*:conf/appContext.xml");
classpath:和classpath\*:的区别
classpath: :表示从该工程中的类路径中加载资源,classpath:和 classpath:/是等价的,都是相对于类的根路径。资源文件库标准的在文件系统中,也可以在 JAR 或 ZIP 的类包中。 classpath*:假设多个 JAR 包或文件系统类路径都有一个相同的配置文件,classpath:只会在第一个加载的类路径下查找,而 classpath*: 会扫描所有这些 JAR 包及类路径下出现的同名文件。
第四章 验证、数据绑定和类型转换
一、BeanWrapper
bean 包中一个非常重要的类是 BeanWrappe 接口及其相应的实现 (BeanWrapperImpl)。 正如在 javadoc 中引用的, BeanWrapper 提供了设置和获取属性值、获取属性描述符等功能。 此外, BeanWrapper 提供了对嵌套属性的支持,允许对子属性进行无限深度的检索。 说的简单一点,就是这个类能帮助我对使用更简单的 api 通过反射操作一个 bean 的属性。
我们以设置和获取基本和嵌套属性为例
设置和获取属性是通过 BeanWrapper 的 setPropertyValue 和 getPropertyValue 重载方法变体来完成的。 下表显示了这些约定的一些例子:
| 表达式 | 释义 |
|---|---|
| name | 指示属性 “name” 对应于 “getName()” 或 isName() 和 `setName(..) 方法。 |
| account.name | 指示属性 'account' 的嵌套属性 'name',该属性对应于(例如) getAccount(). setname() 或 getAccount(). getname() 方法。 |
| account[2] | 指示索引属性 'account' 的第三个元素。 索引属性的类型可以是 'array'、'list' 或其他自然有序的集合。 |
| account[COMPANYNAME] | 指示由 “account”、“map” 属性的 “COMPANYNAME” 键索引的映射条目的值。 |
下面两个示例类使用 'BeanWrapper' 来获取和设置属性:
public class Company {

   private String name;
   private Employee managingDirector;

   public String getName() {
       return this.name;
   }

   public void setName(String name) {
       this.name = name;
   }

   public Employee getManagingDirector() {
       return this.managingDirector;
   }

   public void setManagingDirector(Employee managingDirector) {
       this.managingDirector = managingDirector;
   }
}

public class Employee {

   private String name;

   private float salary;

   public String getName() {
       return this.name;
   }

   public void setName(String name) {
       this.name = name;
   }

   public float getSalary() {
       return salary;
   }

   public void setSalary(float salary) {
       this.salary = salary;
   }
}
下面的代码片段展示了如何检索和操作实例化后的 'Company' 和 'Employee' 的一些属性:
BeanWrapper company = new BeanWrapperImpl(new Company());
// setting the company name..
company.setPropertyValue("name", "Some Company Inc.");
// ... can also be done like this:
PropertyValue value = new PropertyValue("name", "Some Company Inc.");
company.setPropertyValue(value);

// ok, let's create the director and tie it to the company:
BeanWrapper jim = new BeanWrapperImpl(new Employee());
jim.setPropertyValue("name", "Jim Stravinsky");
company.setPropertyValue("managingDirector", jim.getWrappedInstance());

// retrieving the salary of the managingDirector through the company
Float salary = (Float) company.getPropertyValue("managingDirector.salary");
二、PropertyEditor 属性编辑器
Spring 使用 PropertyEditor 的概念来实现对象和字符串之间的转换。
例如, Date 可以用人类可读的方式表示(如:"2007-14-09"),而我们仍然可以将人类可读的形式转换回原始日期(或者,更好的是,将任何以人类可读形式输入的日期转换回 Date 对象。 这种行为可以通过注册类型为 java.beans.PropertyEditor 的自定义编辑器来实现。
Spring 中使用 PropertyEditor 的几个例子:
- 通过使用
PropertyEditor实现来设置 bean 的属性。 - 在 Spring 的 MVC 框架中解析 HTTP 请求参数是通过使用各种各样的
PropertyEditor实现来完成的,后续学 mvc 的时候会讲。
Spring 有许多内置的 PropertyEditor 实现,这使得我们的工作变得更加简单。 它们都位于 org.springframework.beans 中的 propertyeditors 包中。 默认情况下,大多数是由 BeanWrapperImpl 注册的。 下表描述了 Spring 提供的各种 PropertyEditor 实现:
| 分类 | 释义 |
|---|---|
| ClassEditor | 将表示类的字符串解析为实际类,反之亦然。 当未找到类时,将抛出一个' IllegalArgumentException '。 默认情况下,由' BeanWrapperImpl '注册。 |
| CustomBooleanEditor | 布尔属性的属性编辑器。完成字符串和布尔值的转化。 默认情况下,由' BeanWrapperImpl '注册。 |
| CustomCollectionEditor | 集合的属性编辑器,将给定的描述集合的字符串转化为目标集合类型。 |
| CustomDateEditor | 可自定义的属性编辑器,支持自定义日期格式。 默认未注册。 必须根据需要使用适当的格式进行用户注册。 |
| ByteArrayPropertyEditor | 字节数组的编辑器, 将字符串转换为对应的字节表示形式。 默认情况下由 BeanWrapperImpl 注册。 |
| CustomNumberEditor | 可自定义任何数字类的属性编辑器,如 “Interger”、“Long”、“Float” 或 “Double”。 默认情况下,由 BeanWrapperImpl 注册,但可以通过将其自定义实例注册为自定义编辑器来覆盖。 |
| FileEditor | 将字符串解析为 java.io.file 的对象。 默认情况下,由 BeanWrapperImpl 注册。 |
| LocaleEditor | 可以将字符串解析为 Locale 对象,反之亦然(字符串格式为 '[language][country][variant]',与 Locale 的 toString() 方法相同)。 也接受空格作为分隔符,作为下划线的替代。 默认情况下,由 BeanWrapperImpl 注册。 |
| PatternEditor | 可以将字符串解析为' java.util.regex。 模式的对象,反之亦然。 |
| PropertiesEditor | 可以转换字符串到' Properties '对象。 默认情况下,由' BeanWrapperImpl '注册。 |
| StringTrimmerEditor | 修剪字符串的属性编辑器。 允许将空字符串转换为 null 值。 默认情况下未注册-必须是用户注册的。 |
| URLEditor | 可以将 URL 的字符串表示形式解析为实际的 'URL' 对象。 默认情况下,由 BeanWrapperImpl 注册。 |
注册额外的自定义 PropertyEditor 实现
当将 bean 属性设置为字符串值时,Spring IoC 容器最终使用标准 JavaBeans 的 PropertyEditor 实现将这些字符串转换为属性的复杂类型。 Spring 预注册了许多自定义的 PropertyEditor 实现(例如,将一个表示为字符串的类名转换为 'class' 对象)。 此外,Java 的标准 JavaBeans PropertyEditor 查找机制允许对类的 PropertyEditor 进行适当的命名,并将其放置在与其提供支持的类相同的包中,这样就可以自动找到它。
如果需要注册其他自定义的 propertyeEditors ,可以使用几种机制,其实本质是一样的。
- 第一种手动的方法(通常不方便也不推荐)是使用
ConfigurableBeanFactory接口的registerCustomEditor()方法,这里您必须佣有一个BeanFactory引用,比如我们可以写一个beanFactoryPostProccessor。 - 另一种(稍微方便一点)机制是使用名为
CustomEditorConfigurer的特殊 beanFactoryPostProccessor,这是 spring 给我们提供的,下边的案例演示了这个方式。
标准 PropertyEditor 实例用于将表示为字符串的属性值转换为属性的实际复杂类型。 你可以使用 CustomEditorConfigurer ,一个 beanFactoryPostProccessor,来方便地添加对附加的 PropertyEditor 实例的支持到 ApplicationContext 。
考虑下面的例子,它定义了一个名为 ExoticType 的用户类和另一个名为 DependsOnExoticType 的类,后者需要将 ExoticType 设置为属性:
package example;

public class ExoticType {

   private String name;

   public ExoticType(String name) {
       this.name = name;
   }
}

public class DependsOnExoticType {

   private ExoticType type;

   public void setType(ExoticType type) {
       this.type = type;
   }
}
我们希望能够将 type 属性分配为字符串, PropertyEditor 将其转换为实际的 ExoticType 实例。 下面的 beanDefinition 展示了如何建立这种关系:
<bean id="sample" class="example.DependsOnExoticType">
   <!-- 这里没有使用rel,二十使用value,这个会当做字符串进行解析 -->
   <property name="type" value="aNameForExoticType"/>
</bean>
PropertyEditor 实现类似如下:
// converts string representation to ExoticType object
package example;

public class ExoticTypeEditor extends PropertyEditorSupport {
// 容器发现需要一个对象的实例,而只是找到了一个字符串,就会根据type的类型匹配这个转化器
   // 这个转化器会进行构造
   public void setAsText(String text) {
       setValue(new ExoticType(text.toUpperCase()));
   }
}
最后,下面的例子展示了如何使用 CustomEditorConfigurer 向 ApplicationContext 注册新的 PropertyEditor ,然后它将能够在需要时使用它:
public class CustomEditorConfigurer implements BeanFactoryPostProcessor, Ordered
这家伙是一个 BeanFactoryPostProcessor,他会在创建好 bean 工厂后进行注册:
@Override
public void postProcessBeanFactory(ConfigurableListableBeanFactory beanFactory) throws BeansException {
   if (this.propertyEditorRegistrars != null) {
       for (PropertyEditorRegistrar propertyEditorRegistrar : this.propertyEditorRegistrars) {
           beanFactory.addPropertyEditorRegistrar(propertyEditorRegistrar);
       }
   }
   if (this.customEditors != null) {
       this.customEditors.forEach(beanFactory::registerCustomEditor);
   }
}
需要我们写的仅仅是在 xml 中注册一下即可:
<bean class="org.springframework.beans.factory.config.CustomEditorConfigurer">
   <property name="customEditors">
       <map>
           <entry key="example.ExoticType" value="example.ExoticTypeEditor"/>
       </map>
   </property>
</bean>
我们还可以使用 PropertyEditorRegistrar
下面的例子展示了如何创建自己的 propertyeditorregistry 实现:
package com.foo.editors.spring;

public final class CustomPropertyEditorRegistrar implements PropertyEditorRegistrar {

   public void registerCustomEditors(PropertyEditorRegistry registry) {

       // it is expected that new PropertyEditor instances are created
       registry.registerCustomEditor(ExoticType.class, new ExoticTypeEditor());

       // you could register as many custom property editors as are required here...
   }
}
下一个例子展示了如何配置一个 CustomEditorConfigurer ,并将一个 CustomPropertyEditorRegistrar 的实例注入其中:
<bean class="org.springframework.beans.factory.config.CustomEditorConfigurer">
   <property name="propertyEditorRegistrars">
       <list>
           <ref bean="customPropertyEditorRegistrar"/>
       </list>
   </property>
</bean>

<bean id="customPropertyEditorRegistrar"
   class="com.foo.editors.spring.CustomPropertyEditorRegistrar"/>
三、类型转换
Spring 3 核心包提供了一个通用类型转换系统。 在 Spring 容器中,您可以使用此系统作为 PropertyEditor 的替代方案,将外部化 bean 属性值字符串转换为所需的属性类型。
1、 Converter 的 API
实现类型转换逻辑很简单,如下面的接口定义所示:
package org.springframework.core.convert.converter;

public interface Converter<S, T> {

   T convert(S source);
}
创建你自己的转换器,需要实现转换器接口,并使用泛型 “S” 作为你要转换的原始类型,“T” 作为你要转换 目标类型。
core.convert 包中提供了几个转换器实现。 其中包括从字符串到数字和其他常见类型的转换器。 下面的例子显示了 StringToInteger 类,它是一个典型的 Converter 实现:
package org.springframework.core.convert.support;

final class StringToInteger implements Converter<String,Integer> {

   public Integer convert(String source) {
       return Integer.valueOf(source);
   }
}
2、 ConversionService 的 API
conversionservice 定义了一个用于在运行时执行类型转换逻辑的统一 API:
package org.springframework.core.convert;

public interface ConversionService {

   boolean canConvert(Class<?> sourceType, Class<?> targetType);

   <T> T convert(Object source, Class<T> targetType);

   boolean canConvert(TypeDescriptor sourceType, TypeDescriptor targetType);

   Object convert(Object source, TypeDescriptor sourceType, TypeDescriptor targetType);
}
大多数 ConversionService 实现也实现 ConverterRegistry ,它提供了一个用于注册转换器的 API。
spring 提供了一个强大的 ConversionService 实现,即 GenericConversionService ,他是适合在大多数环境中使用的通用实现。Spring 会选择 ConversionService,并在框架需要执行类型转换时使用它。
要在 Spring 中注册默认的 conververService ,请添加以下带有 converversionservice 'id' 的 beanDefinition:
<bean id="conversionService"
   class="org.springframework.context.support.ConversionServiceFactoryBean"/>
默认的 converversionservice 可以在字符串、数字、枚举、集合、映射和其他常见类型之间进行转换。 要使用您自己的自定义转换器来补充或覆盖默认转换器,请设置 converters 属性。 属性值可以实现任何 Converter、ConverterFactory 或 GenericConverter 接口。
<bean id="conversionService"
       class="org.springframework.context.support.ConversionServiceFactoryBean">
   <property name="converters">
       <set>
           <bean class="example.MyCustomConverter"/>
       </set>
   </property>
</bean>
3、 配置 DataBinder 进行数据验证
从 Spring 3 开始,你就可以用一个 Validator 配置一个 DataBinder 实例。 一旦配置完成,您就可以通过调用 binder.validate() 来调用 Validator 。 任何验证 'Errors' 都会自动添加到绑定的 'BindingResult' 中。
下面的例子展示了如何通过编程方式使用 DataBinder 在绑定到目标对象后调用验证逻辑:
// 绑定一个要验证的实例
DataBinder dataBinder = new DataBinder(new User(105,"22","22"));
// 绑定一个验证的规则
dataBinder.addValidators(new Validator() {
   @Override
   public boolean supports(Class<?> clazz) {
       return clazz == User.class;
   }

   @Override
   public void validate(Object target, Errors errors) {
       User user = (User)target;
       if (user.getId() > 100){
           errors.rejectValue("id","202","值太大了");
       }
   }
});
// 开始验证
dataBinder.validate();
// 获取验证的结果
BindingResult bindingResult = dataBinder.getBindingResult();
List<ObjectError> allErrors = bindingResult.getAllErrors();
for (ObjectError allError : allErrors) {
   System.out.println(allError);
}
第五章:Spring 表达式语言(SpEL)
一、简介
本节介绍SpEL 接口及其表达式语言的简单使用。 下面的代码引入了 SpEL API 来计算字符串字面表达式 'Hello World'。
ExpressionParser parser = new SpelExpressionParser();
Expression exp = parser.parseExpression("'Hello World'");
String message = (String) exp.getValue();
消息变量的值是 “Hello World”。
ExpressionParser 接口负责解析表达式字符串。 在前面的示例中,表达式字符串是由单引号表示的字符串字面量。 Expression 接口负责计算前面定义的表达式字符串。 当调用 parser 时,可以抛出 ParseException 和 EvaluationException 两个异常。
Expression 接口负责计算前面定义的表达式字符串。 SpEL 支持广泛的特性,例如调用方法、访问属性和调用构造函数。
在下面的方法调用示例中,我们甚至可以在字符串字面量上调用 concat 方法:
ExpressionParser parser = new SpelExpressionParser();
Expression exp = parser.parseExpression("'Hello World'.concat('!')");
String message = (String) exp.getValue();
'message' 的值现在是 'Hello World!'。
下面的例子调用了 'String' 属性 bytes :
ExpressionParser parser = new SpelExpressionParser();

// invokes 'getBytes()'
Expression exp = parser.parseExpression("'Hello World'.bytes");
byte[] bytes = (byte[]) exp.getValue();
这一行将字面值转换为字节数组。
SpEL 还通过使用标准点表示法(如 'prop1.prop2.prop3')和相应的属性值设置来支持嵌套属性。 也可以访问公共字段。
下面的例子展示了如何使用点表示法来获取文字的长度:
ExpressionParser parser = new SpelExpressionParser();

// invokes 'getBytes().length'
Expression exp = parser.parseExpression("'Hello World'.bytes.length");
int length = (Integer) exp.getValue();
还可以调用 String 的构造函数而不是使用字符串字面值,如下例所示:
ExpressionParser parser = new SpelExpressionParser();
Expression exp = parser.parseExpression("new String('hello world').toUpperCase()");
String message = exp.getValue(String.class);
从字面量构造一个新的 'String',并使其为大写。
SpEL 更常见的用法是提供一个针对特定对象实例(称为根对象)求值的表达式字符串。 下面的例子展示了如何从 'Inventor' 类的实例中检索 'name' 属性:
// Create and set a calendar
GregorianCalendar c = new GregorianCalendar();
c.set(1856, 7, 9);

// The constructor arguments are name, birthday, and nationality.
Inventor tesla = new Inventor("Nikola Tesla", c.getTime(), "Serbian");

ExpressionParser parser = new SpelExpressionParser();

Expression exp = parser.parseExpression("name"); // Parse name as an expression
String name = (String) exp.getValue(tesla);
// name == "Nikola Tesla"
// 这个表达式在比较连个名字是不是’Nikola Tesla‘
exp = parser.parseExpression("name == 'Nikola Tesla'");
boolean result = exp.getValue(tesla, Boolean.class);
// result == true
二 、 Bean 定义中的表达式
您可以使用 SpEL 表达式和基于 xml 或基于注解的配置元数据来定义 BeanDefinition 实例。 在这两种情况下,定义表达式的语法形式都是 #{<expression string>}。
1、XML 配置
属性或构造函数参数值可以通过使用表达式设置,如下例所示:
<bean id="numberGuess" class="org.spring.samples.NumberGuess">
   <property name="randomNumber" value="#{ T(java.lang.Math).random() * 100.0 }"/>

   <!-- other properties -->
</bean>
应用程序上下文中的所有 bean 都可以作为具有公共 bean 名称的预定义变量使用。 这包括用于访问运行时环境的标准上下文 bean,如 environment (类型为 org.springframework.core.env.Environment),以及 systemProperties 和 systemEnvironment (类型为 Map<String, Object>)。
下面的示例显示了对 systemProperties bean 的 SpEL 变量访问:
<bean id="taxCalculator" class="org.spring.samples.TaxCalculator">
   <property name="defaultLocale" value="#{systemProperties['user.region'] }"/>

   <!-- other properties -->
</bean>
注意,这里不需要在预定义变量前加上 '#' 符号。
您还可以通过名称引用其他 bean 属性,如下例所示:
<bean id="numberGuess" class="org.spring.samples.NumberGuess">
   <property name="randomNumber" value="#{ T(java.lang.Math).random() * 100.0 }"/>

   <!-- other properties -->
</bean>

<bean id="shapeGuess" class="org.spring.samples.ShapeGuess">
   <property name="initialShapeSeed" value="#{ numberGuess.randomNumber }"/>

   <!-- other properties -->
</bean>
2、注解配置
要指定默认值,可以在字段、方法和方法或构造函数参数上放置 @Value 注解。
设置字段的默认值的示例如下:
public class FieldValueTestBean {

   @Value("#{ systemProperties['user.region'] }")
   private String defaultLocale;

   public void setDefaultLocale(String defaultLocale) {
       this.defaultLocale = defaultLocale;
   }

   public String getDefaultLocale() {
       return this.defaultLocale;
   }
}
下面的例子展示了一个等价的属性 setter 方法:
public class PropertyValueTestBean {

   private String defaultLocale;

   @Value("#{ systemProperties['user.region'] }")
   public void setDefaultLocale(String defaultLocale) {
       this.defaultLocale = defaultLocale;
   }

   public String getDefaultLocale() {
       return this.defaultLocale;
   }
}
自动连接的方法和构造函数也可以使用 @Value 注解,如下面的例子所示:
public class SimpleMovieLister {

   private MovieFinder movieFinder;
   private String defaultLocale;

   @Autowired
   public void configure(MovieFinder movieFinder,
           @Value("#{ systemProperties['user.region'] }") String defaultLocale) {
       this.movieFinder = movieFinder;
       this.defaultLocale = defaultLocale;
   }

   // ...
}
public class MovieRecommender {

   private String defaultLocale;

   private CustomerPreferenceDao customerPreferenceDao;

   public MovieRecommender(CustomerPreferenceDao customerPreferenceDao,
           @Value("#{systemProperties['user.country']}") String defaultLocale) {
       this.customerPreferenceDao = customerPreferenceDao;
       this.defaultLocale = defaultLocale;
   }

   // ...
}
三、语法参考(不需要记忆啊)
本节描述 Spring 表达式语言的工作原理。 它涵盖以下主题:
1、 文字表达方式
支持的文字表达式类型有字符串、数字值(int、real、hex)、布尔值和空值。 字符串由单引号分隔。 若要将单引号本身放入字符串中,请使用两个单引号字符。
下面的例子显示了文字的简单用法。 通常,它们不会像这样单独使用,而是作为更复杂表达式的一部分使用——例如,在逻辑比较运算符的一侧使用文字。
ExpressionParser parser = new SpelExpressionParser();

// evals to "Hello World"
String helloWorld = (String) parser.parseExpression("'Hello World'").getValue();

double avogadrosNumber = (Double) parser.parseExpression("6.0221415E+23").getValue();

// evals to 2147483647
int maxValue = (Integer) parser.parseExpression("0x7FFFFFFF").getValue();

boolean trueValue = (Boolean) parser.parseExpression("true").getValue();

Object nullValue = parser.parseExpression("null").getValue();
数字支持使用负号、指数符号和小数点。 默认情况下,使用 Double.parseDouble() 解析实数。
2、 Arrays, Lists, Maps
使用句点来指示嵌套的属性值。
// evals to 1856
int year = (Integer) parser.parseExpression("birthdate.year + 1900").getValue(context);

String city = (String) parser.parseExpression("placeOfBirth.city").getValue(context);
More Actions 允许属性名称的首字母不区分大小写。 因此,上面例子中的表达式可以写成“生日”。 “年+ 1900”和“出生地点”。 分别城”。 此外,可以通过方法调用访问属性——例如, getPlaceOfBirth(). getcity() 而不是 placeOfBirth.city 。
使用方括号表示法获取数组和列表的内容,示例如下:
ExpressionParser parser = new SpelExpressionParser();
EvaluationContext context = SimpleEvaluationContext.forReadOnlyDataBinding().build();

// Inventions Array

// evaluates to "Induction motor"
String invention = parser.parseExpression("inventions[3]").getValue(
       context,tesla,String.class);

// Members List

// evaluates to "Nikola Tesla"
String name = parser.parseExpression("members[0].name").getValue(
       context,ieee,String.class);

// List and Array navigation
// evaluates to "Wireless communication"
String invention = parser.parseExpression("members[0].inventions[6]").getValue(
       context,ieee,String.class);
3、 内联列表
可以使用 '{}' 符号在表达式中直接表示列表。
// evaluates to a Java list containing the four numbers
List numbers = (List) parser.parseExpression("{1, 2, 3, 4}").getValue(context);

List listOfLists = (List) parser.parseExpression("{{'a', 'b'}, {'x', 'y'}}").getValue(context);
'{}' 它本身就是一个空列表。 出于性能原因,如果列表本身完全由固定的字面值组成,则创建一个常量列表来表示表达式(而不是在每次求值时构建一个新列表)。
4、 内联映射
您还可以使用 {key:value} 表示法在表达式中直接表示映射。 下面的例子展示了如何做到这一点:
// evaluates to a Java map containing the two entries
Map inventorInfo = (Map) parser.parseExpression("{name:'Nikola', dob:'10-July-1856'}").getValue(context);

Map mapOfMaps = (Map) parser.parseExpression("{name:{first:'Nikola', last:'Tesla'}, dob:{day:10, month:'July', year:1856}}").getValue(context);
{:}它本身就是一个空映射。 出于性能原因,如果映射本身由固定的文字或其他嵌套的常量结构(列表或映射)组成,则创建一个常量映射来表示表达式(而不是在每次求值时构建一个新映射)。 map 键的引用是可选的(除非键包含句号(' . '))。 上面的例子没有使用引号键。
5、 数组结构
可以使用熟悉的 Java 语法构建数组,也可以提供一个初始化式,以便在构造时填充数组。 下面的例子展示了如何做到这一点:
int[] numbers1 = (int[]) parser.parseExpression("new int[4]").getValue(context);

// Array with initializer
int[] numbers2 = (int[]) parser.parseExpression("new int[]{1, 2, 3}").getValue(context);

// Multi dimensional array
int[][] numbers3 = (int[][]) parser.parseExpression("new int[4][5]").getValue(context);
You cannot currently supply an initializer when you construct a multi-dimensional array.
6、 方法调用
您可以使用典型的 Java 编程语法来调用方法。 您还可以在文字上调用方法。 也支持变量参数。 下面的例子展示了如何调用方法:
// string literal, evaluates to "bc"
String bc = parser.parseExpression("'abc'.substring(1,3)").getValue(String.class);

// evaluates to true
boolean isMember = parser.parseExpression("isMember('Mihajlo Pupin')").getValue(
       societyContext, Boolean.class);
7、 运算符
Spring 表达式语言支持以下类型的操作符:
关系运算符
使用标准操作符表示法支持关系操作符(等于、不等于、小于、小于或等于、大于和大于或等于)。 下面的例子展示了一些操作符示例:
// evaluates to true
boolean trueValue = parser.parseExpression("2 == 2").getValue(Boolean.class);

// evaluates to false
boolean falseValue = parser.parseExpression("2 < -5.0").getValue(Boolean.class);

// evaluates to true
boolean trueValue = parser.parseExpression("'black' < 'block'").getValue(Boolean.class);
除了标准的关系操作符外,SpEL 还支持 instanceof 和基于正则表达式的 matches 操作符。 下面的例子展示了两者的例子:
// evaluates to false
boolean falseValue = parser.parseExpression(
       "'xyz' instanceof T(Integer)").getValue(Boolean.class);

// evaluates to true
boolean trueValue = parser.parseExpression(
       "'5.00' matches '^-?\\d+(\\.\\d{2})?$'").getValue(Boolean.class);

// evaluates to false
boolean falseValue = parser.parseExpression(
       "'5.0067' matches '^-?\\d+(\\.\\d{2})?$'").getValue(Boolean.class);
每个符号运算符也可以指定为纯字母等效符。 这避免了所使用的符号对嵌入表达式的文档类型(例如 XML 文档)具有特殊意义的问题。 对应文本为:
- lt (<)
- gt (>)
- le (<=)
- ge (>=)
- eq (==)
- ne (!=)
- div (/)
- mod (%)
- not (!).
所有的文本操作符都是不区分大小写的。
逻辑运算符
SpEL 支持以下逻辑操作符:
- and (&&)
- or (||)
- not (!)
下面的示例演示如何使用逻辑运算符:
// -- AND --

// evaluates to false
boolean falseValue = parser.parseExpression("true and false").getValue(Boolean.class);

// evaluates to true
String expression = "isMember('Nikola Tesla') and isMember('Mihajlo Pupin')";
boolean trueValue = parser.parseExpression(expression).getValue(societyContext, Boolean.class);

// -- OR --

// evaluates to true
boolean trueValue = parser.parseExpression("true or false").getValue(Boolean.class);

// evaluates to true
String expression = "isMember('Nikola Tesla') or isMember('Albert Einstein')";
boolean trueValue = parser.parseExpression(expression).getValue(societyContext, Boolean.class);

// -- NOT --

// evaluates to false
boolean falseValue = parser.parseExpression("!true").getValue(Boolean.class);

// -- AND and NOT --
String expression = "isMember('Nikola Tesla') and !isMember('Mihajlo Pupin')";
boolean falseValue = parser.parseExpression(expression).getValue(societyContext, Boolean.class);
数学运算符
你可以在数字和字符串上使用加法运算符(+)。 您可以只在数字上使用减法(-)、乘法(*)和除法(/)操作符。 您还可以对数字使用模(%)和指数幂(^)运算符。 执行标准操作符优先级。 下面的例子展示了使用中的数学运算符:
// Addition
int two = parser.parseExpression("1 + 1").getValue(Integer.class);  // 2

String testString = parser.parseExpression(
       "'test' + ' ' + 'string'").getValue(String.class);  // 'test string'

// Subtraction
int four = parser.parseExpression("1 - -3").getValue(Integer.class);  // 4

double d = parser.parseExpression("1000.00 - 1e4").getValue(Double.class);  // -9000

// Multiplication
int six = parser.parseExpression("-2 * -3").getValue(Integer.class);  // 6

double twentyFour = parser.parseExpression("2.0 * 3e0 * 4").getValue(Double.class);  // 24.0

// Division
int minusTwo = parser.parseExpression("6 / -3").getValue(Integer.class);  // -2

double one = parser.parseExpression("8.0 / 4e0 / 2").getValue(Double.class);  // 1.0

// Modulus
int three = parser.parseExpression("7 % 4").getValue(Integer.class);  // 3

int one = parser.parseExpression("8 / 5 % 2").getValue(Integer.class);  // 1

// Operator precedence
int minusTwentyOne = parser.parseExpression("1+2-3*8").getValue(Integer.class);  // -21
赋值运算
要设置属性,请使用赋值操作符(=)。 这通常是在调用 setValue 中完成的,但也可以在调用 getValue 中完成。 下面的例子展示了使用赋值操作符的两种方法:
Inventor inventor = new Inventor();
EvaluationContext context = SimpleEvaluationContext.forReadWriteDataBinding().build();

parser.parseExpression("name").setValue(context, inventor, "Aleksandar Seovic");

// alternatively
String aleks = parser.parseExpression(
       "name = 'Aleksandar Seovic'").getValue(context, inventor, String.class);
8、类型
你可以使用特殊的 'T' 操作符来指定一个 java.lang.Class(类型)的实例。 静态方法也可以通过使用此操作符来调用。'StandardTypeLocator'(它可以被替换)是建立在对 java.lang 的包。 这意味着 T() 引用 java.lang 包不需要完全限定,但所有其他类型引用必须是完全限定的。 下面的示例演示如何使用“T”操作符:
Class dateClass = parser.parseExpression("T(java.util.Date)").getValue(Class.class);

Class stringClass = parser.parseExpression("T(String)").getValue(Class.class);

boolean trueValue = parser.parseExpression(
       "T(java.math.RoundingMode).CEILING < T(java.math.RoundingMode).FLOOR")
       .getValue(Boolean.class);
9、构造函数
你可以使用 new 操作符来调用构造函数。 你应该对所有类型使用完全限定类名,除了那些位于 java. lang 包的类 ( Integer , Float , String ,等等)。 下面的例子展示了如何使用 new 操作符来调用构造函数:的
Inventor einstein = p.parseExpression(
       "new org.spring.samples.spel.inventor.Inventor('Albert Einstein', 'German')")
       .getValue(Inventor.class);

// create new Inventor instance within the add() method of List
p.parseExpression(
       "Members.add(new org.spring.samples.spel.inventor.Inventor(
           'Albert Einstein', 'German'))").getValue(societyContext);
10、 变量
可以使用 #variableName 语法引用表达式中的变量。 变量是通过在 EvaluationContext 实现上使用 setVariable 方法设置的。
下面的例子展示了如何使用变量。
Inventor tesla = new Inventor("Nikola Tesla","Serbian");

// 我们必须创建一个上下文,在上下文中定义变量
EvaluationContext context = SimpleEvaluationContext.forReadWriteDataBinding().build();
context.setVariable("newName","Mike Tesla");

parser.parseExpression("name = #newName").getValue(context,tesla);
System.out.println(tesla.getName())  // "Mike Tesla"
11、 Bean 的引用
如果计算上下文已经配置了 bean 解析器,那么您可以使用 @ 符号从表达式中查找 bean。
下面的例子展示了如何做到这一点:
// 定义一个容器
ApplicationContext ctx = new AnnotationConfigApplicationContext(A.class);
// 创建一个解析器
ExpressionParser parser = new SpelExpressionParser();
// 定义一个表达式上下文
StandardEvaluationContext context = new StandardEvaluationContext();
// 这个地方规定了我要从哪里查找bean,我们的具体实现是BeanFactoryResolver,代表了从容器中获取
context.setBeanResolver(new BeanFactoryResolver(ctx));
Object bean = parser.parseExpression("@messageListener").getValue(context);
要访问 FactoryBean 本身,应该在 bean 名称前加上 '&' 符号。 下面的例子展示了如何做到这一点:
ExpressionParser parser = new SpelExpressionParser();
StandardEvaluationContext context = new StandardEvaluationContext();
context.setBeanResolver(new MyBeanResolver());

// This will end up calling resolve(context, "&foo") on MyBeanResolver during evaluation
Object bean = parser.parseExpression("&foo").getValue(context);
12、 三元运算符 (If-Then-Else)
可以使用三元运算符在表达式中执行 if-then-else 条件逻辑。 下面的例子显示了一个最小的示例:
String falseString = parser.parseExpression(
       "false ? 'trueExp' : 'falseExp'").getValue(String.class);
在这种情况下,布尔值 false 导致返回字符串值 'false exp' 。 下面是一个更现实的例子:
Expression exp = parser.parseExpression("'Hello World'.bytes.length gt 2 ? 2:3")
第六章 Spring 面向切面编程
我们会有这样的需求:
批量给所有的 service 层的方法实现上统一加上事务,而不是一个个加:
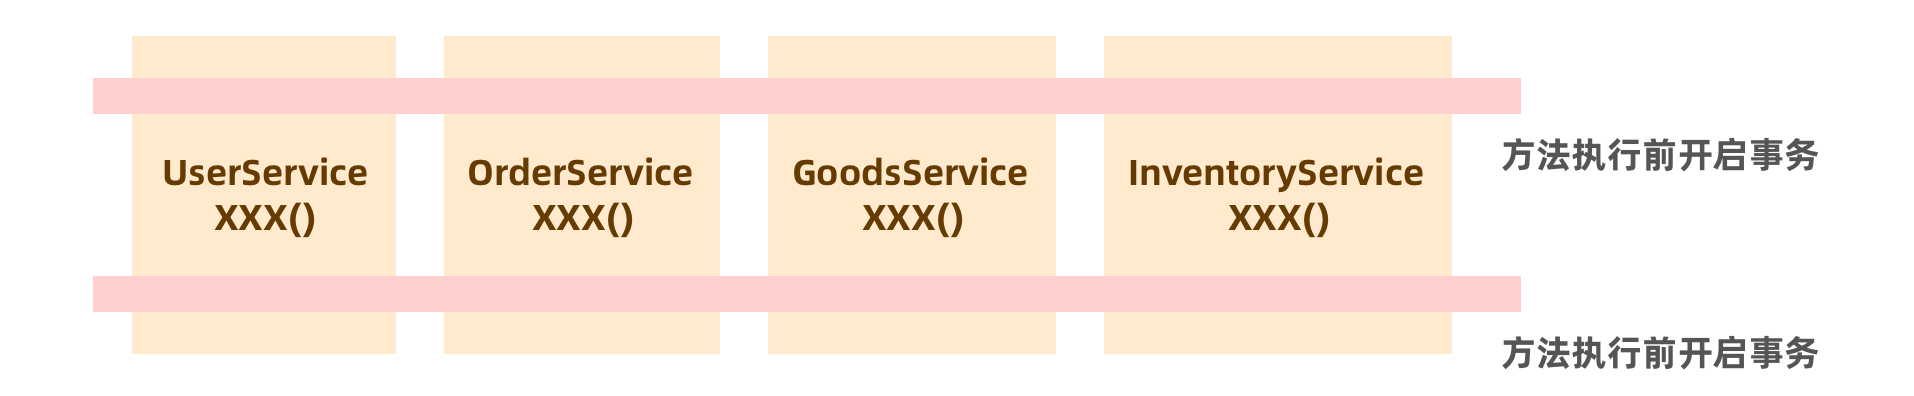
面向切面编程的本质很像我们 web 阶段学习的过滤器,本质是找到一批具有相同特征(在相同包下,拥有相同的注解)的类,对其进行批量的动态代理(对每一个 bean 的构建进行拦截)。
其实我们可以通过 BeanPostProcessor 做一个简单的实现,而事实上,本章学习的 AOP 也是通过一个特殊的 BeanPostProcessor 实现的。BeanPostProcessor 本身就可以在容器启动的时候拦截已经构造完成的 bean 并对它进行处理。
一、 AOP 概述
- 面向切面编程(AOP)通过提供另一种考虑程序结构的方法对面向对象编程(OOP)进行了补充。
- OOP 中模块化的关键单元是类,而 AOP 中模块化的关键单元是 aspect(切面)。
- Spring 的关键组件之一是 AOP 框架。 虽然 Spring IoC 容器不依赖于 AOP(这意味着如果您不想使用 AOP 就不需要),但 AOP 对 Spring IoC 进行了补充,提供了一个非常强大的企业级解决方案。
这里有几个名词需要了解一下:
- aop alliance:是 AOP 联盟,该组织定义了很多针对面向切面的接口 api,通常 Spring 等其它具备动态织入功能的框架依赖此包。
- AspectJ:AOP 虽然是方法论,但就好像 OOP 中的 Java 一样,一些先行者也开发了一套语言来支持 AOP。目前用得比较火的就是 AspectJ 语言了,它是一种几乎和 Java 完全一样的语言,而且完全兼容 Java。当然 spring 也有独立的 AOP 的实现。
让我们从定义一些核心的 AOP 概念和术语开始:
- Aspect(切面):一个关注点的模块化,这个关注点可能会横切多个对象。事务管理是 J2EE 应用中一个关于横切关注点的很好的例子。
- Join point(连接点 ):在程序执行过程中某个特定的点,比如某方法调用的时候或者处理异常的时候。
- Advice(通知):在切面的某个特定的连接点(Joinpoint)上执行的动作。通知有各种类型,其中包括“around”、“before”和“after”等通知。 通知的类型将在后面部分进行讨论。许多 AOP 框架,包括 Spring,都是以拦截器做通知模型, 并维护一个以连接点为中心的拦截器链。
- Pointcut(切入点 ):匹配连接点(Joinpoint)的断言。通知和一个切入点表达式关联,并在满足这个切入点的连接点上运行。 切入点表达式如何和连接点匹配 是 AOP 的核心:Spring 缺省使用 AspectJ 切入点语法。
- Introduction(引入): Spring 允许引入新的接口(以及一个对应的实现)到任何被代理的对象。例如,你可以使用一个引入来使 bean 实现 IsModified 接口,以便简化缓存机制。
- Target object(目标对象):被一个或者多个切面(aspect)所通知(advise)的对象。也有人把它叫做 被通知(advised) 对象。 既然 Spring AOP 是通过运行时代理实现的,这个对象永远是一个 被代理(proxied) 对象。
- AOP 代理 AOP proxy: 在 Spring 中,AOP 代理可以是 JDK 动态代理或者 CGLIB 代理。
- Weaving(织入):把切面(aspect)连接到其它的应用程序类型或者对象上,并创建一个被通知(advised)的对象,这个过程叫织入。 这些可以在编译时(例如使用 AspectJ 编译器),类加载时和运行时完成。 Spring 和其他纯 Java AOP 框架一样,在运行时完成织入。
Spring AOP 包括以下类型的通知:
- Before advice: 在连接点之前运行的通知,但不能阻止执行流继续执行到连接点(除非它抛出异常)。
- After returning advice: 在连接点正常完成后运行的通知(例如,如果方法返回而不引发异常)。
- After throwing advice: 在方法通过抛出异常退出时运行的通知。
- After (finally) advice: 不管连接点以何种方式退出(正常或异常返回),都要运行的通知。
- Around advice: 围绕连接点(如方法调用)的通知。 这是最有力的建议。 Around 通知可以在方法调用前后执行自定义行为。 它还负责选择是继续到连接点,还是通过返回自己的返回值或抛出异常来简化被通知的方法执行。
更多的内容会在后边的学习中进一步深入。
二、Spring AOP 能力和目标
- Spring AOP 是用纯 Java 实现的。 不需要特殊的编译过程。
- Spring AOP 目前只支持方法执行连接点(在 Spring bean 上的方法上执行通知)。 如果需要通知字段访问和更新连接点,可以考虑使用 AspectJ 之类的语言。
- Spring AOP 的 AOP 方法不同于大多数其他 AOP 框架。 目的不是提供最完整的 AOP 实现(尽管 Spring AOP 很有能力)。 相反,其目的是提供 AOP 实现和 Spring IoC 之间的紧密集成,以帮助解决企业应用程序中的常见问题。
Spring 和 AspectJ
Spring 框架的 AOP 功能通常与 Spring IoC 容器一起使用。 切面是通过使用普通 beanDefinition 语法配置的。 使用 Spring AOP 不能轻松或有效地完成一些事情,比如通知非常细粒度的对象(通常是域对象)。 AspectJ 是这种情况下的最佳选择。 然而,我们的经验是,Spring AOP 为企业 Java 应用程序中的大多数问题提供了一个很好的解决方案。
Spring AOP 从不与 AspectJ 竞争,以提供全面的 AOP 解决方案。 我们相信基于代理的框架(如 Spring AOP)和成熟的框架(如 AspectJ)都是有价值的,它们是互补的,而不是相互竞争的。 Spring 无缝地将 Spring AOP 和 IoC 与 AspectJ 集成在一起,以支持在一致的基于 Spring 的应用程序体系结构中使用 AOP。 这种集成不会影响 Spring AOP API 或 AOP Alliance API, Spring AOP 保持向后兼容。
三、AOP 代理
Spring AOP 默认为 AOP 代理使用标准的 JDK 动态代理, 这允许代理任何接口(或接口集)。
Spring AOP 也可以使用 CGLIB 代理。 缺省情况下,如果业务对象没有实现接口,则使用 CGLIB。 由于编写接口是很好的实践,因此业务类通常实现一个或多个业务接口是可能的。
四、@AspectJ 风格的支持
@AspectJ 是将切面声明为带有注解的常规 Java 类的一种风格。 @AspectJ 风格是由 AspectJ 项目作为 AspectJ 5 发行版的一部分引入的。 Spring 与 AspectJ 5 有相同的注解, 但是,AOP 运行时仍然是纯 Spring AOP,并且不依赖于 AspectJ 编译器或编织器。
1、对于 @AspectJ 的支持
要在 Spring 配置中使用 @AspectJ 注解,您需要启用 Spring 支持,以便基于@AspectJ 注解配置 Spring AOP,如果 Spring 确定一个 bean 被一个或多个切面通知,它将自动为该 bean 生成一个代理,以拦截方法调用,并确保通知在需要时运行。
@AspectJ 支持可以通过 XML 或 java 的配置来启用。 在这两种情况下,你还需要确保AspectJ 的 'aspectjweaver.jar' 库在你的应用程序的类路径上(1.8 或更高版本)。 这个库可以在 AspectJ 发行版的 'lib' 目录中或 Maven 中央存储库中获得。
使用 Java 配置启用 @AspectJ 支持
要使用 Java 的 @Configuration 启用@AspectJ 支持,请添加 @EnableAspectJAutoProxy 注解,如下面的示例所示:
@Configuration
@EnableAspectJAutoProxy
public class AppConfig {

}
使用 XML 配置启用 @AspectJ 支持,请使用 <aop:aspectj-autoproxy/> 元素,如下例所示:
<?xml version="1.0" encoding="UTF-8"?>
<beans xmlns="http://www.springframework.org/schema/beans"
   xmlns:xsi="http://www.w3.org/2001/XMLSchema-instance"
   xmlns:aop="http://www.springframework.org/schema/aop"
   xsi:schemaLocation="
       http://www.springframework.org/schema/beans https://www.springframework.org/schema/beans/spring-beans.xsd
       http://www.springframework.org/schema/aop https://www.springframework.org/schema/aop/spring-aop.xsd">

   <!-- bean definitions here -->
<aop:aspectj-autoproxy/>
</beans>
当然,我们需要引入 aop 的命名空间。
2、 声明一个切面
启用 @AspectJ 支持后,在应用程序上下文中定义的任何带有 @AspectJ 注解类的 bean 都会被 Spring 自动检测并用于配置 Spring AOP。
两个示例中的第一个展示了应用程序上下文中的常规 beanDefinition,它指向一个具有“@Aspect”注解的 bean 类:
<bean id="myAspect" class="org.xyz.NotVeryUsefulAspect">
   <!-- configure properties of the aspect here -->
</bean>
两个示例中的第二个展示了 'NotVeryUsefulAspect' 类定义,它是用 'org.aspectj.lang.annotation' 标注的。 方面的注解;
package org.xyz;
import org.aspectj.lang.annotation.Aspect;

@Aspect
public class NotVeryUsefulAspect {
}
用 @Aspect 标注的类可以有方法和字段,与任何其他类一样。 它们还可以包含切入点、通知和引入(类型间)声明。
通过组件扫描自动检测切面你可以在 Spring XML 配置中通过 @Configuration 类中的 @Bean 方法将切面类注册为常规 bean,或者让 Spring 通过类路径扫描自动检测它们——就像任何其他 Spring 管理的 bean 一样。 但是,请注意,``@Aspect注解不足以实现类路径中的自动检测。 为了达到这个目的,您需要添加一个单独的@Component` 注解。
在 Spring AOP 中,切面本身不能成为来自其他通知的目标。 类上的 @Aspect 注解将其标记为一个切面类,因此会将其排除在自动代理之外。
3、声明一个切入点
切入点确定感兴趣的连接点,从而使我们能够控制通知何时运行。
切入点声明由两部分组成:包含名称和方法签名,以及确定我们感兴趣的方法执行的切入点表达式。
怎么确定一个方法:public void com.ydlclass.service.impl.*(..)
@Pointcut("execution(* transfer(..))") // the pointcut expression
private void anyOldTransfer() {} // the pointcut signature
支持切入点指示器
Spring AOP 支持以下在切入点表达式中使用的 AspectJ 切入点指示器(PCD):
- execution: (常用)用于匹配方法执行的连接点,这是在使用 Spring AOP 时使用的主要切入点指示符。(匹配方法)
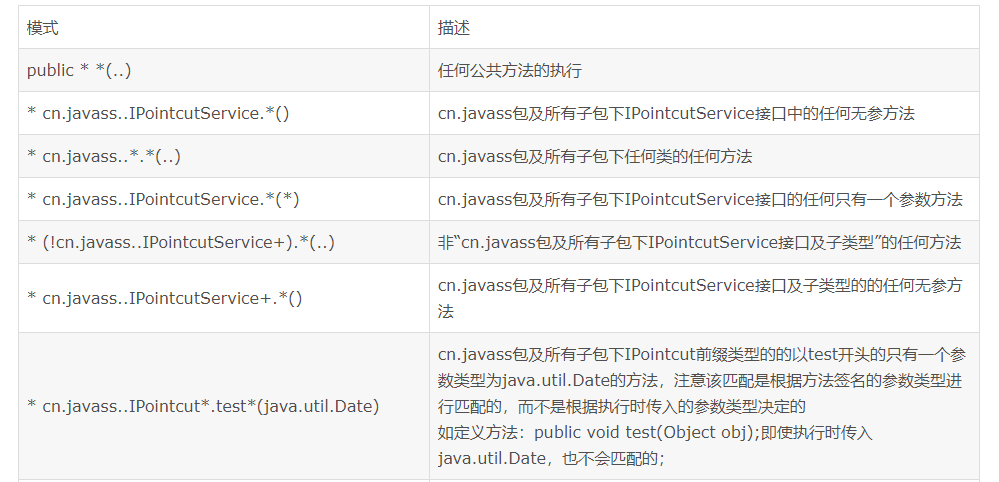
- within: 用于匹配指定类型内的方法执行。(匹配整个类)

- this: 用于匹配当前 AOP 代理对象类型的执行方法;注意是 AOP 代理对象的类型匹配,这样就可能包括引入接口也进行类型匹配。(配置整个类)
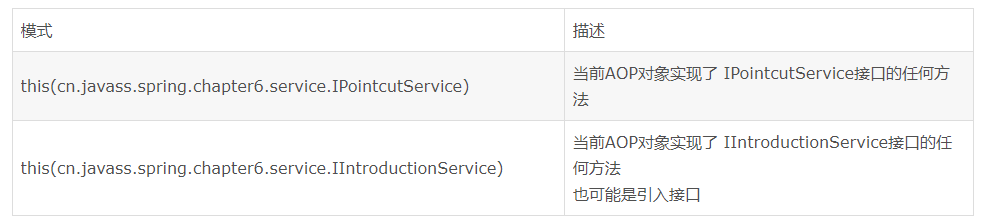
- target: 用于匹配当前目标对象类型的执行方法;注意是目标对象的类型匹配,这样就不包括引入接口也进行类型匹配。(配置整个类)
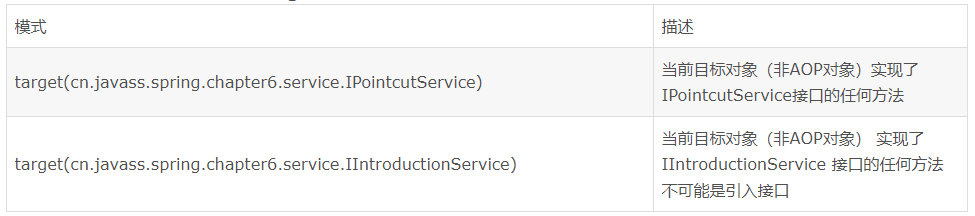
- args: 限制匹配连接点(使用 Spring AOP 时的方法执行),其中参数是给定类型的实例。 (参数类型匹配)

- @target: 用于匹配当前目标对象类型的执行方法,其中目标对象持有指定的注解 。(类上的注解)

- @args: 用于匹配当前执行的方法传入的参数持有指定注解的执行。(参数上的注解)

- @within: 用于匹配所有持有指定注解类型内的方法。(类上的注解)

- @annotation: (常用)于匹配当前执行方法持有指定注解的方法。(方法上的注解)

bean:使用“bean(Bean id 或名字通配符)”匹配特定名称的 Bean 对象的执行方法;Spring ASP 扩展的,在 AspectJ 中无相应概念。

切入点表达式运算
可以使用&&, || 和 ! 组合切入点表达式。 您还可以通过名称引用切入点表达式。 下面的例子展示了三个切入点表达式:
@Pointcut("execution(public * *(..))")
private void anyPublicOperation() {}

@Pointcut("within(com.xyz.myapp.trading..*)")
private void inTrading() {}

@Pointcut("anyPublicOperation() && inTrading()")
private void tradingOperation() {}
共享公共切入点定义
在使用企业应用程序时,开发人员经常希望从几个切面引用应用程序的模块和特定的操作集。 我们建议定义一个 CommonPointcut 切面来捕获通用的切入点表达式。 这样一个方面典型地类似于以下示例:
package com.xyz.myapp;

import org.aspectj.lang.annotation.Aspect;
import org.aspectj.lang.annotation.Pointcut;

@Aspect
public class CommonPointcuts {

   /**
    * A join point is in the web layer if the method is defined
    * in a type in the com.xyz.myapp.web package or any sub-package
    * under that.
    */
   @Pointcut("within(com.xyz.myapp.web..*)")
   public void inWebLayer() {}

   /**
    * A join point is in the service layer if the method is defined
    * in a type in the com.xyz.myapp.service package or any sub-package
    * under that.
    */
   @Pointcut("within(com.xyz.myapp.service..*)")
   public void inServiceLayer() {}

   /**
    * A join point is in the data access layer if the method is defined
    * in a type in the com.xyz.myapp.dao package or any sub-package
    * under that.
    */
   @Pointcut("within(com.xyz.myapp.dao..*)")
   public void inDataAccessLayer() {}

   /**
    * A business service is the execution of any method defined on a service
    * interface. This definition assumes that interfaces are placed in the
    * "service" package, and that implementation types are in sub-packages.
    *
    * If you group service interfaces by functional area (for example,
    * in packages com.xyz.myapp.abc.service and com.xyz.myapp.def.service) then
    * the pointcut expression "execution(* com.xyz.myapp..service.*.*(..))"
    * could be used instead.
    *
    * Alternatively, you can write the expression using the 'bean'
    * PCD, like so "bean(*Service)". (This assumes that you have
    * named your Spring service beans in a consistent fashion.)
    */
   @Pointcut("execution(* com.xyz.myapp..service.*.*(..))")
   public void businessService() {}

   /**
    * A data access operation is the execution of any method defined on a
    * dao interface. This definition assumes that interfaces are placed in the
    * "dao" package, and that implementation types are in sub-packages.
    */
   @Pointcut("execution(* com.xyz.myapp.dao.*.*(..))")
   public void dataAccessOperation() {}

}
您可以在任何需要切入点表达式的地方引用在这样一个切面中定义的切入点。 例如,要使服务层成为事务性的,可以这样写:
<aop:config>
   <aop:advisor
       pointcut="com.xyz.myapp.CommonPointcuts.businessService()"
       advice-ref="tx-advice"/>
</aop:config>

<tx:advice id="tx-advice">
   <tx:attributes>
       <tx:method name="*" propagation="REQUIRED"/>
   </tx:attributes>
</tx:advice>
4、 声明通知
通知与切入点表达式相关联,并在切入点匹配的方法执行之前、之后或前后运行。 切入点表达式可以是对指定切入点的简单引用,也可以是适当声明的切入点表达式。
a、(Before advice)前置通知
你可以使用 @Before 注解在方面中声明 before 通知:
import org.aspectj.lang.annotation.Aspect;
import org.aspectj.lang.annotation.Before;

@Aspect
public class BeforeExample {

   @Before("com.xyz.myapp.CommonPointcuts.dataAccessOperation()")
   public void doAccessCheck() {
       // ...
   }
}
如果使用切入点表达式,可以将前面的示例重写为以下示例:
import org.aspectj.lang.annotation.Aspect;
import org.aspectj.lang.annotation.Before;

@Aspect
public class BeforeExample {

   @Before("execution(* com.xyz.myapp.dao.*.*(..))")
   public void doAccessCheck() {
       // ...
   }
}
b、(After returning advice)返回通知
当匹配的方法执行正常返回时,返回通知运行。 你可以通过使用 @AfterReturning 注解声明它:
import org.aspectj.lang.annotation.Aspect;
import org.aspectj.lang.annotation.AfterReturning;

@Aspect
public class AfterReturningExample {

   @AfterReturning("com.xyz.myapp.CommonPointcuts.dataAccessOperation()")
   public void doAccessCheck() {
       // ...
   }
}
有时,您需要在通知主体中访问返回的实际值。 你可以使用 @afterreturn 的形式绑定返回值以获得访问,如下例所示:
import org.aspectj.lang.annotation.Aspect;
import org.aspectj.lang.annotation.AfterReturning;

@Aspect
public class AfterReturningExample {

   @AfterReturning(
       pointcut="com.xyz.myapp.CommonPointcuts.dataAccessOperation()",
       returning="retVal")
   public void doAccessCheck(Object retVal) {
       // ...
   }
}
c、(After throwing advice)抛出异常后通知
抛出通知后,当匹配的方法执行通过抛出异常退出时运行。 你可以通过使用 @AfterThrowing 注解来声明它,如下面的例子所示:
import org.aspectj.lang.annotation.Aspect;
import org.aspectj.lang.annotation.AfterThrowing;

@Aspect
public class AfterThrowingExample {

   @AfterThrowing("com.xyz.myapp.CommonPointcuts.dataAccessOperation()")
   public void doRecoveryActions() {
       // ...
   }
}
通常,您如果希望通知仅在抛出给定类型的异常时运行,而且您还经常需要访问通知主体中抛出的异常。 你可以使用 'thrown' 属性来限制匹配(如果需要,则使用 'Throwable' 作为异常类型),并将抛出的异常绑定到一个 advice 参数。 下面的例子展示了如何做到这一点:
import org.aspectj.lang.annotation.Aspect;
import org.aspectj.lang.annotation.AfterThrowing;

@Aspect
public class AfterThrowingExample {

   @AfterThrowing(
       pointcut="com.xyz.myapp.CommonPointcuts.dataAccessOperation()",
       throwing="ex")
   public void doRecoveryActions(DataAccessException ex) {
       // ...
   }
}
throwing 属性中使用的名称必须与通知方法中的参数名称相对应。 当一个方法执行通过抛出异常而退出时,异常将作为相应的参数值传递给 advice 方法。
d、After (Finally) 最终通知
After (finally)通知在匹配的方法执行退出时运行。 它是通过使用 @After 注解声明的。 After advice 必须准备好处理正常和异常返回条件,它通常用于释放资源以及类似的目的。 下面的例子展示了如何使用 after finally 通知:
import org.aspectj.lang.annotation.Aspect;
import org.aspectj.lang.annotation.After;

@Aspect
public class AfterFinallyExample {

   @After("com.xyz.myapp.CommonPointcuts.dataAccessOperation()")
   public void doReleaseLock() {
       // ...
   }
}
更多值得注意的地方,AspectJ 中的 @After 通知被定义为 after finally ,类似于 try-catch 语句中的 finally 块。 它将对任何结果,其中包括正常返回或从连接点抛出异常都会进行调用,而 @afterreturn 只适用于成功的正常返回。
e、Around 通知
Around advice 环绕匹配的方法执行。 它有机会在方法运行之前和之后进行工作,并确定方法何时、如何运行,甚至是否真正运行。 如果您需要在方法执行之前和之后以线程安全的方式共享状态(例如,启动和停止计时器),经常使用 Around 通知。 我们推荐,总是使用最弱的通知形式,以满足你的要求(也就是说,不要使用环绕通知,如果前置通知也可以完成需求)。
Around 通知是通过使用 @Around 注解声明的。 advice 方法的第一个参数必须是 ProceedingJoinPoint 类型。 在通知体中,在 ProceedingJoinPoint 上调用 proceed() 会导致底层方法运行。 proceed 方法也可以传入 Object[] 。 当方法执行时,数组中的值被用作方法执行的参数。
下面的例子展示了如何使用 around advice:
import org.aspectj.lang.annotation.Aspect;
import org.aspectj.lang.annotation.Around;
import org.aspectj.lang.ProceedingJoinPoint;

@Aspect
public class AroundExample {

   @Around("com.xyz.myapp.CommonPointcuts.businessService()")
   public Object doBasicProfiling(ProceedingJoinPoint pjp) throws Throwable {
       // 我们可以在前边做一些工作,比如启动计时器

       // 这里是真正的方法调用的地方
       Object retVal = pjp.proceed();
       // 我们可以在后边做一些工作,比如停止计时器,搜集方法的执行时间
       return retVal;
   }
}
注:around 通知返回的值是方法调用者看到的返回值。 例如,一个简单的缓存切面可以从缓存返回一个值(如果它有一个值),如果没有,则调用 proceed()。 注意,proceed 方法你可以只调用一次,也可以调用多次,也可以根本不去调用, 这都是可以的。
f、通知的参数
Spring 提供了完整类型的通知,这意味着您可以在通知签名中声明所需的参数(就像我们前面在返回和抛出示例中看到的那样)。
访问当前 JoinPoint
任何通知方法都可以声明一个类型为 org.aspectj.lang.JoinPoint 的参数作为它的第一个参数(注意,around 通知需要声明类型为 ProceedingJoinPoint)的第一个参数,它是 oinPoint 的一个子类。 JoinPoint 接口提供了许多有用的方法:
getArgs(): 返回方法参数。getThis(): 返回代理对象。getTarget(): 返回目标对象。getSignature(): 返回被通知的方法的签名。toString(): 打印被建议的方法的有用描述。
@Before("beforePointcut()")
private void beforeAdvice(JoinPoint jp) throws InvocationTargetException, IllegalAccessException {
MethodSignature signature = (MethodSignature)jp.getSignature();
// 能拿到方法,能不能拿到方法的注解
Method method = signature.getMethod();
// 调用方法的过程
method.invoke(jp.getTarget(), jp.getArgs());
System.out.println("this is before advice");
}
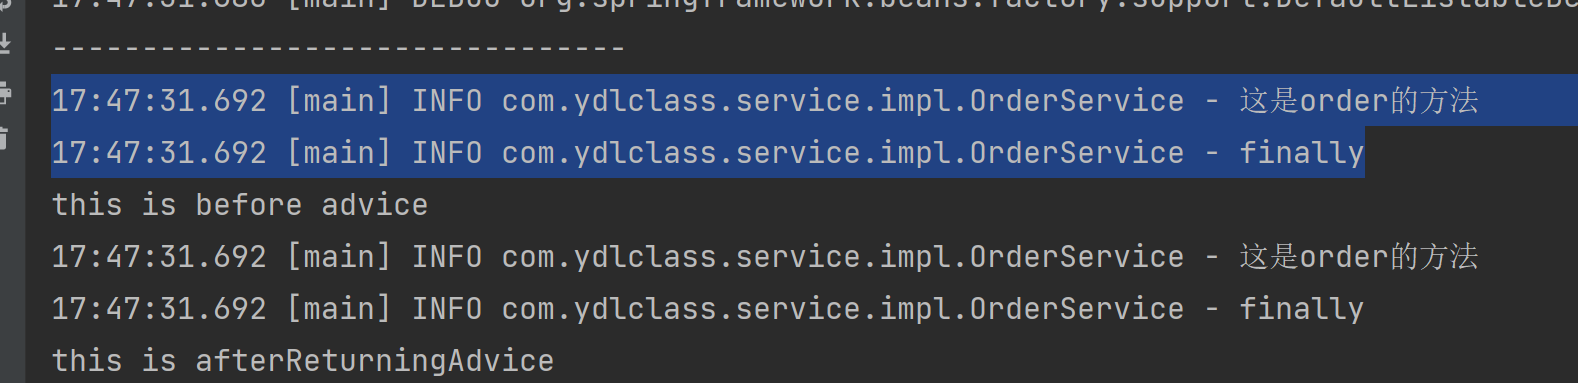
将参数传递给 Advice
我们已经看到了如何绑定返回值或异常值。 要使参数值对通知主体可用,可以使用 args 的绑定形式。 如果在 args 表达式中使用参数名代替类型名,则在调用通知时将传递相应值作为参数值。
举个例子应该能更清楚地说明这一点:
@Override
public String order(Integer money) {
try {
logger.info("这是order的方法");
return "inner try";
} finally {
logger.info("finally");
//return "finally";
}
}
@Before("execution(* com.ydlclass.service.impl.OrderService.*(..)) && args(money,..)")
public void validateAccount(Integer money) {
System.out.println("before--------" + money);
}
切入点表达式的 args(account,..) 部分有两个目的
- 首先,它限制只匹配哪些方法执行,其中方法接受至少一个参数,并且传递给该参数的参数是 'Account' 的一个实例。
- 其次,它通过 'Account' 参数使通知可以使用实际的 'Account' 对象。
另一种方式是编写方法声明一个切入点,该切入点在匹配连接点时“提供” Account 对象值,然后从通知中引用指定的切入点。 这看起来如下:
@Pointcut("com.xyz.myapp.CommonPointcuts.dataAccessOperation() && args(account,..)")
private void accountDataAccessOperation(Account account) {}
@Before("accountDataAccessOperation(account)")
public void validateAccount(Account account) {
// ...
}
5、引入 Introduction
引入使切面能够声明被通知的对象实现给定的接口,也就是让代理对象实现新的接口。
@DeclareParents(value="com.ydlclass.service.impl.OrderService",defaultImpl= ActivityService.class)
public static IActivityService activityService;
要实现的接口由注解字段的类型决定。 @DeclareParents 注解的 value 属性是一个 AspectJ 类型类。 任何与之匹配的类型的 bean 都将实现 UsageTracked 接口。 注意,在前面示例的 before 通知中,服务 bean 可以直接用作 UsageTracked 接口的实现。 如果以编程方式访问 bean,您将编写以下代码:
IActivityService bean = ctx.getBean(IActivityService.class);
bean.sendGif();
搞过 debug 看到了,生成的代理实现了两个接口:

6、Advice Ordering
- 当多个通知都想在同一个连接点上运行时,Spring AOP 遵循与 AspectJ 相同的优先规则来确定通知执行的顺序。 优先级最高的通知在进入时首先运行因此,给定两个 before 通知,优先级最高的将首先运行。 从连接点退出时,优先级最高的通知最后运行因此,给定两个 after 通知,优先级最高的通知将第二运行。
- 当在不同切面定义的两个通知都需要在同一个连接点上运行时,除非另行指定,否则执行顺序是未定义的。 您可以通过指定优先级来控制执行顺序。 在切面类中使用
Ordered接口,或者用@Order注释它。 对于两个切面,从Ordered.getOrder()返回较低值的切面(或注释值)具有较高的优先级。
7、AOP 的例子
业务代码的执行有时会由于并发性问题而失败(例如,死锁而导致的失败)。如果再次尝试该操作,很可能在下一次尝试时成功。 对于适合在这种条件下重试的业务服务,我们希望进行透明地重试操作。 这是一个明显跨越 service 层中的多个服务的需求,因此是通过切面实现的理想需求。
因为我们想要重试操作,所以我们需要使用 around 通知,以便我们可以多次调用 proceed()。 下面的例子显示了基本方面的实现:
@Aspect
public class ConcurrentOperationExecutor implements Ordered {
private static final int DEFAULT_MAX_RETRIES = 2;
private int maxRetries = DEFAULT_MAX_RETRIES;
private int order = 1;
public void setMaxRetries(int maxRetries) {
this.maxRetries = maxRetries;
}
public int getOrder() {
return this.order;
}
public void setOrder(int order) {
this.order = order;
}
@Around("com.xyz.myapp.CommonPointcuts.businessService()")
public Object doConcurrentOperation(ProceedingJoinPoint pjp) throws Throwable {
int numAttempts = 0;
PessimisticLockingFailureException lockFailureException;
do {
numAttempts++;
try {
return pjp.proceed();
}
catch(PessimisticLockingFailureException ex) {
lockFailureException = ex;
}
} while(numAttempts <= this.maxRetries);
throw lockFailureException;
}
}
注意,切面实现了 'Ordered' 接口,因此我们可以将该切面的优先级设置得高于事务通知,我们希望每次重试时都有一个新的事务。'maxRetries' 和 'order' 属性都是可以由 Spring 配置注入的。
对应的 Spring 配置如下:
<aop:aspectj-autoproxy/>
<bean id="concurrentOperationExecutor" class="com.xyz.myapp.service.impl.ConcurrentOperationExecutor">
<property name="maxRetries" value="3"/>
<property name="order" value="100"/>
</bean>
五、基于 schema 的 AOP 支持
如果您喜欢基于 xml 的格式,Spring 还提供了使用aop 命名空间标记定义切面的支持。 它支持与使用 @AspectJ 样式时完全相同的切入点表达式和通知类型。
要使用本节中描述的 aop 命名空间标记,您需要导入 'spring-aop' 模块。
在 Spring 配置中,所有切面和通知元素都必须放在一个 <aop:config> 元素中(在应用程序上下文配置中可以有多个 <aop:config> 元素)。 一个 <aop:config> 元素可以包含切入点、通知和切面元素(注意这些元素必须按照这个顺序声明)。
配置切面,切点表达式,通知的方法如下
<?xml version="1.0" encoding="UTF-8"?>
<beans xmlns="http://www.springframework.org/schema/beans"
xmlns:xsi="http://www.w3.org/2001/XMLSchema-instance"
xmlns:aop="http://www.springframework.org/schema/aop"
xsi:schemaLocation="
http://www.springframework.org/schema/beans https://www.springframework.org/schema/beans/spring-beans.xsd
http://www.springframework.org/schema/aop https://www.springframework.org/schema/aop/spring-aop.xsd">
<!-- <aop:aspectj-autoproxy/>-->
<aop:config>
<aop:aspect ref="aop">
<aop:pointcut id="point" expression="execution(* com.ydlclass..*(..))"/>
<aop:before method="beforeAdvice" pointcut="execution(* com.ydlclass..*(..)) and args(money,..)"/>
<aop:after method="afterAdvice" pointcut-ref="point"/>
<aop:after-returning method="afterReturningAdvice" pointcut-ref="point"/>
<aop:after-throwing throwing="ex" method="afterThrowing" pointcut-ref="point"/>
</aop:aspect>
</aop:config>
<bean id="aop" class="com.ydlclass.aspecj.MyAop"/>
<bean id="orderService" class="com.ydlclass.service.impl.OrderService"/>
<bean id="userService" class="com.ydlclass.service.impl.UserService"/>
</beans>
Introduction
<aop:aspect id="usageTrackerAspect" ref="usageTracking">
<aop:declare-parents
types-matching="com.xzy.myapp.service.*+"
implement-interface="com.xyz.myapp.service.tracking.UsageTracked"
default-impl="com.xyz.myapp.service.tracking.DefaultUsageTracked"/>
</aop:aspect>
AOP 示例
public class ConcurrentOperationExecutor implements Ordered {
private static final int DEFAULT_MAX_RETRIES = 2;
private int maxRetries = DEFAULT_MAX_RETRIES;
private int order = 1;
public void setMaxRetries(int maxRetries) {
this.maxRetries = maxRetries;
}
public int getOrder() {
return this.order;
}
public void setOrder(int order) {
this.order = order;
}
public Object doConcurrentOperation(ProceedingJoinPoint pjp) throws Throwable {
int numAttempts = 0;
PessimisticLockingFailureException lockFailureException;
do {
numAttempts++;
try {
return pjp.proceed();
}
catch(PessimisticLockingFailureException ex) {
lockFailureException = ex;
}
} while(numAttempts <= this.maxRetries);
throw lockFailureException;
}
}
对应的 Spring 配置如下:
<aop:config>
<aop:aspect id="concurrentOperationRetry" ref="concurrentOperationExecutor">
<aop:pointcut id="idempotentOperation"
expression="execution(* com.xyz.myapp.service.*.*(..))"/>
<aop:around
pointcut-ref="idempotentOperation"
method="doConcurrentOperation"/>
</aop:aspect>
</aop:config>
<bean id="concurrentOperationExecutor"
class="com.xyz.myapp.service.impl.ConcurrentOperationExecutor">
<property name="maxRetries" value="3"/>
<property name="order" value="100"/>
</bean>
六、选择使用哪种 AOP 声明风格
一旦您确定使用 aop 是实现给定需求的最佳方法,您如何决定是使用 Spring AOP 还是 AspectJ,是使用切面语言(代码)风格 aspectj、@AspectJ 注解风格还是 Spring XML 风格?
1、Spring AOP 还是 Full AspectJ?
Spring AOP 比使用完整的 AspectJ 更简单,因为不需要在开发和构建过程中引入 AspectJ 编译器/编织器。 如果您只需要在 Spring bean 上执行操作,那么 Spring AOP 是正确的选择。 如果需要通知不受 Spring 容器管理的对象,则需要 AspectJ。
2、 @AspectJ 还是 Spring AOP 的 XML?
如果您选择使用 Spring AOP,那么您可以选择 @AspectJ 或 XML 样式。
XML 样式可能是现有 Spring 用户最熟悉的,并且它是由真正的 pojo 支持的。 当使用 AOP 作为配置企业服务的工具时,XML 可能是一个很好的选择(一个很好的测试是您是否认为切入点表达式是您可能想要独立更改的配置的一部分)。 使用 XML 样式,可以从配置中更清楚地看出系统中存在哪些。
XML 样式有两个缺点。 首先,它没有将它所处理的需求的实现完全封装在一个地方。 其次,与@AspectJ 风格相比,XML 风格在它能表达的内容上稍微受到一些限制,只支持“单例”切面实例化模型,并且不可能组合在 XML 中声明的命名切入点。 例如,在 @AspectJ 风格中,你可以写如下内容:
@Pointcut("execution(* get*())")
public void propertyAccess() {}
@Pointcut("execution(org.xyz.Account+ *(..))")
public void operationReturningAnAccount() {}
@Pointcut("propertyAccess() && operationReturningAnAccount()")
public void accountPropertyAccess() {}
在 XML 样式中,可以声明前两个切入点:
<aop:pointcut id="propertyAccess"
expression="execution(* get*())"/>
<aop:pointcut id="operationReturningAnAccount"
expression="execution(org.xyz.Account+ *(..))"/>
XML 方法的缺点是不能通过组合这些定义来定义“accountPropertyAccess”切入点。
@AspectJ 还有一个优点,即 @AspectJ 切面可以被 Spring AOP 和 AspectJ 理解(从而使用)。 因此,如果您以后决定需要 AspectJ 的功能来实现额外的需求,您可以轻松地迁移到经典的 AspectJ 当中。
总的来说,Spring 团队更喜欢自定义切面的 @AspectJ 风格,而不是简单的企业服务配置。
七、以编程方式创建 @AspectJ 代理
除了通过使用 <aop:config> 或 <aop:aspectj-autoproxy> 在配置中声明方面之外,还可以通过编程方式创建通知目标对象的代理。
代码如下:
public static void main(String[] args) {
AspectJProxyFactory aspectJProxyFactory = new AspectJProxyFactory(new OrderService());
aspectJProxyFactory.addAspect(MyAspect.class);
IOrderService proxy = (IOrderService)aspectJProxyFactory.getProxy();
proxy.order(111);
}
第七章 事务管理
回顾 jdbc 中的事务是怎么实现的:
-- 将事务设置为手动提交
set autocommit = false;
-- 开启事务
START TRANSACTION;
INSERT INTO `user`(id,username,`password`) values (10001,'zs','123');
-- 新增保存点
SAVEPOINT x;
INSERT INTO `user`(id,username,`password`) values (10002,'lisi','123');
-- 回滚到保存点x
ROLLBACK TO x;
START TRANSACTION;
INSERT INTO `user`(id,username,`password`) values (10003,'lisi','123');
SELECT * FROM user;
COMMIT;
一、Spring 框架事务支持模型的优点
全面的事务支持是使用 Spring 框架最令人信服的原因之一。 Spring Framework 为事务管理提供了一个一致的抽象,给我们的开发带来了极大的遍历。
Spring 允许应用程序开发人员在任何环境中使用一致的编程模型。 只需编写一次代码,它就可以从不同环境中的不同事务管理策略中获益。 Spring 框架同时提供声明式和编程式事务管理。 大多数用户更喜欢声明式事务管理,这也是我们在大多数情况下所推荐的。 使用声明式模型,开发人员通常很少或不编写与事务管理相关的代码,因此,不依赖于 Spring Framework 事务 API 或任何其他事务 API,也就是啥也不用写。
二、 理解 Spring 框架的事务抽象
spring 事务对事务抽象提现在一下三个类中:PlatformTransactionManager,TransactionDefinition ,TransactionStatus。
1、TransactionManager
TransactionManage 主要有一下两个子接口:
org.springframework.transaction.PlatformTransactionManager 接口用于为不同平台提供统一抽象的事务管理器。
org.springframework.transaction.ReactiveTransactionManager 接口用于响应式事务管理,这个不重要。
下面显示了 PlatformTransactionManager API 的定义:
public interface PlatformTransactionManager extends TransactionManager {
TransactionStatus getTransaction(TransactionDefinition definition) throws TransactionException;
void commit(TransactionStatus status) throws TransactionException;
void rollback(TransactionStatus status) throws TransactionException;
}
任何 PlatformTransactionManager 接口实现类的方法抛出的 TransactionException 是未检查的 (也就是说,它继承了 java.lang.RuntimeException 的类)。 这里边隐藏了一个知识点,我们后续再说。
public abstract class TransactionException extends NestedRuntimeException {
public TransactionException(String msg) {
super(msg);
}
public TransactionException(String msg, Throwable cause) {
super(msg, cause);
}
}
任何一个 TransactionManager 的实现通常需要了解它们工作的环境:JDBC、mybatis、Hibernate 等等。 下面的示例展示了如何定义一个本地的 PlatformTransactionManager 实现(在本例中,使用纯 JDBC)。
你可以通过创建一个类似于下面这样的 bean 来定义 JDBC DataSource:
username=root
password=root
url=jdbc:mysql://127.0.0.1:3306/ydlclass?characterEncoding=utf8&serverTimezone=Asia/Shanghai
driverName=com.mysql.cj.jdbc.Driver
<?xml version="1.0" encoding="UTF-8"?>
<beans xmlns="http://www.springframework.org/schema/beans"
xmlns:xsi="http://www.w3.org/2001/XMLSchema-instance"
xmlns:p="http://www.springframework.org/schema/p"
xmlns:context="http://www.springframework.org/schema/context"
xsi:schemaLocation="http://www.springframework.org/schema/beans
https://www.springframework.org/schema/beans/spring-beans.xsd
http://www.springframework.org/schema/context
https://www.springframework.org/schema/context/spring-context.xsd">
<context:property-placeholder location="jdbc.properties"/>
<bean id="dataSource" class="com.alibaba.druid.pool.DruidDataSource">
<property name="driverClassName" value="${driverName}"/>
<property name="username" value="${username}"/>
<property name="password" value="${password}"/>
<property name="url" value="${url}"/>
</bean>
</beans>
DataSourceTransactionManager 是 PlatformTransactionManager 的一个子类,他需要一个数据源进行注入:
<bean id="txManager" class="org.springframework.jdbc.datasource.DataSourceTransactionManager">
<property name="dataSource" ref="dataSource"/>
</bean>
注意点,在 DataSourceTransactionManager 源码中有这么一句话,讲线程的持有者绑定到线程当中:
// Bind the connection holder to the thread.
if (txObject.isNewConnectionHolder()) {
TransactionSynchronizationManager.bindResource(obtainDataSource(), txObject.getConnectionHolder());
}
private static final ThreadLocal<Map<Object, Object>> resources =
new NamedThreadLocal<>("Transactional resources");
从这里我们也能大致明白,PlatformTransactionManager 的事务是和线程绑定的,事务的获取是从当前线程中获取的。
2、TransactionDefinition
TransactionDefinition 接口指定了当前事务的相关配置,主要配置如下:
- Propagation:通常情况下,事务范围内的所有代码都在该事务中运行。 但是,如果事务方法在已经存在事务的上下文中运行,则可以指定事务的传播行为。
- Isolation:该事务与其他事务的工作隔离的程度。 例如,这个事务可以看到其他事务未提交的写入吗? 隔离级别
- Timeout:该事务在超时并被底层事务基础设施自动回滚之前运行多长时间。
- 只读状态:当代码读取但不修改数据时,可以使用只读事务。 在某些情况下,如使用 Hibernate 时,只读事务可能是一种有用的优化。
public interface TransactionDefinition {
/**
* Support a current transaction; create a new one if none exists.
*/
int PROPAGATION_REQUIRED = 0;
/**
* Support a current transaction; execute non-transactionally if none exists.
*/
int PROPAGATION_SUPPORTS = 1;
/**
* Support a current transaction; throw an exception if no current transaction
*/
int PROPAGATION_MANDATORY = 2;
/**
* Create a new transaction, suspending the current transaction if one exists.
*/
int PROPAGATION_REQUIRES_NEW = 3;
/**
* Do not support a current transaction; rather always execute non-transactionally.
*/
int PROPAGATION_NOT_SUPPORTED = 4;
/**
* Do not support a current transaction; throw an exception if a current transaction
*/
int PROPAGATION_NEVER = 5;
/**
* Execute within a nested transaction if a current transaction exists,
*/
int PROPAGATION_NESTED = 6;
int ISOLATION_DEFAULT = -1;
int ISOLATION_READ_UNCOMMITTED = 1;
int ISOLATION_READ_COMMITTED = 2;
int ISOLATION_REPEATABLE_READ = 4;
int ISOLATION_SERIALIZABLE = 8;
/**
* Use the default timeout of the underlying transaction system,
* or none if timeouts are not supported.
*/
int TIMEOUT_DEFAULT = -1;
}
这个接口有一个默认实现:
public class DefaultTransactionDefinition implements TransactionDefinition, Serializable {
private int propagationBehavior = PROPAGATION_REQUIRED;
private int isolationLevel = ISOLATION_DEFAULT;
private int timeout = TIMEOUT_DEFAULT;
private boolean readOnly = false;
//....
}
3、TransactionStatus
TransactionStatus 接口为事务代码提供了一种简单的方法来控制事务执行和查询事务状态。下面的例子显示了 TransactionStatus 接口:
public interface TransactionStatus extends TransactionExecution, SavepointManager, Flushable {
@Override
//返回当前事务是否是新的; 否则将参与现有事务,或者可能从一开始就不在实际事务中运行。
boolean isNewTransaction();
boolean hasSavepoint();
@Override
// 只设置事务回滚。 这指示事务管理器,事务的唯一可能结果可能是回滚,而不是抛出异常,从而触发回滚。
void setRollbackOnly();
@Override
// 返回事务是否被标记为仅回滚(由应用程序或事务基础设施)。
boolean isRollbackOnly();
void flush();
@Override
// 返回该事务是否已完成,即是否已提交或回滚。
boolean isCompleted();
}
三、编程式事务管理
Spring Framework 提供了两种编程式事务管理的方法:
- 使用 TransactionTemplate。
- 使用 TransactionManager。
1、 使用 TransactionManager
使用 PlatformTransactionManager
我们可以直接使用 org.springframework.transaction.PlatformTransactionManager 直接管理事务。 为此,通过 bean 引用将您使用的 PlatformTransactionManager 的实现传递给您的 bean。 然后,通过使用 TransactionDefinition 和 TransactionStatus 对象,您可以发起事务、回滚和提交。 下面的示例显示了如何这样做:
给容器注入对应的事务管理器:
<context:property-placeholder location="jdbc.properties"/>
<context:component-scan base-package="com.ydlclass"/>
<!-- 注入事务管理器 -->
<bean id="transactionManager" class="org.springframework.jdbc.datasource.DataSourceTransactionManager">
<property name="dataSource" ref="dataSource"/>
</bean>
<!-- 注入事务管理器 -->
<bean id="jdbcTemplate" class="org.springframework.jdbc.core.JdbcTemplate">
<property name="dataSource" ref="dataSource"/>
</bean>
<!--数据源-->
<bean id="dataSource" class="com.alibaba.druid.pool.DruidDataSource">
<property name="url" value="${url}"/>
<property name="driverClassName" value="${driverName}"/>
<property name="username" value="${user}"/>
<property name="password" value="${password}"/>
</bean>
注入对应的 service
@Override
public void transfer(String from, String to, Integer money) {
// 默认的事务配置
DefaultTransactionDefinition definition = new DefaultTransactionDefinition();
// 使用事务管理器进行事务管理
TransactionStatus transaction = transactionManager.getTransaction(definition);
try{
// 转账其实是两个语句
String moneyFrom = "update account set money = money - ? where username = ? ";
String moneyTo = "update account set money = money + ? where username = ? ";
// 从转账的人处扣钱
jdbcTemplate.update(moneyFrom,money,from);
int i = 1/0;
jdbcTemplate.update(moneyTo,money,to);
}catch (RuntimeException exception){
exception.printStackTrace();
// 回滚
transactionManager.rollback(transaction);
}
// 提交
transactionManager.commit(transaction);
}
2、 使用 TransactionTemplate
TransactionTemplate 采用了与其他 Spring 模板相同的方法,比如 JdbcTemplate 。 它使用回调方法将应用程序代码从获取和释放事务性资源的样板程序中解放出来,因为您的代码只关注您想要做的事情,而不是希望将大量的时间浪费在这里。
正如下面的示例所示,使用 TransactionTemplate 绝对会将您与 Spring 的事务基础设施和 api 耦合在一起。 编程事务管理是否适合您的开发需求,这是您必须自己做出的决定。
必须在事务上下文中运行并显式使用 TransactionTemplate 的应用程序代码类似于下一个示例。 您作为一个应用程序开发人员,可以编写一个 TransactionCallback 实现(通常表示为一个匿名内部类),其中包含您需要在事务上下文中运行的代码。 然后你可以将你的自定义 TransactionCallback 的一个实例传递给 TransactionTemplate 中暴露的 execute(..) 方法。 下面的示例显示了如何这样做:
<bean id="transactionTemplate" class="org.springframework.transaction.support.TransactionTemplate">
<property name="transactionManager" ref="transactionManager"/>
</bean>
如果没有返回值,你可以在匿名类中使用方便的 TransactionCallbackWithoutResult 类,如下所示:
@Override
public void transfer3(String from, String to, Integer money) {
transactionTemplate.execute(new TransactionCallbackWithoutResult() {
@Override
protected void doInTransactionWithoutResult(TransactionStatus status) {
// 转账其实是两个语句
String moneyFrom = "update account set money = money - ? where username = ? ";
String moneyTo = "update account set money = money + ? where username = ? ";
// 从转账的人处扣钱
jdbcTemplate.update(moneyFrom, money, from);
// int i = 1 / 0;
jdbcTemplate.update(moneyTo, money, to);
}
});
}
3、 声明式事务管理
大多数 Spring 框架用户选择声明式事务管理。 该选项对应用程序代码的影响最小,因此最符合非侵入式轻量级容器的理想。
Spring 框架的声明性事务管理是通过 Spring 面向切面编程(AOP)实现的。 然而,由于事务切面代码随 Spring Framework 发行版一起提供,并且可以模板的方式使用,所以通常不需要理解 AOP 概念就可以有效地使用这些代码。
(1) 理解 Spring 框架的声明式事务
Spring 框架的声明式事务通过 AOP 代理进行实现,事务的通知是由 AOP 元数据与事务性元数据的结合产生了一个 AOP 代理,该代理使用 TransactionInterceptor 结合适当的 TransactionManager 实现来驱动方法调用的事务。
Spring Framework 的 TransactionInterceptor 为命令式和响应式编程模型提供了事务管理。 拦截器通过检查方法返回类型来检测所需的事务管理风格。 事务管理风格会影响需要哪个事务管理器。 命令式事务需要 PlatformTransactionManager ,而响应式事务使用 ReactiveTransactionManager 实现。
@Transactional 通常用于 PlatformTransactionManager 管理的线程绑定事务,将事务暴露给当前执行线程中的所有数据访问操作。(注意:这不会传播到方法中新启动的线程)。
(2)声明式事务实现的示例
<!-- from the file 'context.xml' -->
<?xml version="1.0" encoding="UTF-8"?>
<beans xmlns="http://www.springframework.org/schema/beans"
xmlns:xsi="http://www.w3.org/2001/XMLSchema-instance"
xmlns:aop="http://www.springframework.org/schema/aop"
xmlns:tx="http://www.springframework.org/schema/tx"
xsi:schemaLocation="
http://www.springframework.org/schema/beans
https://www.springframework.org/schema/beans/spring-beans.xsd
http://www.springframework.org/schema/tx
https://www.springframework.org/schema/tx/spring-tx.xsd
http://www.springframework.org/schema/aop
https://www.springframework.org/schema/aop/spring-aop.xsd">
<!-- the transactional advice (what 'happens'; see the <aop:advisor/> bean below) -->
<tx:advice id="txAdvice" transaction-manager="transactionManager">
<!-- the transactional semantics... -->
<tx:attributes>
<!-- all methods starting with 'get' are read-only -->
<tx:method name="get*" read-only="true"/>
<!-- other methods use the default transaction settings (see below) -->
<tx:method name="*"/>
</tx:attributes>
</tx:advice>
<!-- ensure that the above transactional advice runs for any execution
of an operation defined by the FooService interface -->
<aop:config>
<aop:pointcut id="point" expression="within(com.ydlclass.service..*)"/>
<aop:advisor advice-ref="txAdvice" pointcut-ref="point"/>
</aop:config>
</beans>
(3)事务回滚
上一节概述了如何在应用程序中以声明的方式为类(通常是服务层类)指定事务设置的基础知识。 本节描述如何以简单的声明式方式控制事务的回滚。
重要
在其默认配置中,Spring 框架的事务基础结构代码只在运行时、未检查的异常情况下标记事务进行回滚。 也就是说,当抛出的异常是 'RuntimeException' 的实例或子类时。 (默认情况下,'Error' 实例也会导致回滚)。 事务方法抛出的已检查异常不会导致默认配置的回滚。
您还可以准确地配置哪些 “Exception” 类型将事务标记为回滚。 下面的 XML 代码片段演示了如何为一个已检查的、特定于应用程序的 “Exception” 类型配置回滚:
<tx:advice id="txAdvice" transaction-manager="txManager">
<tx:attributes>
<tx:method name="get*" read-only="true" rollback-for="NoProductInStockException"/>
<tx:method name="*"/>
</tx:attributes>
</tx:advice>
如果您不想在抛出异常时回滚事务,您还可以指定“无回滚规则”。 下面的例子告诉 Spring 框架的事务基础架构,即使面对 InstrumentNotFoundException,也要提交相应的事务:
<tx:advice id="txAdvice">
<tx:attributes>
<tx:method name="updateStock" no-rollback-for="InstrumentNotFoundException"/>
<tx:method name="*"/>
</tx:attributes>
</tx:advice>
当 Spring Framework 的事务,捕获异常并参考配置的回滚规则来决定是否将事务标记为回滚时,最强匹配规则胜出。 因此,在以下配置的情况下,除了 InstrumentNotFoundException 之外的任何异常都会导致事务的回滚:
<tx:advice id="txAdvice">
<tx:attributes>
<tx:method name="*" rollback-for="Throwable" no-rollback-for="InstrumentNotFoundException"/>
</tx:attributes>
</tx:advice>
(4) <tx:advice/> 设置
本节总结了通过使用 <tx:advice/> 标记可以指定的各种事务设置。 默认的 <tx:advice/> 设置是:
- 传播行为是 REQUIRED.。
- 隔离级别为 DEFAULT.
- 事务处于可读写状态。
- 事务超时默认为底层事务系统的默认超时,如果不支持超时,则为 none。
- 任何 RuntimeException 触发回滚,而任何选中的 Exception 不会。
您可以更改这些默认设置。 下表总结了嵌套在 <tx:advice/> 和 <tx:attributes/> 标签中的 <tx:method/> 标签的各种属性:
| 属性 | Required? | 默认值 | 描述 |
|---|---|---|---|
| name | Yes | 要与事务属性相关联的方法名。 通配符 (_) 字符可用于将相同的事务属性设置与许多方法相关联(例如,get_、handle *、on*Event 等等)。 | |
| propagation | No | REQUIRED | 事务传播行为。 |
| isolation | No | DEFAULT | 事务隔离级别。 仅适用于 REQUIRED 或 REQUIRES_NEW 的传播设置。 |
| timeout | No | -1 | 事务超时(秒)。 仅适用于传播 REQUIRED 或 REQUIRES_NEW。 |
| read-only | No | false | 读写事务与只读事务。 只适用于 REQUIRED 或 REQUIRES_NEW。 |
| rollback-for | No | 触发回滚的 “Exception” 实例的逗号分隔列表。 例如,com.foo.MyBusinessException, ServletException。 | |
| no-rollback-for | No | 不触发回滚的 “Exception” 实例的逗号分隔列表。 例如,com.foo.MyBusinessException, ServletException。 |
(5)使用 @Transactional
除了事务配置的基于 xml 的声明性方法外,还可以使用基于注解的方法。 直接在 Java 源代码中声明事务语义使声明更接近受影响的代码。 不存在过多耦合的危险,因为要以事务方式使用的代码几乎总是以这种方式部署的。
使用 @Transactional 注解所提供的易用性可以用一个示例进行最好的说明,下面的文本将对此进行解释。 考虑以下类定义:
// the service class that we want to make transactional
@Transactional
public class DefaultFooService implements FooService {
@Override
public Foo getFoo(String fooName) {
// ...
}
@Override
public Foo getFoo(String fooName, String barName) {
// ...
}
@Override
public void insertFoo(Foo foo) {
// ...
}
@Override
public void updateFoo(Foo foo) {
// ...
}
}
在如上所述的类级别上使用,注解指示声明类(及其子类)的所有方法的默认值。 或者,每个方法都可以单独注解。 请注意,类级注解并不适用于类层次结构中的祖先类; 在这种情况下,继承的方法需要在本地重新声明,以便参与子类级别的注解。
当上述 POJO 类被定义为 Spring 上下文中的 bean 时,您可以通过 @Configuration 类中的 @EnableTransactionManagement 注解使 bean 实例具有事务性。 详见 javadoc。
在 XML 配置中,<tx:annotation-driven transaction-manager="txManager"/>标签提供了类似的便利:
<!-- from the file 'context.xml' -->
<?xml version="1.0" encoding="UTF-8"?>
<beans xmlns="http://www.springframework.org/schema/beans"
xmlns:xsi="http://www.w3.org/2001/XMLSchema-instance"
xmlns:aop="http://www.springframework.org/schema/aop"
xmlns:tx="http://www.springframework.org/schema/tx"
xsi:schemaLocation="
http://www.springframework.org/schema/beans
https://www.springframework.org/schema/beans/spring-beans.xsd
http://www.springframework.org/schema/tx
https://www.springframework.org/schema/tx/spring-tx.xsd
http://www.springframework.org/schema/aop
https://www.springframework.org/schema/aop/spring-aop.xsd">
<!-- this is the service object that we want to make transactional -->
<bean id="fooService" class="x.y.service.DefaultFooService"/>
<!-- enable the configuration of transactional behavior based on annotations -->
<!-- a TransactionManager is still required -->
<tx:annotation-driven transaction-manager="txManager"/>
<bean id="txManager" class="org.springframework.jdbc.datasource.DataSourceTransactionManager">
<!-- (this dependency is defined somewhere else) -->
<property name="dataSource" ref="dataSource"/>
</bean>
<!-- other <bean/> definitions here -->
</beans>
如果要连接的 TransactionManager 的 bean 名称为 TransactionManager ,则可以省略 tx:annotation-driven/ 标记中的 transaction-manager 属性。 如果您想要依赖注入的 TransactionManager bean 有任何其他名称,您必须使用 transaction-manager 属性,如前面的示例所示。
当你在 Spring 的标准配置中使用事务性代理时,你应该只把 @Transactional注解应用到可视性为 'public' 的方法上。 如果使用 @Transactional注解 'protected'、'private' 或包可见的方法,则不会引发错误,但已注解的方法不会显示已配置的事务设置。
如果需要注解非公共方法,请考虑下面段落中关于基于类的代理的提示,或者考虑使用 AspectJ 编译时或加载时编织(稍后介绍)。 当在 @Configuration 类中使用 @EnableTransactionManagement 时,通过注册一个自定义的transactionAttributeSource bean,protected 或包可见的方法也可以使基于类的代理具有事务性,如下面的示例所示。 然而,请注意,基于接口的代理中的事务方法必须始终是“公共的”,并且在被代理的接口中定义。
Spring 团队建议只使用 @Transactional注解来注解具体的类(以及具体类的方法),而不是注解接口。 当然,您可以将 @Transactional注解放在接口(或接口方法)上, 但只有当您使用基于接口的代理时,它才会发挥作用。 Java 注解的事实并不意味着继承接口,如果使用基于类的代理(proxy-target-class = "true")或 weaving-based 方面(模式=“aspectj”),事务设置不认可的代理和编织的基础设施,和对象不是包在一个事务代理。
在代理模式(这是默认的)中,只有通过代理进入的外部方法调用会被拦截。 这意味着,即使被调用的方法被标记为 @Transactional,自调用(实际上是目标对象中的一个方法调用目标对象的另一个方法)在运行时也不会导致实际的事务。 此外,代理必须完全初始化以提供预期的行为,因此您不应该在初始化代码中依赖此特性——例如,在 @PostConstruct 方法中。
(6)@Transactional 的设置
@Transactional注解是元数据,它指定接口、类或方法必须具有事务性语义(例如,“在调用此方法时启动一个全新的只读事务,暂停任何现有事务”)。 默认的 @Transactional 设置如下:
- 传播设置为
PROPAGATION_REQUIRED. - 隔离级别为
ISOLATION_DEFAULT. - 事务处于可读写状态。
- 事务超时默认为底层事务系统的默认超时,如果不支持超时,则为 none。
- 任何 RuntimeException 触发回滚,而任何选中的 Exception 不会。
您可以更改这些默认设置。 下表总结了@Transactional 注解的各种属性:
| 特质 | 类型 | 描述 |
|---|---|---|
| value | String | 指定要使用的事务管理器的可选限定符。 |
| propagation | enum: Propagation | 可选的传播环境。 |
| isolation | enum: Isolation | 可选的隔离级别。 仅适用于 REQUIRED 或 REQUIRES_NEW 的传播值。 |
| timeout | int(以秒为粒度) | 可选的事务超时。 仅适用于 REQUIRED 或 REQUIRES_NEW 的传播值。 |
| readOnly | boolean | 读写事务与只读事务。 只适用于 REQUIRED 或 REQUIRES_NEW 的值。 |
| rollbackFor | Class 对象的数组,它必须派生自 Throwable. | 必须导致回滚的异常类的可选数组。 |
| rollbackForClassName | 类名数组。 类必须派生自 Throwable. | 必须导致回滚的异常类名称的可选数组。 |
| noRollbackFor | Class 对象的数组,它必须派生自 Throwable. | 不能导致回滚的异常类的可选数组。 |
| noRollbackForClassName | String 类名数组,它必须派生自 Throwable. | 异常类名称的可选数组,该数组必须不会导致回滚。 |
| label | 数组 String 标签,用于向事务添加富有表现力的描述。 | 事务管理器可以评估标签,以将特定于实现的行为与实际事务关联起来。 |
目前,您不能显式地控制事务的名称,其中 “name” 指出现在事务监视器(例如,WebLogic 的事务监视器)和日志输出中的事务名称。 对于声明性事务,事务名总是完全限定类名+ '。 +事务建议类的方法名。 例如,如果 'BusinessService' 类的 handlePayment(..) 方法启动了一个事务,事务的名称将是: com.example.BusinessService.handlePayment.
(7) 带 @Transactional 的多个事务管理器
大多数 Spring 应用程序只需要一个事务管理器,但是在某些情况下,您可能希望在一个应用程序中有多个独立的事务管理器。 您可以使用 @Transactional注解的 'value' 或 'transactionManager' 属性来指定要使用的 'transactionManager' 的标识。 这可以是 bean 名,也可以是事务管理器 bean 的限定符值。 例如,使用限定符表示法,您可以在应用程序上下文中将下列 Java 代码与下列事务管理器 bean 声明组合起来:
public class TransactionalService {
@Transactional("order")
public void setSomething(String name) { ... }
@Transactional("account")
public void doSomething() { ... }
@Transactional("reactive-account")
public Mono<Void> doSomethingReactive() { ... }
}
下面的例子显示了 bean 声明:
<tx:annotation-driven/>
<bean id="transactionManager1" class="org.springframework.jdbc.datasource.DataSourceTransactionManager">
...
<qualifier value="order"/>
</bean>
<bean id="transactionManager2" class="org.springframework.jdbc.datasource.DataSourceTransactionManager">
...
<qualifier value="account"/>
</bean>
<bean id="transactionManager3" class="org.springframework.data.r2dbc.connectionfactory.R2dbcTransactionManager">
...
<qualifier value="reactive-account"/>
</bean>
在这种情况下,'TransactionalService' 上的各个方法在单独的事务管理器下运行,通过 'order'、'account' 和 'reactive-account' 限定符进行区分。 如果没有找到特别限定的 'transactionManager' bean,则仍然使用默认的 tx:注解驱动的目标 bean 名 transactionManager。
(8)自定义注解组成
如果您发现在许多不同的方法上重复使用带有 @Transactional的相同属性, Spring 的元注解支持允许您为特定的用例定义自定义的组合注解。 例如,考虑以下注解定义:
@Target({ElementType.METHOD, ElementType.TYPE})
@Retention(RetentionPolicy.RUNTIME)
@Transactional(transactionManager = "order", label = "causal-consistency")
public @interface OrderTx {
}
@Target({ElementType.METHOD, ElementType.TYPE})
@Retention(RetentionPolicy.RUNTIME)
@Transactional(transactionManager = "account", label = "retryable")
public @interface AccountTx {
}
前面的注解让我们将上一节中的示例编写为如下所示:
public class TransactionalService {
@OrderTx
public void setSomething(String name) {
// ...
}
@AccountTx
public void doSomething() {
// ...
}
}
在前面的示例中,我们使用语法来定义事务管理器限定符和事务标签,但是我们还可以包括传播行为、回滚规则、超时和其他特性。
四、 事务传播
| 传播行为 | 含义 |
|---|---|
PROPAGATION_REQUIRED | 表示当前方法必须运行在事务中。如果当前事务存在,方法将会在该事务中运行。否则,会启动一个新的事务 |
PROPAGATION_SUPPORTS | 表示当前方法不需要事务上下文,但是如果存在当前事务的话,那么该方法会在这个事务中运行 |
PROPAGATION_MANDATORY | 表示该方法必须在事务中运行,如果当前事务不存在,则会抛出一个异常 |
PROPAGATION_REQUIRED_NEW | 表示当前方法必须运行在它自己的事务中。一个新的事务将被启动。如果存在当前事务,在该方法执行期间,当前事务会被挂起。如果使用 JTATransactionManager 的话,则需要访问 TransactionManager |
PROPAGATION_NOT_SUPPORTED | 表示该方法不应该运行在事务中。如果存在当前事务,在该方法运行期间,当前事务将被挂起。如果使用 JTATransactionManager 的话,则需要访问 TransactionManager |
PROPAGATION_NEVER | 表示当前方法不应该运行在事务上下文中。如果当前正有一个事务在运行,则会抛出异常 |
PROPAGATION_NESTED | 表示如果当前已经存在一个事务,那么该方法将会在嵌套事务中运行。嵌套的事务可以独立于当前事务进行单独地提交或回滚。如果当前事务不存在,那么其行为与 PROPAGATION_REQUIRED 一样。注意各厂商对这种传播行为的支持是有所差异的。可以参考资源管理器的文档来确认它们是否支持嵌套事务 |
| 隔离级别 | 含义 |
|---|---|
ISOLATION_DEFAULT | 使用后端数据库默认的隔离级别 |
ISOLATION_READ_UNCOMMITTED | 最低的隔离级别,允许读取尚未提交的数据变更,可能会导致脏读、幻读或不可重复读 |
ISOLATION_READ_COMMITTED | 允许读取并发事务已经提交的数据,可以阻止脏读,但是幻读或不可重复读仍有可能发生 |
ISOLATION_REPEATABLE_READ | 对同一字段的多次读取结果都是一致的,除非数据是被本身事务自己所修改,可以阻止脏读和不可重复读,但幻读仍有可能发生 |
ISOLATION_SERIALIZABLE | 最高的隔离级别,完全服从 ACID 的隔离级别,确保阻止脏读、不可重复读以及幻读,也是最慢的事务隔离级别,因为它通常是通过完全锁定事务相关的数据库表来实现的 |
本节描述 Spring 中事务传播的一些语义。 本节详细描述了 Spring 中关于事务传播的一些语义。
在 spring 管理的事务中,要注意物理事务和逻辑事务之间的差异,以及传播设置如何应用于这种差异。
1、了解 PROPAGATION_REQUIRED
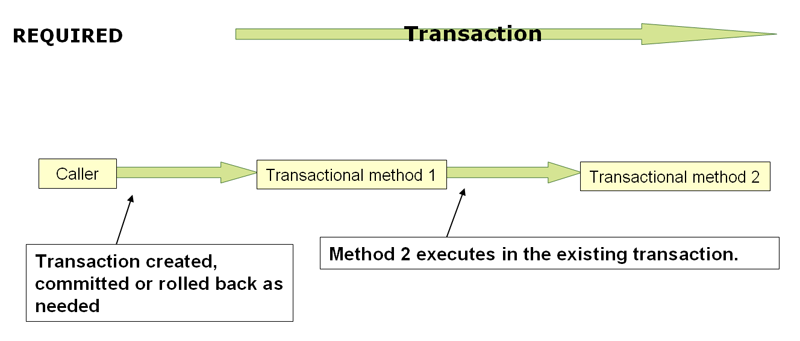
PROPAGATION_REQUIRED 强制物理事务,如果还没有事务存在,则强制当前范围的本地事务,或者强制参与为更大范围定义的现有“外部”事务。 在同一线程内的公共调用堆栈安排中,这是一个很好的默认设置(例如,一个服务 facade 将委托给几个存储库方法,其中所有底层资源都必须参与服务级事务)。
默认情况下,参与的事务加入外部范围的特征,静默地忽略本地隔离级别、超时值或只读标志(如果有的话)。 如果您希望在参与具有不同隔离级别的现有事务时拒绝隔离级别声明,请考虑将事务管理器上的 'validateExistingTransactions' 标记切换为 'true'。 这种非宽松模式还拒绝只读不匹配(即试图参与只读外部作用域的内部读写事务)。
当传播设置为 “PROPAGATION_REQUIRED” 时,将为应用该设置的每个方法创建一个逻辑事务范围。 每个这样的逻辑事务作用域都可以单独确定仅回滚状态,而外部事务作用域在逻辑上独立于内部事务作用域。 对于标准的 ‘PROPAGATION_REQUIRED’ 行为,所有这些作用域都映射到同一个物理事务。 因此,在内部事务作用域中设置的仅回滚标记确实会影响外部事务实际提交的机会。
但是,在内部事务范围设置仅回滚标记的情况下,外部事务本身没有决定回滚,因此回滚(由内部事务范围无声地触发)是不可预料的。 这时会抛出一个相应的 'unexpected drollbackexception'。 这是预期的行为,这样事务的调用者就不会被误导,以为执行了提交,而实际上并没有执行。 因此,如果内部事务(外部调用者不知道)将事务静默地标记为仅回滚,那么外部调用者仍然调用 commit。 外部调用者需要接收一个 'unexpected drollbackexception' 来清楚地表明回滚被执行了。
2、理解 PROPAGATION_REQUIRES_NEW
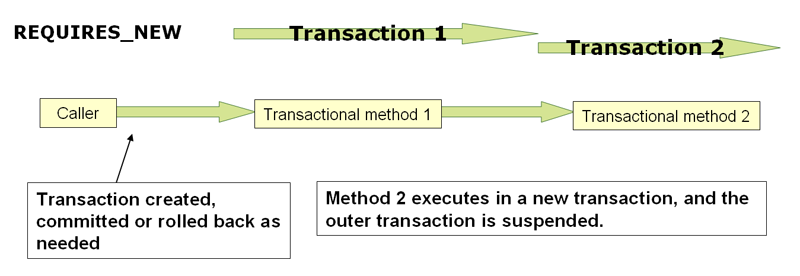
与 PROPAGATION_REQUIRES_NEW 相比, PROPAGATION_REQUIRED 始终为每个受影响的事务范围使用独立的物理事务,从不参与外部范围的现有事务。 在这种安排中,底层资源事务是不同的,因此可以独立地提交或回滚,外部事务不受内部事务的回滚状态的影响,内部事务的锁在完成后立即释放。 这样一个独立的内部事务还可以声明它自己的隔离级别、超时和只读设置,而不继承外部事务的特征。
3、理解 PROPAGATION_NESTED
PROPAGATION_NESTED 使用单个物理事务,其中包含多个保存点,可以回滚到这些保存点。 这样的部分回滚允许内部事务范围触发其范围的回滚,而外部事务可以继续物理事务,尽管已经回滚了一些操作。 该设置通常映射到 JDBC 保存点上,因此它只适用于 JDBC 资源事务。 看到 Spring 的 DataSourceTransactionManager.
五、 在编程式和声明式事务管理之间进行选择
只有在有少量事务操作的情况下,编程式事务管理通常是一个好主意。 例如,如果您有一个 web 应用程序,它只需要为某些更新操作使用事务,那么您可能不希望使用 Spring 或任何其他技术来设置事务代理。 在这种情况下,使用 TransactionTemplate 可能是一种很好的方法。 只有使用事务管理的编程方法才能显式地设置事务名称。
另一方面,如果应用程序有许多事务操作,则声明式事务管理通常是值得的。 它使事务管理远离业务逻辑,并且不难配置。 当使用 Spring 框架而不是 EJB CMT 时,声明性事务管理的配置成本大大降低了。
整合 mybatis
<?xml version="1.0" encoding="UTF-8"?>
<project xmlns="http://maven.apache.org/POM/4.0.0"
xmlns:xsi="http://www.w3.org/2001/XMLSchema-instance"
xsi:schemaLocation="http://maven.apache.org/POM/4.0.0 http://maven.apache.org/xsd/maven-4.0.0.xsd">
<modelVersion>4.0.0</modelVersion>
<groupId>com.ydlclass</groupId>
<artifactId>ssm</artifactId>
<version>1.0-SNAPSHOT</version>
<properties>
<maven.compiler.source>11</maven.compiler.source>
<maven.compiler.target>11</maven.compiler.target>
</properties>
<dependencies>
<dependency>
<groupId>junit</groupId>
<artifactId>junit</artifactId>
<version>4.13.2</version>
<scope>test</scope>
</dependency>
<dependency>
<groupId>org.springframework</groupId>
<artifactId>spring-context</artifactId>
<version>5.2.18.RELEASE</version>
</dependency>
<dependency>
<groupId>org.springframework</groupId>
<artifactId>spring-jdbc</artifactId>
<version>5.2.18.RELEASE</version>
</dependency>
<dependency>
<groupId>org.aspectj</groupId>
<artifactId>aspectjweaver</artifactId>
<version>1.9.6</version>
</dependency>
<!-- 数据源-->
<dependency>
<groupId>com.alibaba</groupId>
<artifactId>druid</artifactId>
<version>1.2.8</version>
</dependency>
<!-- 日志 -->
<dependency>
<groupId>ch.qos.logback</groupId>
<artifactId>logback-classic</artifactId>
<version>1.2.6</version>
</dependency>
<!-- 数据区驱动-->
<dependency>
<groupId>mysql</groupId>
<artifactId>mysql-connector-java</artifactId>
<version>8.0.26</version>
</dependency>
<!-- mybatis-->
<dependency>
<groupId>org.mybatis</groupId>
<artifactId>mybatis</artifactId>
<version>3.5.5</version>
</dependency>
<!-- 整合使用 -->
<dependency>
<groupId>org.mybatis</groupId>
<artifactId>mybatis-spring</artifactId>
<version>2.0.6</version>
</dependency>
<dependency>
<groupId>org.projectlombok</groupId>
<artifactId>lombok</artifactId>
<version>1.18.22</version>
</dependency>
</dependencies>
<build>
<plugins>
<plugin>
<groupId>org.apache.maven.plugins</groupId>
<artifactId>maven-compiler-plugin</artifactId>
<version>3.8.1</version>
<configuration>
<source>${maven.compiler.source}</source>
<target>${maven.compiler.target}</target>
<encoding>UTF-8</encoding>
</configuration>
</plugin>
</plugins>
</build>
</project>
/**
* @author itnanls(微信)
* 我们的服务: 一路陪跑,顺利就业
*/
public interface UserMapper {
User getUser(@Param("userId") int userId);
}
<?xml version="1.0" encoding="UTF-8"?>
<beans xmlns="http://www.springframework.org/schema/beans"
xmlns:xsi="http://www.w3.org/2001/XMLSchema-instance"
xmlns:p="http://www.springframework.org/schema/p"
xmlns:aop="http://www.springframework.org/schema/aop"
xmlns:tx="http://www.springframework.org/schema/tx"
xmlns:context="http://www.springframework.org/schema/context"
xmlns:mybatis="http://mybatis.org/schema/mybatis-spring"
xsi:schemaLocation="http://www.springframework.org/schema/beans
https://www.springframework.org/schema/beans/spring-beans.xsd
http://www.springframework.org/schema/context
https://www.springframework.org/schema/context/spring-context.xsd
http://www.springframework.org/schema/tx
https://www.springframework.org/schema/tx/spring-tx.xsd
http://mybatis.org/schema/mybatis-spring
http://mybatis.org/schema/mybatis-spring.xsd
http://www.springframework.org/schema/aop
https://www.springframework.org/schema/aop/spring-aop.xsd">
<context:property-placeholder location="jdbc.properties"/>
<context:component-scan base-package="com.ydlclass"/>
<!--扫描mapper文件-->
<mybatis:scan base-package="com.ydlclass.mapper"/>
<bean id="sqlSessionFactory" class="org.mybatis.spring.SqlSessionFactoryBean">
<property name="dataSource" ref="dataSource"/>
<!-- <property name="configLocation" value="mybatis-config.xml"/>-->
<property name="mapperLocations" value="mapper/**/*.xml"/>
<property name="configuration">
<bean class="org.apache.ibatis.session.Configuration">
<property name="mapUnderscoreToCamelCase" value="true"/>
<property name="logPrefix" value="ydlclass_"/>
</bean>
</property>
</bean>
<!-- 注入事务管理器 -->
<bean id="transactionManager" class="org.springframework.jdbc.datasource.DataSourceTransactionManager">
<property name="dataSource" ref="dataSource"/>
</bean>
<!--数据源-->
<bean id="dataSource" class="com.alibaba.druid.pool.DruidDataSource">
<property name="url" value="${url}"/>
<property name="driverClassName" value="${driverName}"/>
<property name="username" value="${user}"/>
<property name="password" value="${password}"/>
</bean>
<!-- the transactional advice (what 'happens'; see the <aop:advisor/> bean below) -->
<tx:advice id="txAdvice" transaction-manager="transactionManager">
<!-- the transactional semantics... -->
<tx:attributes>
<!-- all methods starting with 'get' are read-only -->
<tx:method name="get*" read-only="true" propagation="SUPPORTS"/>
<tx:method name="select*" read-only="true" propagation="SUPPORTS"/>
<!-- other methods use the default transaction settings (see below) -->
<tx:method name="update*" read-only="false" propagation="REQUIRED"/>
<tx:method name="delete*" read-only="false" propagation="REQUIRED"/>
<tx:method name="insert*" read-only="false" propagation="REQUIRED"/>
</tx:attributes>
</tx:advice>
<!-- ensure that the above transactional advice runs for any execution
of an operation defined by the FooService interface -->
<aop:config>
<aop:pointcut id="point" expression="within(com.ydlclass.service..*)"/>
<aop:advisor advice-ref="txAdvice" pointcut-ref="point"/>
</aop:config>
</beans>
<?xml version="1.0" encoding="UTF-8" ?>
<!DOCTYPE configuration
PUBLIC "-//mybatis.org//DTD Config 3.0//EN"
"http://mybatis.org/dtd/mybatis-3-config.dtd">
<configuration>
<typeAliases>
<typeAlias type="com.ydlclass.entity.User" alias="user"/>
</typeAliases>
</configuration>
@Slf4j
public class Client {
public static void main(String[] args) {
ClassPathXmlApplicationContext application = new ClassPathXmlApplicationContext("application.xml");
UserMapper userMapper = application.getBean(UserMapper.class);
User user = userMapper.getUser(10002);
log.info("{}",user);
}
}